Microsoft FSLogix is a set of solutions that enhance, enable, and simplify persistent and non-persistent Windows computing environments. FSLogix solutions are appropriate for virtual environments in both public and private clouds. Additionally, FSLogix can enable greater portability of computing sessions.
FSLogix solutions include:
- Profile Container
- Office Container
- Application Masking
- Java Version Control
What you can do with FSLogix solutions:
- Maintain user context in non-persistent environments
- Minimize sign-in times for non-persistent environments
- Optimize file IO between host/client and remote profile store
- Native (local) profile experience, eliminating many compatibility issues with solutions using visible redirection, such as User Profile Disk (UPD)
- Simplify the management of applications and 'Gold Images'
- Specify the version of Java to be utilized by specific URLs and applications
Before we dive into FSLogix as a solution please check out this Nutanix Frame blog about user profiles:
Windows User Profiles in a Frame World April 27, 2021
Key capabilities
- Redirect user profiles to a network location using Profile Container. Profiles are placed in VHD(X) files and mounted at run time. It's common to copy a profile to and from the network when a user signs in and out of a remote environment. Because user profiles are often large, sign-in and sign-out times often become unacceptable. Mounting and using the profile container on the network eliminates delays associated with solutions that copy files.
- Redirect only the portion of the profile that contains Office data by using the Office Container. Office Container allows an organization already using an alternate profile solution to enhance Office in a non-persistent or persistent environment. This functionality is helpful with Outlook .OST files.
- Applications use the profile as if it were on the local drive. Because the FSLogix solutions use a Filter Driver to redirect the profile, applications do not recognize that the profile container is stored on the network. Obscuring the redirection is essential because many applications will not work correctly with a profile stored on remote storage.
- Profile Container is used with Cloud Cache to create resilient and highly available environments. Cloud Cache places a portion of the profile VHD on the local hard drive. Cloud Cache also allows an administrator to specify multiple remote profile locations. The Local Cache, with multiple remote profile containers, insulates users from network and storage failures.
- Application Masking manages access to an application, font, printer, or other items based on rules. Access can be controlled by various areas, by user, IP Address range, or other criteria. Application Masking significantly decreases the complexity of managing large numbers of gold images.
- Profile Container and Office Container do not provide any profile conversion functionality. Operating systems that share a profile version should be able to share a single user profile.
Requirements
You are eligible to access FSLogix Profile Container, Office 365 Container, Application Masking, and Java Redirection tools if you have any of the following licenses:
- Microsoft 365 E3/E5
- Microsoft 365 A3/A5/ Student Use Benefits
- Microsoft 365 F1/F3
- Microsoft 365 Business
- Windows 10 Enterprise E3/E5
- Windows 10 Education A3/A5
- Windows 10 VDA per user
- Remote Desktop Services (RDS) Client Access License (CAL)
- Remote Desktop Services (RDS) Subscriber Access License (SAL)
FSLogix solutions may be used in any public or private datacenter as long as a user is properly licensed. FSLogix tools operate on all Windows operating systems including:
- Desktop - Windows 7 or newer
- Server - Windows Server 2008 R2 or newer
FSLogix solutions support both 32-bit and 64-bit where applicable. These solutions are only supported in environments that Microsoft, original software vendors, and equipment vendors support for their application.
Frame workloads are supported on Windows 10 for client OS and Windows Server 2016 or higher at this time.
Profile Container
Profile Container is used to redirect the entire user profile in non-persistent, virtual environments, such as Virtual Desktops. When using Profile Container, the entire user profile (except for data that is excluded using the redirections.xml) is included in the profile container.
For users familiar with managing profiles in non-persistent environments, the function of Profile Containers may be compared to Microsoft User Profile Disk, Liquidware ProfileUnity, Profile Disk and Nutanix Frame Enterprise Profiles, or Citrix UPM. Although the function is similar, the underlying method and technology is different, resulting in certain benefits as described.
Installation and Setup on Frame
The following details will address how to install and configure a Frame environment using FSLogix as a third-party Windows user profile solution for user data persistence.
Test Environment Requirements:
- Single AHV Cluster with Prism Central
- Microsoft Active Directory Domain Controller 2016/2019 server
- File Server 2016/2019
- Central File share for Profiles
- Two Non-Persistent Frame Accounts
- Frame Guest Agent (FGA) v8.0.12.0 or higher
- AIR 8GB Instances
- Windows10 build 2004 & 20H2 tested
- A domain admin and a domain user account
Prerequisites
Before configuring Profile Container:
- Verify that you meet all entitlement and configuration requirements
- Download and install the latest FSLogix Software
- Consider storage and network requirements for your users' profiles
- Verify that your users have appropriate storage permissions where profiles will be placed
- Profile Container is installed and configured. Stop and remove other solutions intended to manage remote profiles. Using multiple profile solutions concurrently can cause issues.
- Exclude the VHD(X) files for Profile Containers from antivirus (AV) scanning
- Ensure Frame accounts are domain joined (including the Sandbox temporarily)
- Ensure OFS is configured for the Frame accounts (engineering enablement task)
- Ensure that TimeFreeze is not in use (it can be installed but not in use).
Installation and Setup
Download and install the most recent FSLogix build.
Add the Sandbox to the domain (can be temporary to install and test FSLogix Profile Containers).
PowerShell: Add-Computer -DomainName _dansdomain.com_
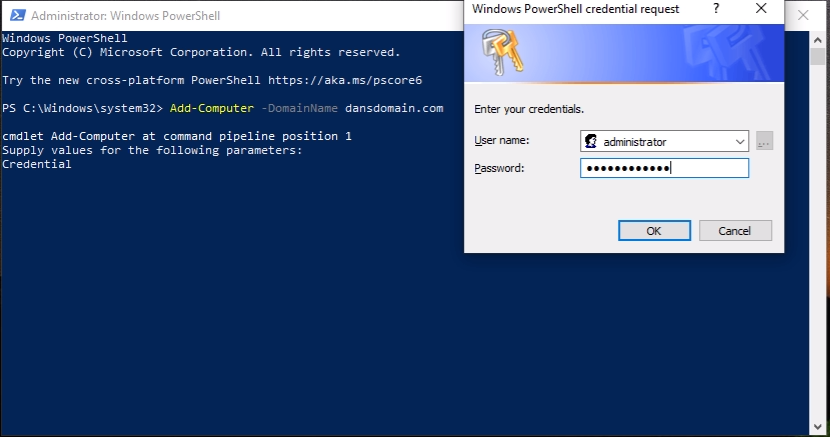
FCP (Frame Credential Provider) will block domain join when using FGA v8.x.x Currently FCP limits the use of UAC.
- Log in to the Sandbox with domain admin credentials.
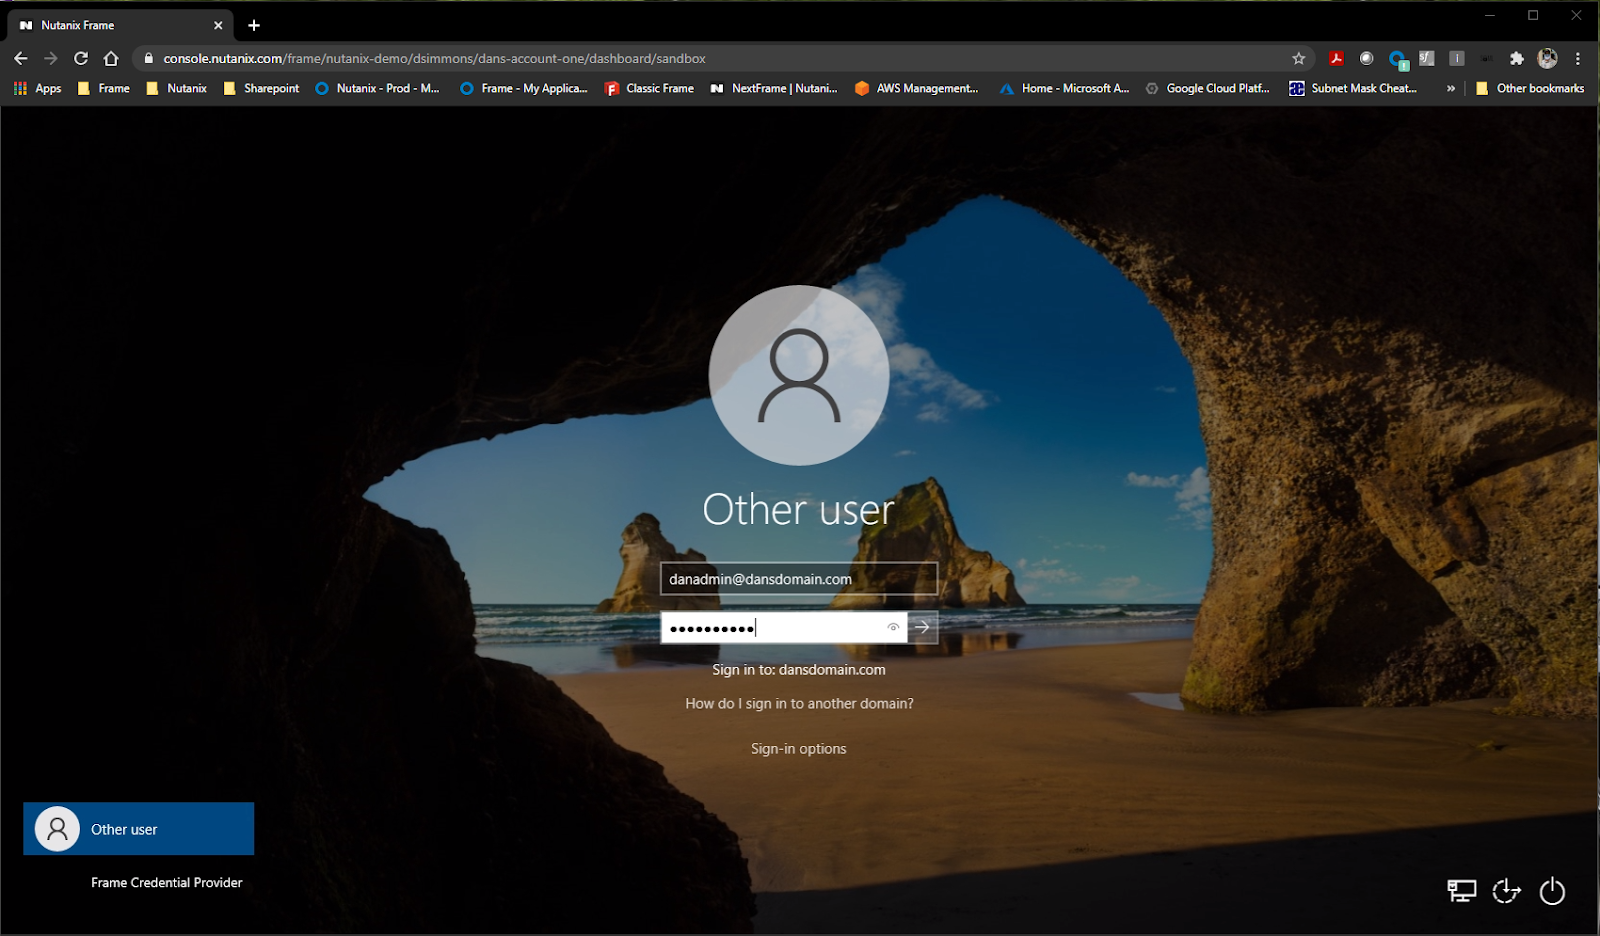
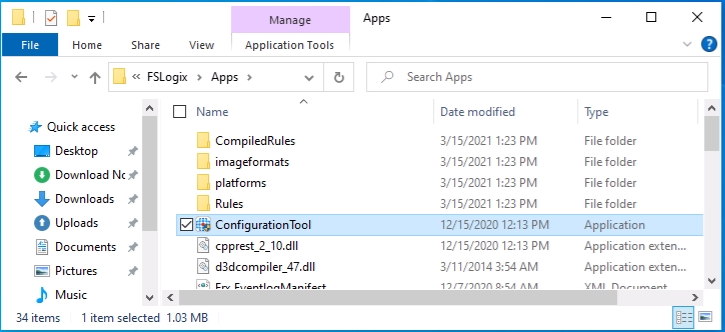
- Run ConfigurationTool on the Sandbox in
C:\ProgramFiles\FSLogix\Appsas an administrator.
- Define VHDx locations (e.g.,
\\dansdc01\FSLogixon the DC)
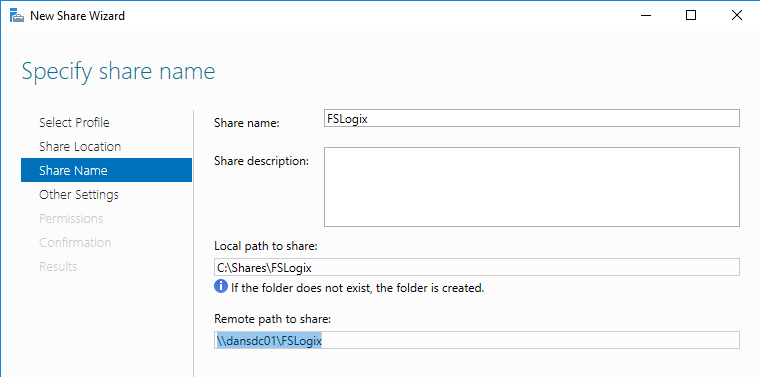
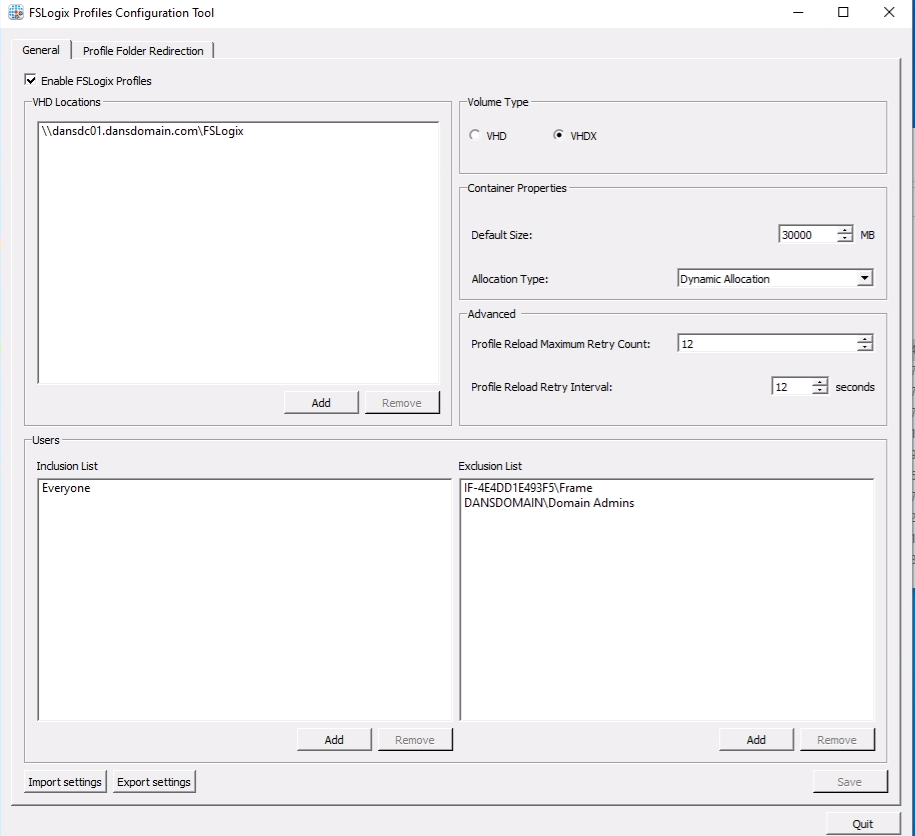
Use FQDN and not the NetBIOS name. The FSLogix Agent works best with DNS.
Ensure permissions on FS are set correctly as per FSLogix documentation

Add SYSTEM with Full Control permissions on the profiles folder.
VHD file format is only for Win7/Server2008, while VHDx is forWin10/Server2016+. Use VHDX when possible so you can resize the VHDX- based VM.
- Add the Frame user and Domain Admins to the exclusion list.
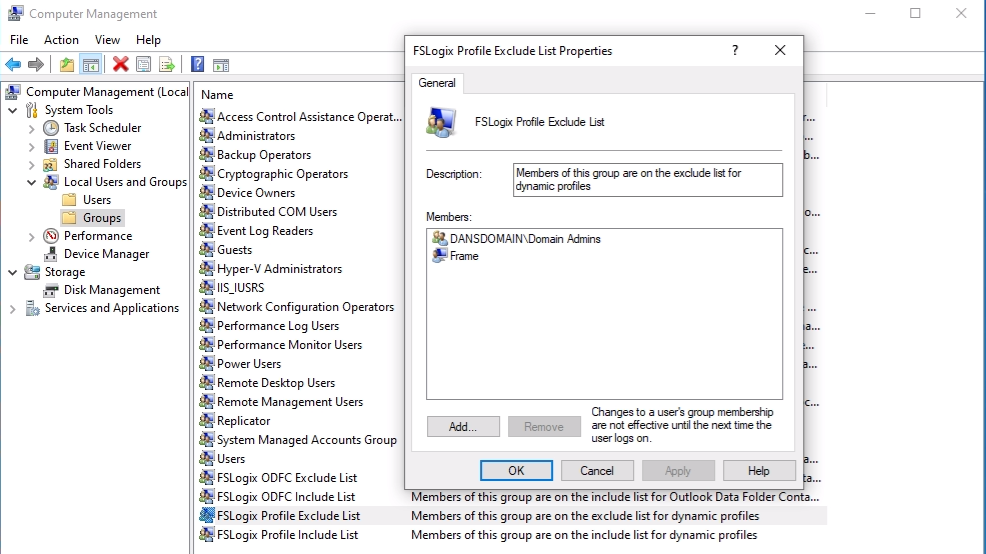
- Verify the Altitude registry value for OFS via the Registry in:
HKLM\System\CCS\Services\OFS\Instances\OFS Instance- from 145600.6 to 47290.1 (6 x 0) Reboot your Sandbox. This setting is required in order for FSLogix Profiles to work with Frame. If not completed, initial profile creation will fail. Verify it’s as stated.

- Check OFS filter driver altitude via fltmc.exe from an administrative command prompt.
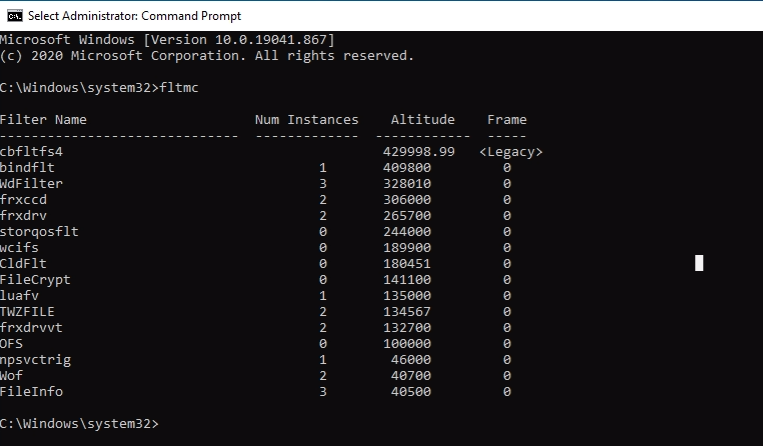
Frame strongly recommends administrators leave the Sandbox on the Domain.
Leaving the Sandbox domain-joined simplifies future management. However, if you must remove the Sandbox from the Domain, follow the steps below:
a. Go to System properties; Advanced system settings
b. Select the Name tab.
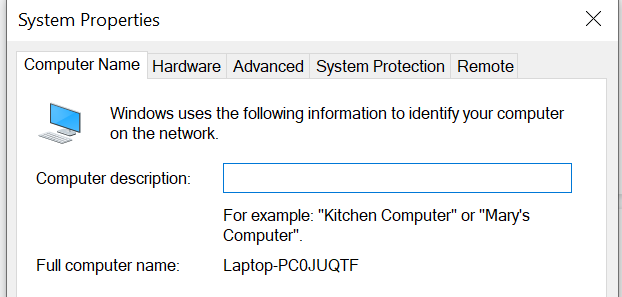
c. Select the Workgroup button and point to the workgroup of choice.
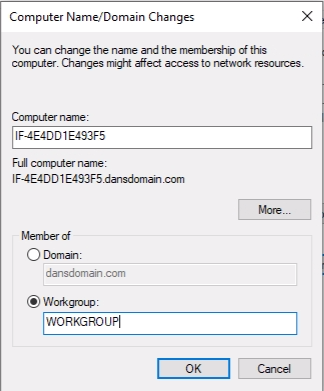
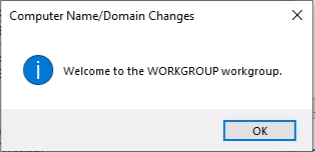
d. Select OK.
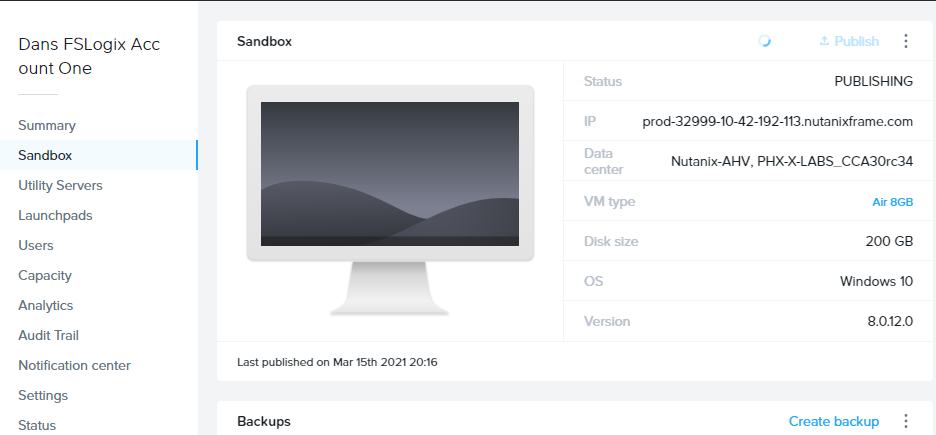
- Navigate back to your Frame account's Sandbox and initiate a publish.
- Log in to a desktop instance as a Domain User (not a Domain Admin). Make some changes to the desktop ( e.g., create a folder). Close the session.
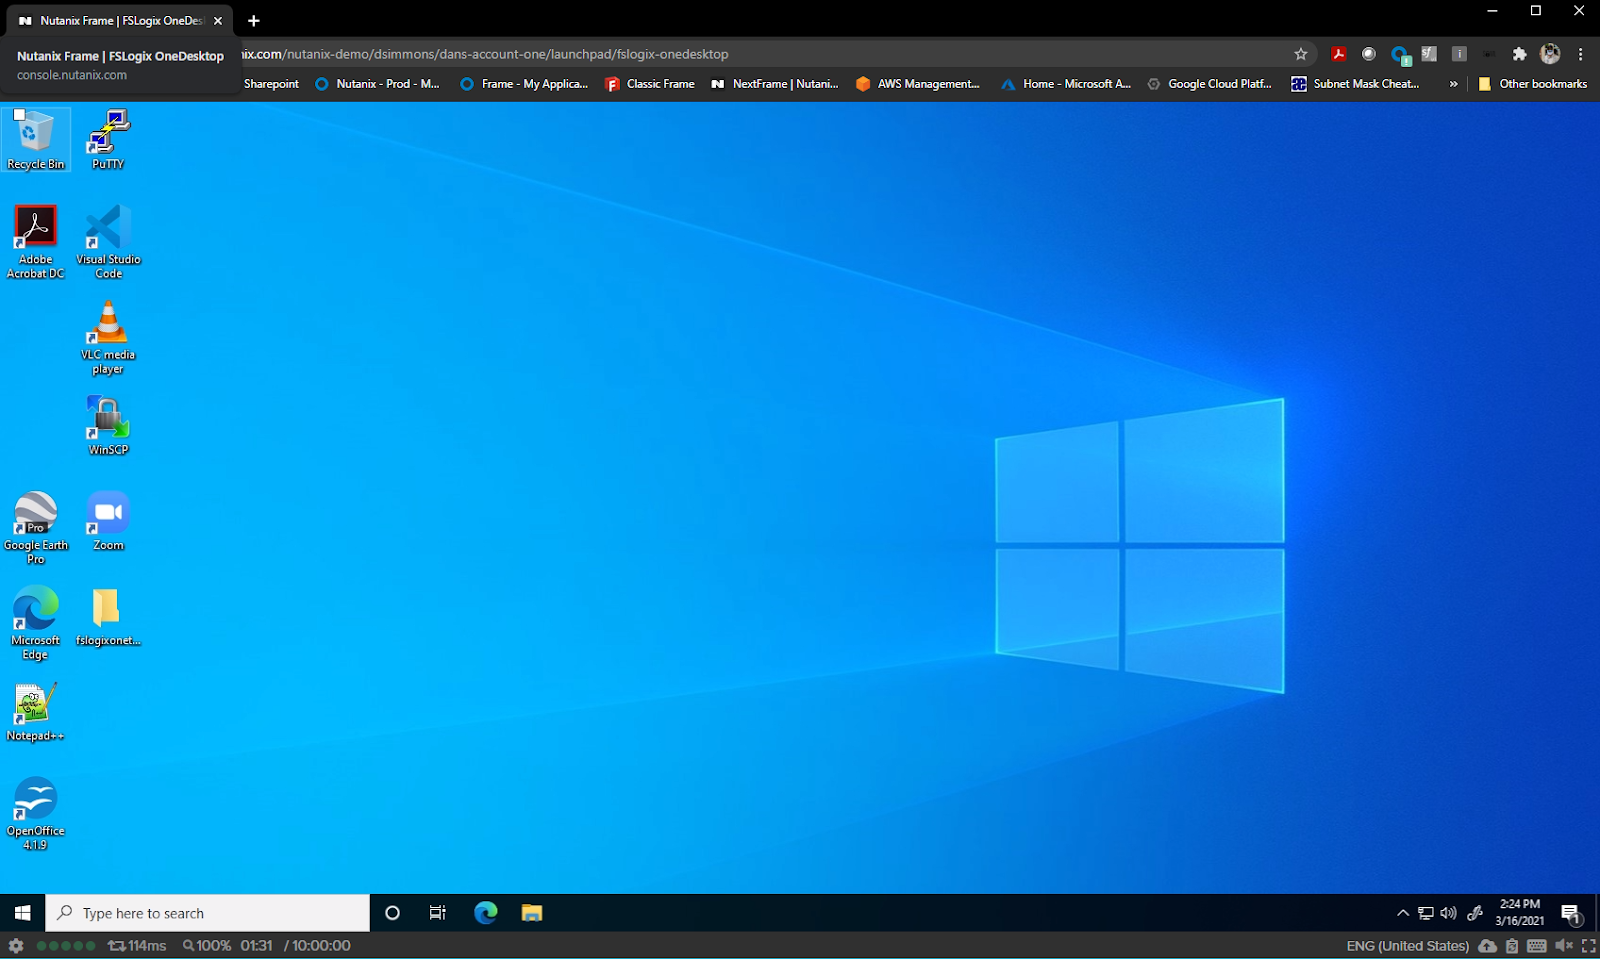
Log in to a new session and see if the change you made earlier persisted.
Verify that a container exists on the file share you made to store the profile containers.

Application Masking
Application Masking can be used to manage user access of installed components and applications. Application Masking may be used in both physical and virtual environments. It is most often applied to manage non-persistent, virtual environments such as virtual desktops.
Prerequisites
- Verify that Entitlement and other requirements are met
- Install FSLogix on the Sandbox VM that will use Application Masking
- Install Application Masking Rules Editor on the Sandbox VM that administrators will be using to create rules
- Install all applications, printers, fonts, and other resources to be managed with Application Masking on the Sandbox VM
- Apply any organization-specific configuration for intended environments
Assignment Order and Management
Assignments are executed from top to bottom.
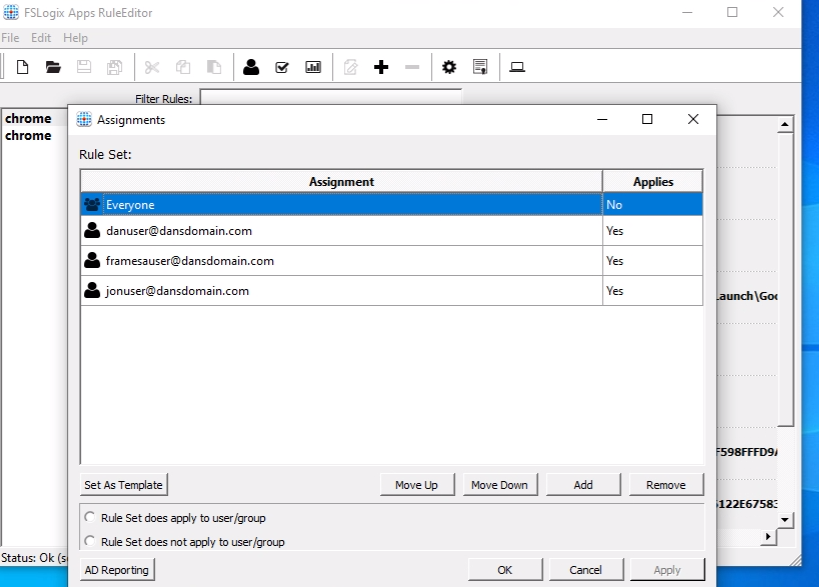
Example: Consider if two assignments were made for the same Rule Set. The first assignment applies the Rule Set to Everyone; the second assignment specifies that the Rule Set does NOT apply to User1. In this case, the Rule Set would apply to everyone except User1.
If an administrator were to reverse the order of the assignments above, the Rule Set would apply to Everyone without exclusion. Read more about assignment order and management in Microsoft's official documentation.
Manage Rule Sets and Rules in Application Masking
Application Masking manages access to applications, fonts, and other resources based on criteria. The Application Rules Editor is used to describe the resource to be managed. The editor is also used to define rule criteria. For instance, an administrator would want GitHub to be hidden from an Accounting group. Additional details can be found in Microsoft’s official documentation.
Things you can do with the Application Rules Editor:
- Create new Rule Sets
- Edit existing Rule Sets
- Manage the user and group assignments for Rule Sets
- Temporarily test Rule Sets
Configure FSLogix Application Masking with Frame
- Install Rule Editor, then run “FSLogixAppsRuleEditorSetup.exe” as an administrator.
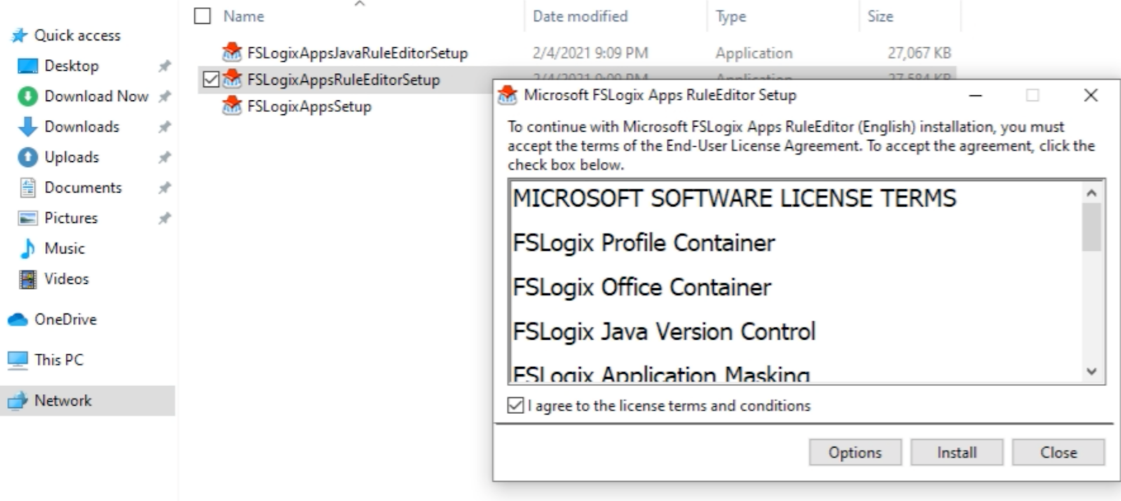
Create Application Masking Rules
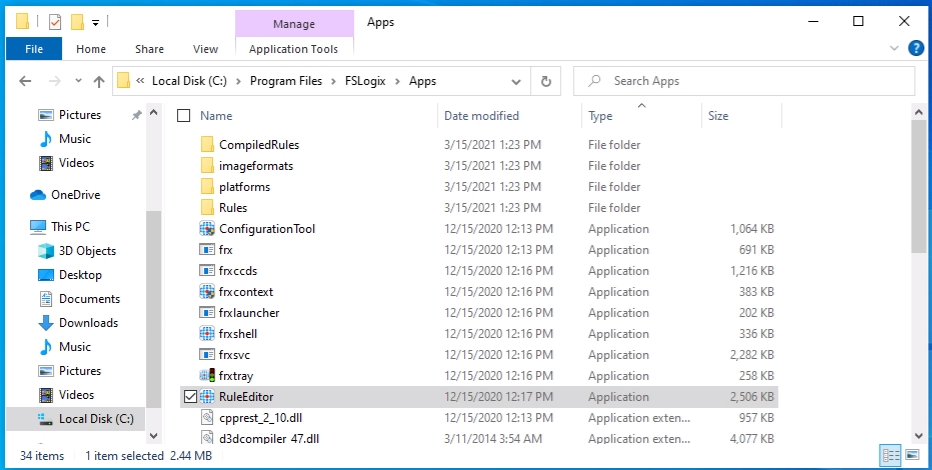
- Run
C:\Program Files\FSLogix\Apps\RuleEditor.exe, then run the Rule Editor as an administrator.
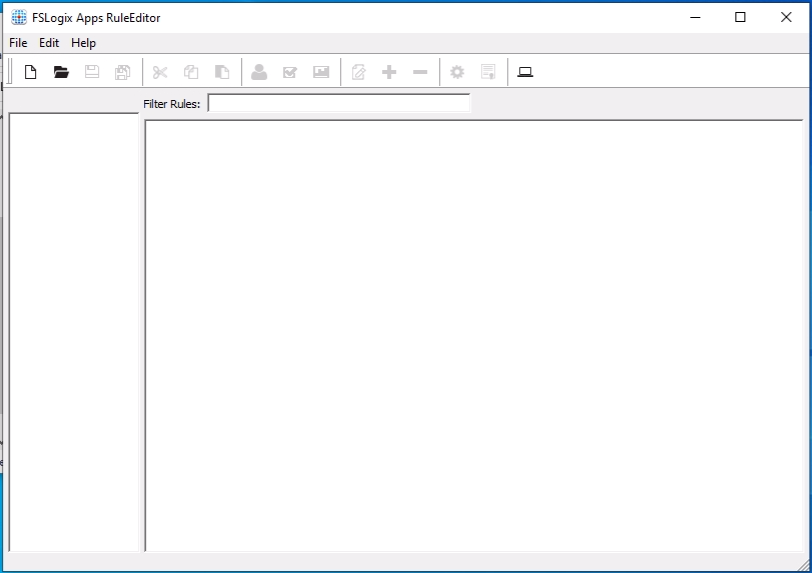
- Create Application Rules
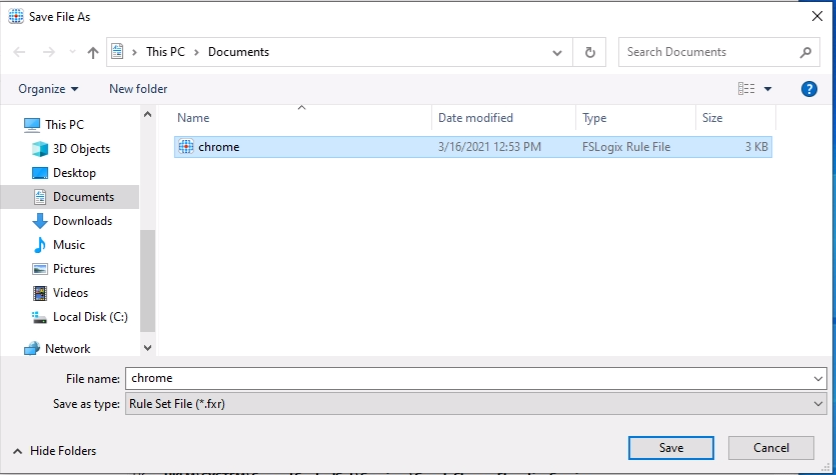
- Name the file in your storage location.
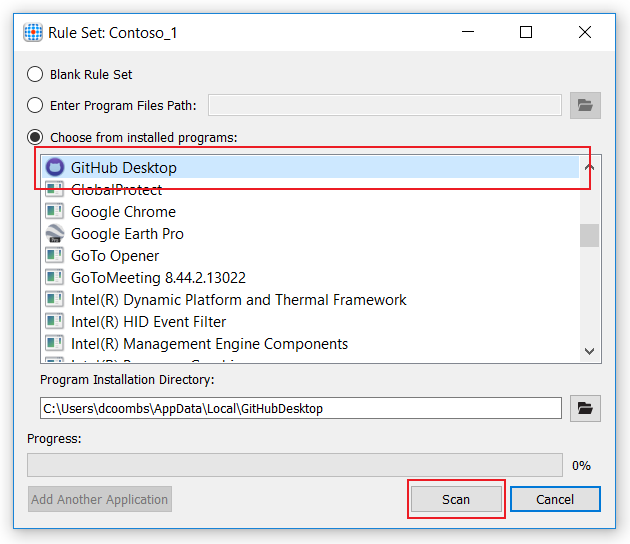
- Select the application you want to manage. Click “Scan” to have the Rules Editor detect the application settings. When scanning is complete, Click “OK.”
- Assign masking method to rule (user here) to rule.
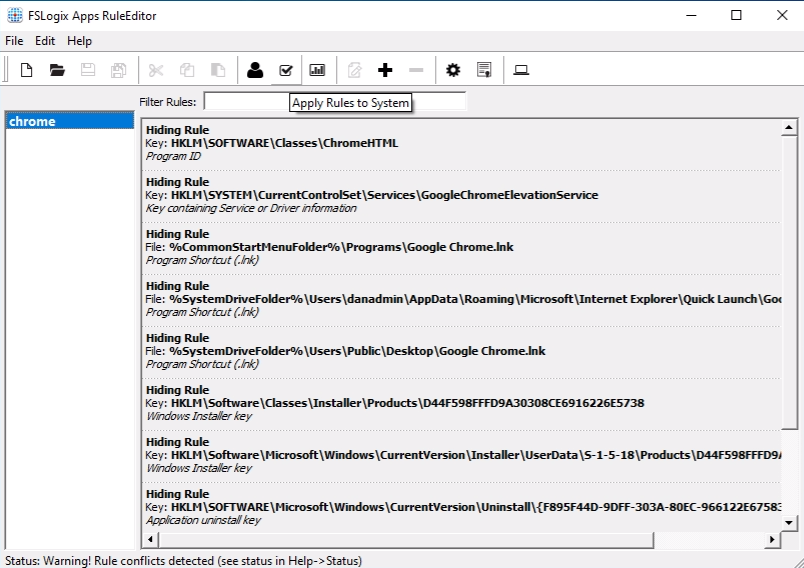
- Apply rules to the system to verify status (see status warning at the bottom of the screenshot below) select the checkbox option again to remove applied rules.
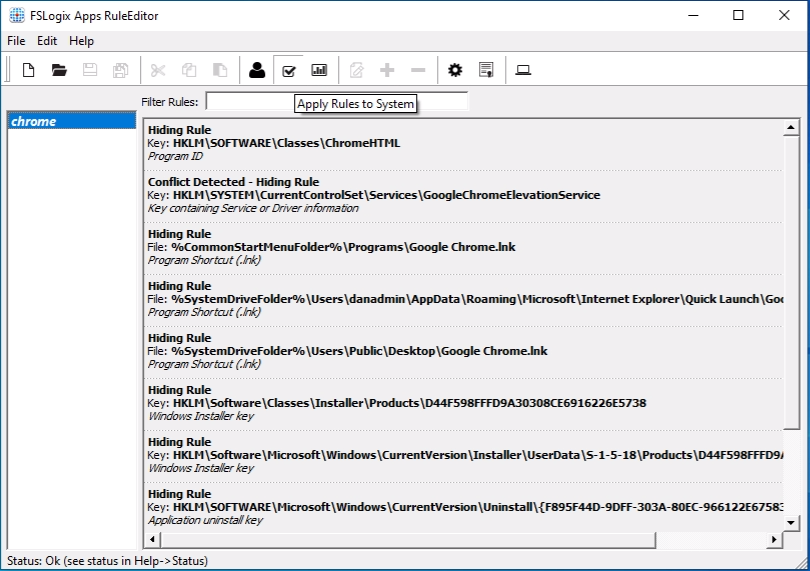
- Once you see Status: Ok in the lower left corner of the window, then unapply and save the rule.
Once you have created the rules, exit the editor.
Copy rules from your source location into
C:\Program Files\FSLogix\Apps\Rules.
- Two files of the same name exist for each rule each with adoffernat extension, .faxc & .fxc, copy them all.
- Compiled rules will automatically be stored in
C:\Program Files\FSLogix\Apps\CompiledRules.

- Clear the “Quick access” (a.k.a. “recent files”) section in File Explorer in the Sandbox to ensure they aren’t visible to end users.
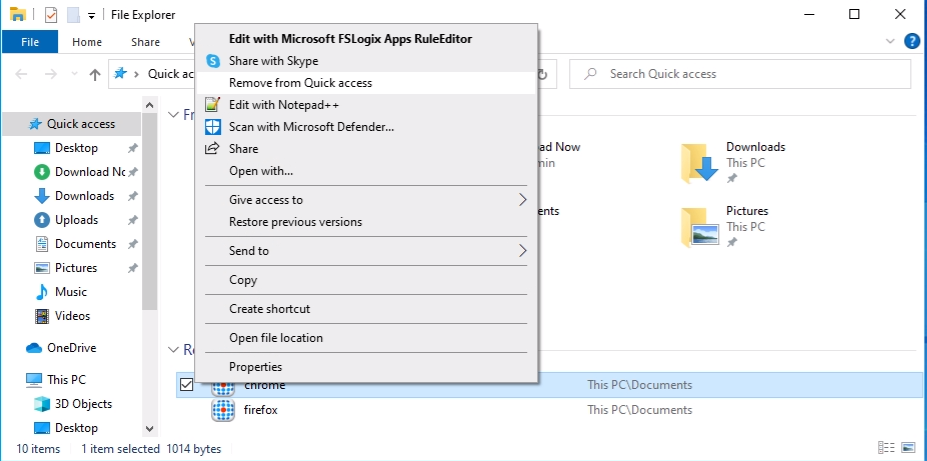
Log off of the Sandbox.
Initiate a publish from the Sandbox page of the Dashboard.
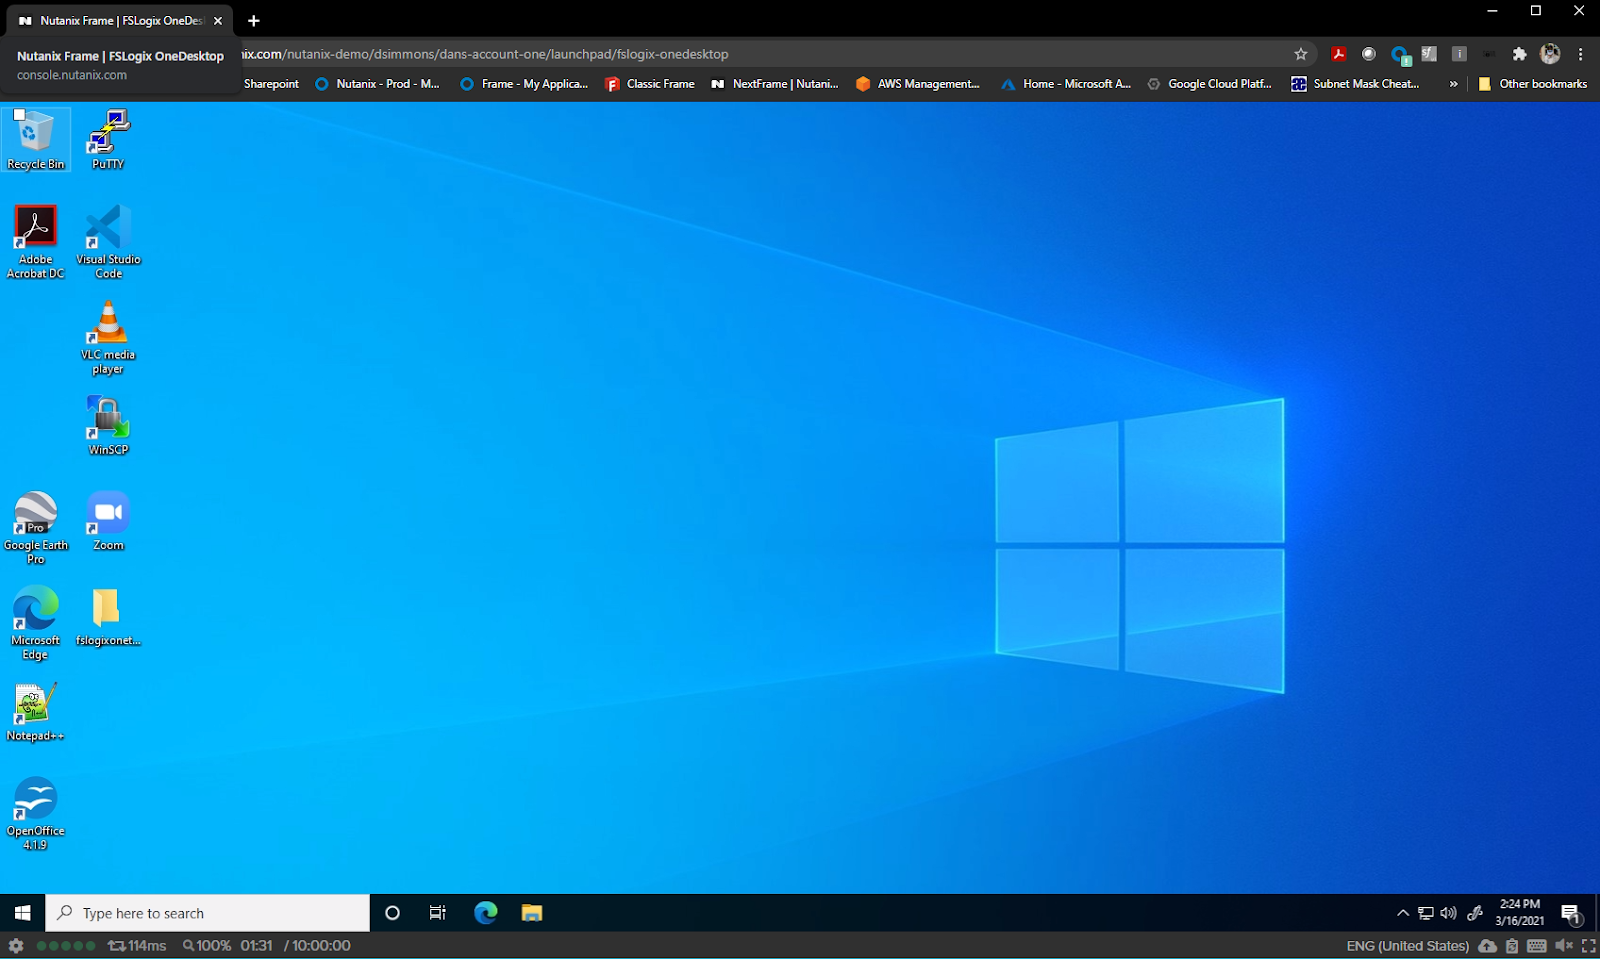
Lastly, log in and test as a non-admin/end user to verify the rules are taking effect (mask Chrome and Firefox.)
- As a best practice, use one rule file set for each application suite (such a Microsoft Office).
- Device-based application (e.g. Visio/Project) masking is possible with Device-based licensing by changing license parameters in rule editor. Be sure to add a Client name variable as part of the rule.
- If you want to use masking conditions based on AD Groups, ensure that Sandbox & Frame Account are set up to use Classic AD. As mentioned before, Classic AD is not required and you may also use other masking rules besides users or groups.
Use Of FSLogix Group Policy Template Files
FSLogix relies on a set of registry keys to be enabled and correctly configured on the VMs. There are several ways to apply these registry keys, depending on the scenario and scale of your environment:
- Manually creating registry keys using Windows Registry Editor:
- It is not recommended since it is error-prone and potentially high risk. Manual effort is required, and scale to many hosts is difficult. It should be used only for testing and prototyping on a single machine.
- Local Policies:
- It is possible to use the Group Policy Object (GPO) mechanism in Windows to apply a set of configuration settings (registry keys) using an object stored locally on a single computer. Should be used only for testing and development of GPO objects to be applied on a larger scale using a Central Store.
- It can be used as a simple Sandbox master image management solution with Frame.
- Central Store for Policies:
- This approach is the recommended mechanism to apply FSLogix, and any other configuration setting, at scale on all WVD Host Pool VMs. A centralized repository hosted on Active Directory Domain Controllers is used, thus replicated throughout the entire Active Directory domain.
Prerequisites
Local Policies and Central Store for Policies rely on a Windows feature called Group policy administrative templates, also known as ADMX templates. The two files that you will need to copy to create your ADMX template are fslogix.adml and fslogix.admx, which we will discuss in more detail below.
In older versions of the FSLogix installation package, two additional and separate files have been provided to configure the ADMX template for Office Container: FSLogixODFC.admx and FSLogixODFC.adml. These files are no longer provided since all the contained settings are now inside a single set of files, that is fslogix.adml and fslogix.admx.
ADMX Templates
Group policy administrative templates, also known as ADMX templates, include settings you can configure for Windows machines through Group Policy Objects (GPO). Administrative Templates files are divided into .admx files and language-specific .adml files. The changes that are implemented in these files let administrators configure the same set of policies by using two languages. Administrators can configure policies by using the language-specific .adml files and the language-neutral .admx files.
In order to facilitate GPO creation, administrators can import these templates and have the editor user interface automatically configured with all the included settings. Once development of GPO is finished with all the desired changes, the resulting GPO object can be associated (linked) to an Organization Unit (OU) in Active Directory.
When VMs are created and joined to the Active Directory domain, the GPOs will automatically be applied, and FSLogix will be configured.
Local Policy Settings
Local Policy Edit
It is possible to create and edit locally a GPO object using the same template files, in a production environment it is recommended to use a Central Store. For completeness, here are the steps necessary to use the template files locally:
- Copy the ADMX file (fslogix.admx) to
C:\Windows\PolicyDefinitions(and unblock the access to the file in the file attribute) - Copy the ADML file (fslogix.adml) to
C:\Windows\PolicyDefinitions\en-US(and unblock the access to the file in the file attribute) - Run the “Local Group Policy Editor” tool (GPEDIT.MSC)
- Browse to Computer Configuration thenAdministrative Templates then look for FSLogix container.
- Review and enable desired settings, then save the object.

Central Store
To take advantage of the benefits of .admx files, and to distribute settings automatically to the entire VM production pools, you must create a Central Store in the Sysvol folder on a Windows domain controller. The Central Store is a file location that is checked by the Group Policy tools by default.
The Group Policy tools use all .admx files that are in the Central Store. The files that are in the Central Store are replicated to all domain controllers in the domain. To create a Central Store for .admx and .adml files, create a new folder that is named PolicyDefinitions in the following location (for example) on the domain controller:
\\contoso.com\SYSVOL\contoso.com\policies\PolicyDefinitions
Now copy the FSLogix file fslogix.admx only into this location.
The PolicyDefinitions folder on the Windows domain controller stores all .admx files and .adml files for all languages that are enabled on the client computers. The .adml files are stored in a language-specific folder. For example, English (United States) files are stored in a folder that is named en-US. If not present already, you will need to create a language-specific folder en-US, then add fslogix.adml inside.
Template Edit
In the previous section, you completed the preparation of the ADMX template specific for FSLogix for your Active Directory domain. Now you are ready to use this template to create a GPO for your VM production pool. Read more about this process in Microsoft's official documentation.
General Profile Container and Application Masking Troubleshooting
Error Messages
The Error message below occurs when you are attempting to save the FSLogix configuration and the Sandbox is not domain joined.

Usually when an FSLogix component is not working, Error will be set. When it is set, it corresponds to a standard Windows Error Code. Reference their official documentation for a list of reference codes.
Logs
- The Log files are in
%ProgramData\FSLogix\Logs\Profile C:\Program Files\FSLogix\Apps\Frxtray.exe(FSLogix icon tray) is an excellent way to get visibility into the FSLogix profile and its status, configuration etc.

By default, the profile container VHD will contain the entire Windows profile for the user, except for:
- The TEMP (TMP) folder location
- The IE Cache folder location
The Windows user profile is composed of the contents of a specific folder location and some registry information. Typically this folder location is something like C:\Users\username
If desired, the admin can specify that parts of the user profile are persisted in the profile container. Exclusions are done with a redirections.xml file. The redirections.xml file instructs the FSLogix agent to redirect specific folders out of the profile container and into the local C: drive. Any part of the profile that is excluded will be deleted at sign-out. See official Microsoft documentation for details.
Additional Tips
- Configuring Personal Drive together with the FSLogix Profile Container did not cause an issue, verified via Disk Manager.
- It is easy to map a drive letter to FSLogix Profile Container share and browse inside the container for troubleshooting in the instance or Sandbox.
The Profile Container sets three values that represent the state of Profile Container or Office Container:
- Status
- Reason
- Error
Profile Container stores error values here:
HKLM\Software\FSLogix\Profiles\Sessions<UserSID>
FSLogix Office Container stores error values in two places:
HKLM\Software\Policies\FSLogix\ODFC\Sessions<UserSID>HKCU\Software\FSLogix\ODFC\Sessions
If the Status is zero, the system is in a working state, and Reason will reflect the state.
- For example, if Status and Reason are both zero, then the FSLogix Container is attached and working for this user.
Status Codes
Status codes can be found in Microsoft's official documentation.
Group policies
Two group policies need to be set correctly, as described below:
To redirect internet and temporary files, the user needs permission to redirect the profile folder. You can find the GPO by going through the menus:
- User Configuration > Administrative Templates > Desktop > Prohibit User from manually redirecting Profile Folder
This GPO needs to be deactivated to get a value of zero. However, I noticed that the policy is not setting the correct value (at least for me) and therefore, I set the value by a user REG GPO.
HKCU\Software\Microsoft\Windows\CurrentVersion\Policies\ExplorerDisablePersonalDirChange REG_DWORD = 0x00000000
A favorite GPO with companies is removing the run entry from the start menu, but this will also prohibit opening UNC paths. With FSLogix, the redirection.xml file is downloaded from an unc share to the local profile. Therefore the download of the redirection.xml file would be blocked, and the exclusions will not apply.
- User Configuration > Administrative Templates > Start Menu and Taskbar > Remove Run menu from Start Menu
Windows Search and Log Off
The Windows search, when active, can have open file handles to files in the user profile. Because of that, the virtual disk cannot be unloaded and will cause an issue with the following user logon. The workaround to this is to set up a task at logoff that restarts the Windows search. The restart would have no impact on other users because the restart takes less than a second.
The following command will restart the Windows search service :
Powershell.exe -NoLogo -NoProfile -NonInteractive Restart-Service WSearch
System file access
Under certain conditions, the system keeps open file handles to the user profile and is more specific to the user keyword store. The open handle will block an unload of the virtual disk and the profile gets stuck at that server. There is an undocumented value CleanupInvalidSessions under HKLM\Software\fslogix\apps that can be used with the current FSLogix Version 2.9.7802.10873 and might help. If not, then you must restart the server!
Format of the Redirection File
It's important that the redirection file has no errors in the format or the XML syntax. If the file includes errors, then this can lead to different behavior. The best indicator is the FSLogix eventlog, an event that starts with "error.cpp(13)," and has become an alert for me. Often, then the vDisk cannot be unloaded from the server.
Official Microsoft Documentation:
- FSLogix Release Notes
- Configure Profile Container Tutorial
- Storage Permissions for Profile Container and Office Container
- Install FSLogix Agent
- Profile Container troubleshooting guide
- FSLogix Logging and Diagnostics
- Create FSLogix profile container Azure Files Active Directory Domain Services - Azure
- Configure FSLogix Cloud Cache Tutorial
- Cloud Cache for resiliency and availability
- FSLogix/Invoke-FslShrinkDisk - Shrinks FSLogix Profile and O365 dynamically expanding disk(s).