Authorization
The Frame Platform provides administrators with a role-based access control (RBAC) capability to manage user and administrative access to their accounts. Through the Frame Admin user interface, administrators are able to assign roles which grant varying levels of access to their users. These same granular controls are available for all authentication types.
Customer and Organization administrators can manage users from the Admin page by clicking on the ellipsis next to the desired entity, selecting “Edit,” and clicking on the “Security” tab. Account administrators manage their users from the “Users” section of their Dashboard.
Roles
Roles allow administrators to easily manage the permissions and access levels of their users. Regardless of the authentication type, administrators must specify the role they wish to grant to their users before those users can be authorized to access Frame resources.
Administrators are able to grant permissions based on their own level of access. For instance, while a Customer admin can assign any role to any user, an Organization admin can only grant the Organization Admin role or below to another user.
You can read more about Frame account hierarchy in the Platform Hierarchy section. Administrators must assign roles when inviting users. They may also modify roles for existing users at any time. If you have not yet invited any users, please refer to the Basic Authentication or third-party Identity Provider Integrations sections of our documentation, depending on which platform you wish to use to add your users.
User Permissions
Google (OAuth2) IdP
If you have decided to use the Google OAuth integration through Frame, it's easy to manage users by domain/email.
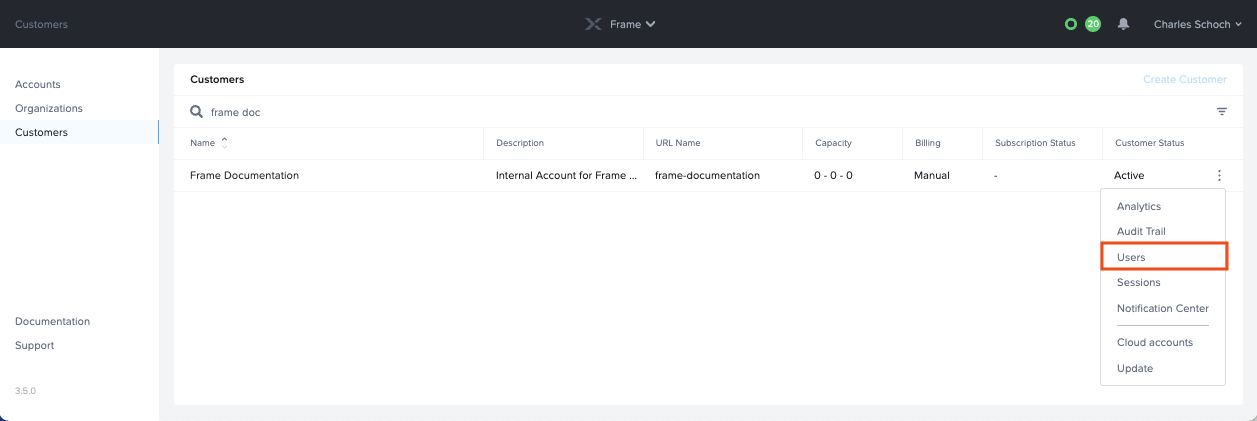
From the Nutanix Console, navigate to your desired entity where you wish to set up your Okta integration (Customer/Organization/Account). Click on the ellipsis listed next to the entity name and select Users.
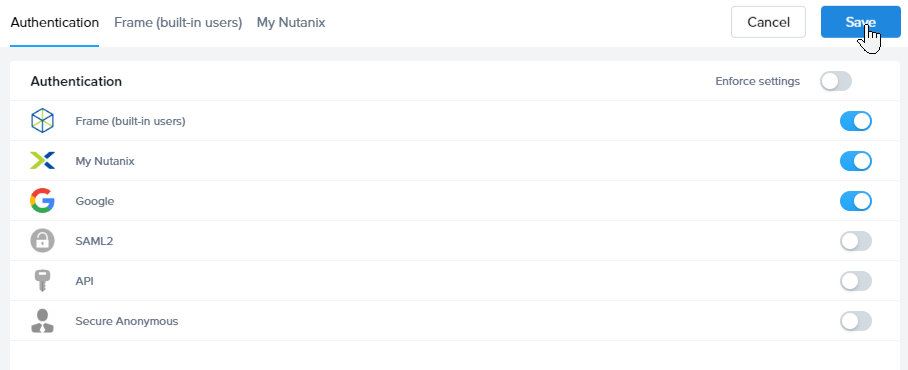
Enable the Google toggle from the Authentication tab and then click Save in the upper right corner of the console.
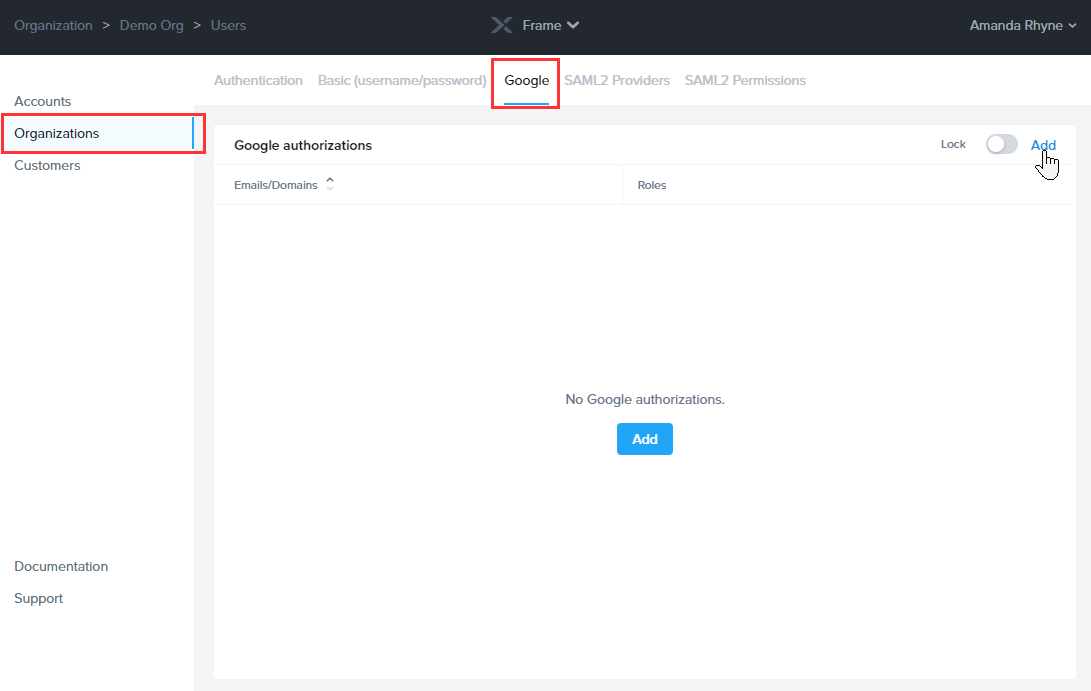
Click the new Google tab. Click Add at the top-right.
A new window will appear prompting you to enter either an email address or a domain. For this example, we will add a domain and give anyone associated with that domain an Account Administrator role on the “Doc-Acct” Account.
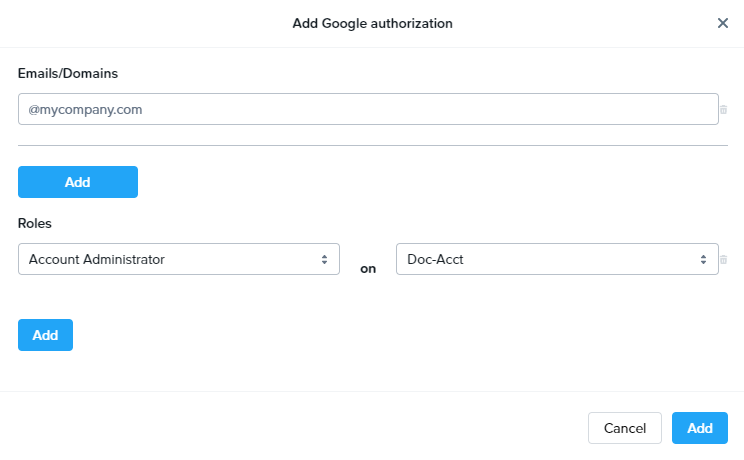
When specifying a Google Workspace domain, you must prefix the domain with the @ symbol, as shown above.
Admins can also add multiple domains and email addresses under the same role set. For example, using the Add button, we have added a single email address along with our domain. The user associated with that email address will be given the same role on the “Doc-Acct” Account.
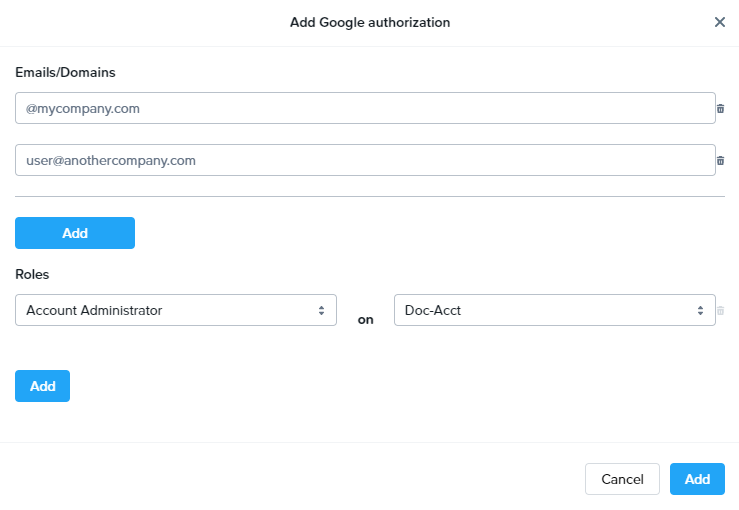
To add another level of granularity, our domain and single email address can be given additional roles by clicking Add below the Roles section.
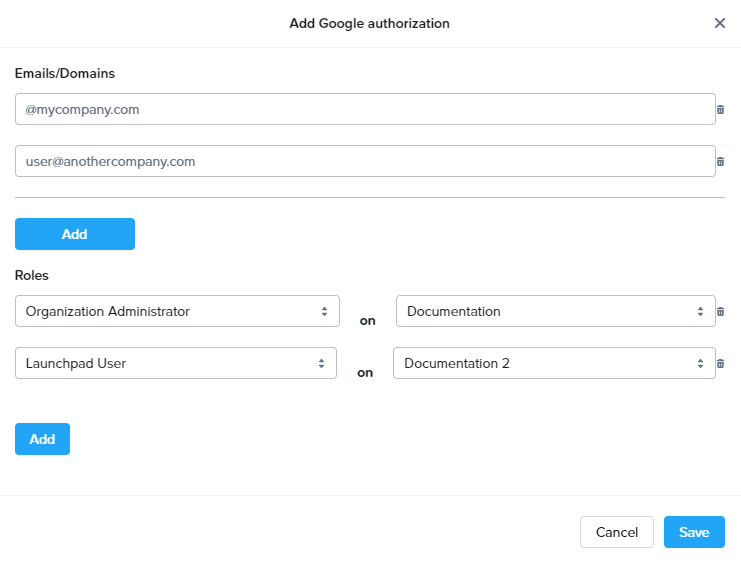
Now, once we click Add at the bottom of the window, the domain and single email address will be given Launchpad User access on the "Applications 2” Launchpad, and Account Administrator access on the “Persistent Desktops” account. Administrators can add many Google authorization role sets for multiple domains/email addresses.
User Permissions with a SAML2 IdP
Once you have set up your SAML2 provider integration with Frame, you will need to designate permissions for your users. Navigate to the SAML2 Permissions tab to the right of the SAML2 Providers tab from the Users page of the desired entity. Click Add Permission.
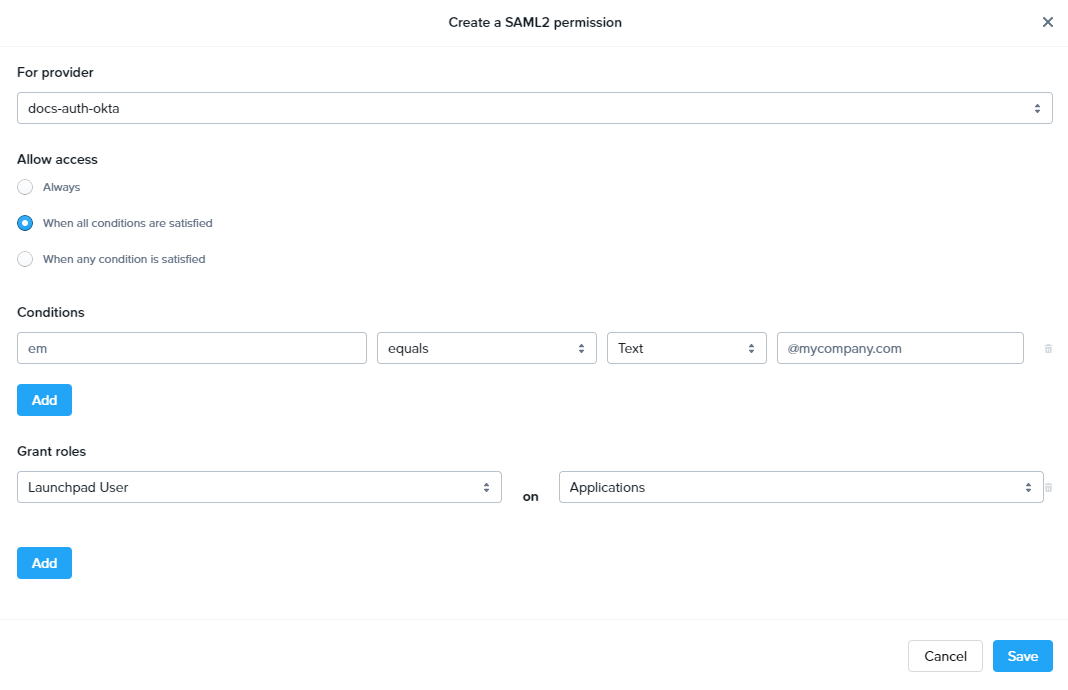
- For provider: Select the SAML2 Provider you are designating permissions for.
- Allow access:
- Always: Once the user is authenticated, they have access to the role you specify below – no conditions required.
- When all conditions are satisfied: The user must meet all conditions specified by the Admin to be granted access to the role specified.
- When any condition is satisfied: The user can meet any conditions specified by the Admin to be granted access to the role specified.
- Conditions: Specify your assertion claims and their values which will correspond with the roles you wish to grant. Reference the table below for our accepted assertion claims.
- Grant roles: Select the desired roles you wish to grant to your users. You can add multiple role sets by using the Add button. Reference the roles section above for more information.
| Assertion Claim | Claim Value | Example |
|---|---|---|
| em | johnsmith@mycompany.com | |
| givenName | First Name | John |
| sn | Surname | Smith |
When qualifying users by domain, it is best practice to use “em ends with @yourcompany.com.”
During the IdP setup, you may have used mail to define the email attribute. While this is fine for the IdP, you must use em to reference the email attribute when configuring SAML2 permissions on Frame.
Click Save when you are done. Administrators can add multiple permission sets under the SAML2 Permissions section.
SAML2 Attributes
When creating SAML2 permissions on Frame, admins may use custom attributes from their IdP by setting specific permissions settings. For this example, we will use a very common custom attribute – “groups.” Most IdPs provide ways to “group” users and these groups can be passed to Frame via custom attribute mappings. Using additional attribute maps, you can build conditions for varying roles and access privileges. When creating any rules for SAML2 claims/attributes, use “contains” in the comparison operator field as shown below.
Here is an example of where you would set group statements in Okta:

Here is an example of a list of groups in Okta:
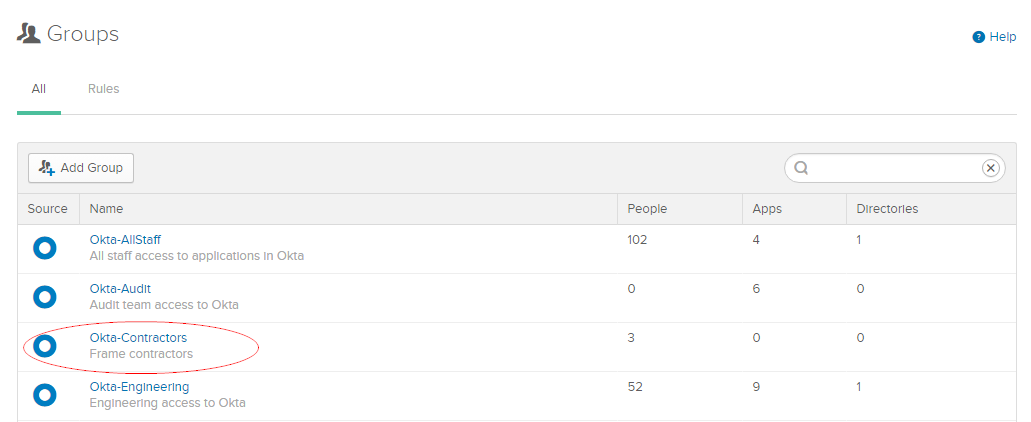
This is how we would pass one of the groups (“Okta-Contractors”) over to Frame, allowing administrators to create rules and roles to meet their needs.
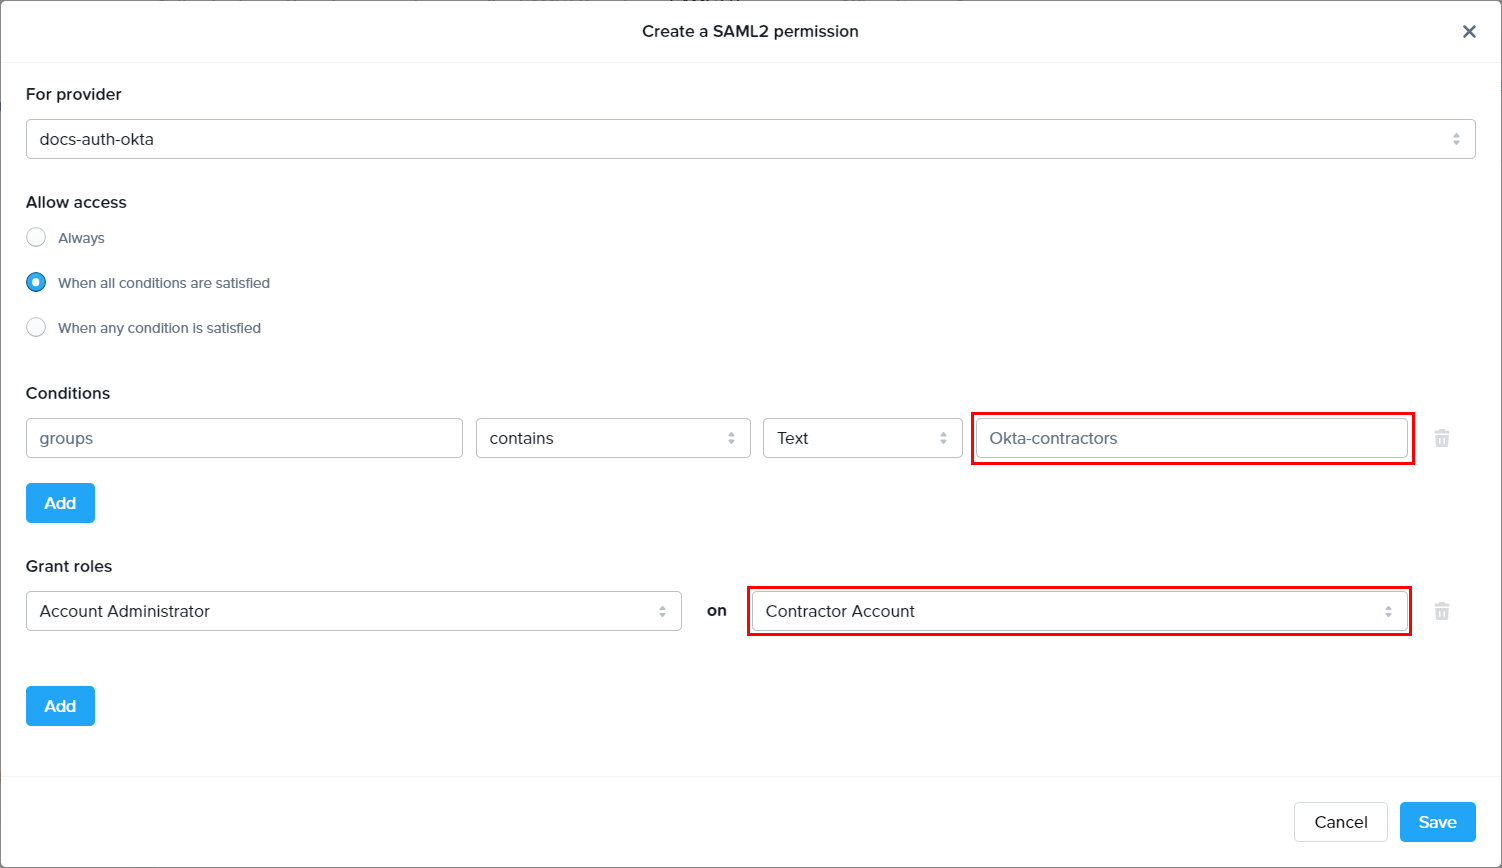
With the configuration above, any users from the “Okta-Contractors” group signing into Frame will be given Account Administrator access to the “Contractor Account.”
All identity providers use different methods to manage user groups, please consult your IdP's documentation for more information about groups and group management.
Troubleshooting
If users see the following Unauthorized page after successfully authenticating to their SAML2 identity provider, then there were no SAML2 Permission rules that were satisfied by the SAML2 attribute names and corresponding values provided by the identity provider.
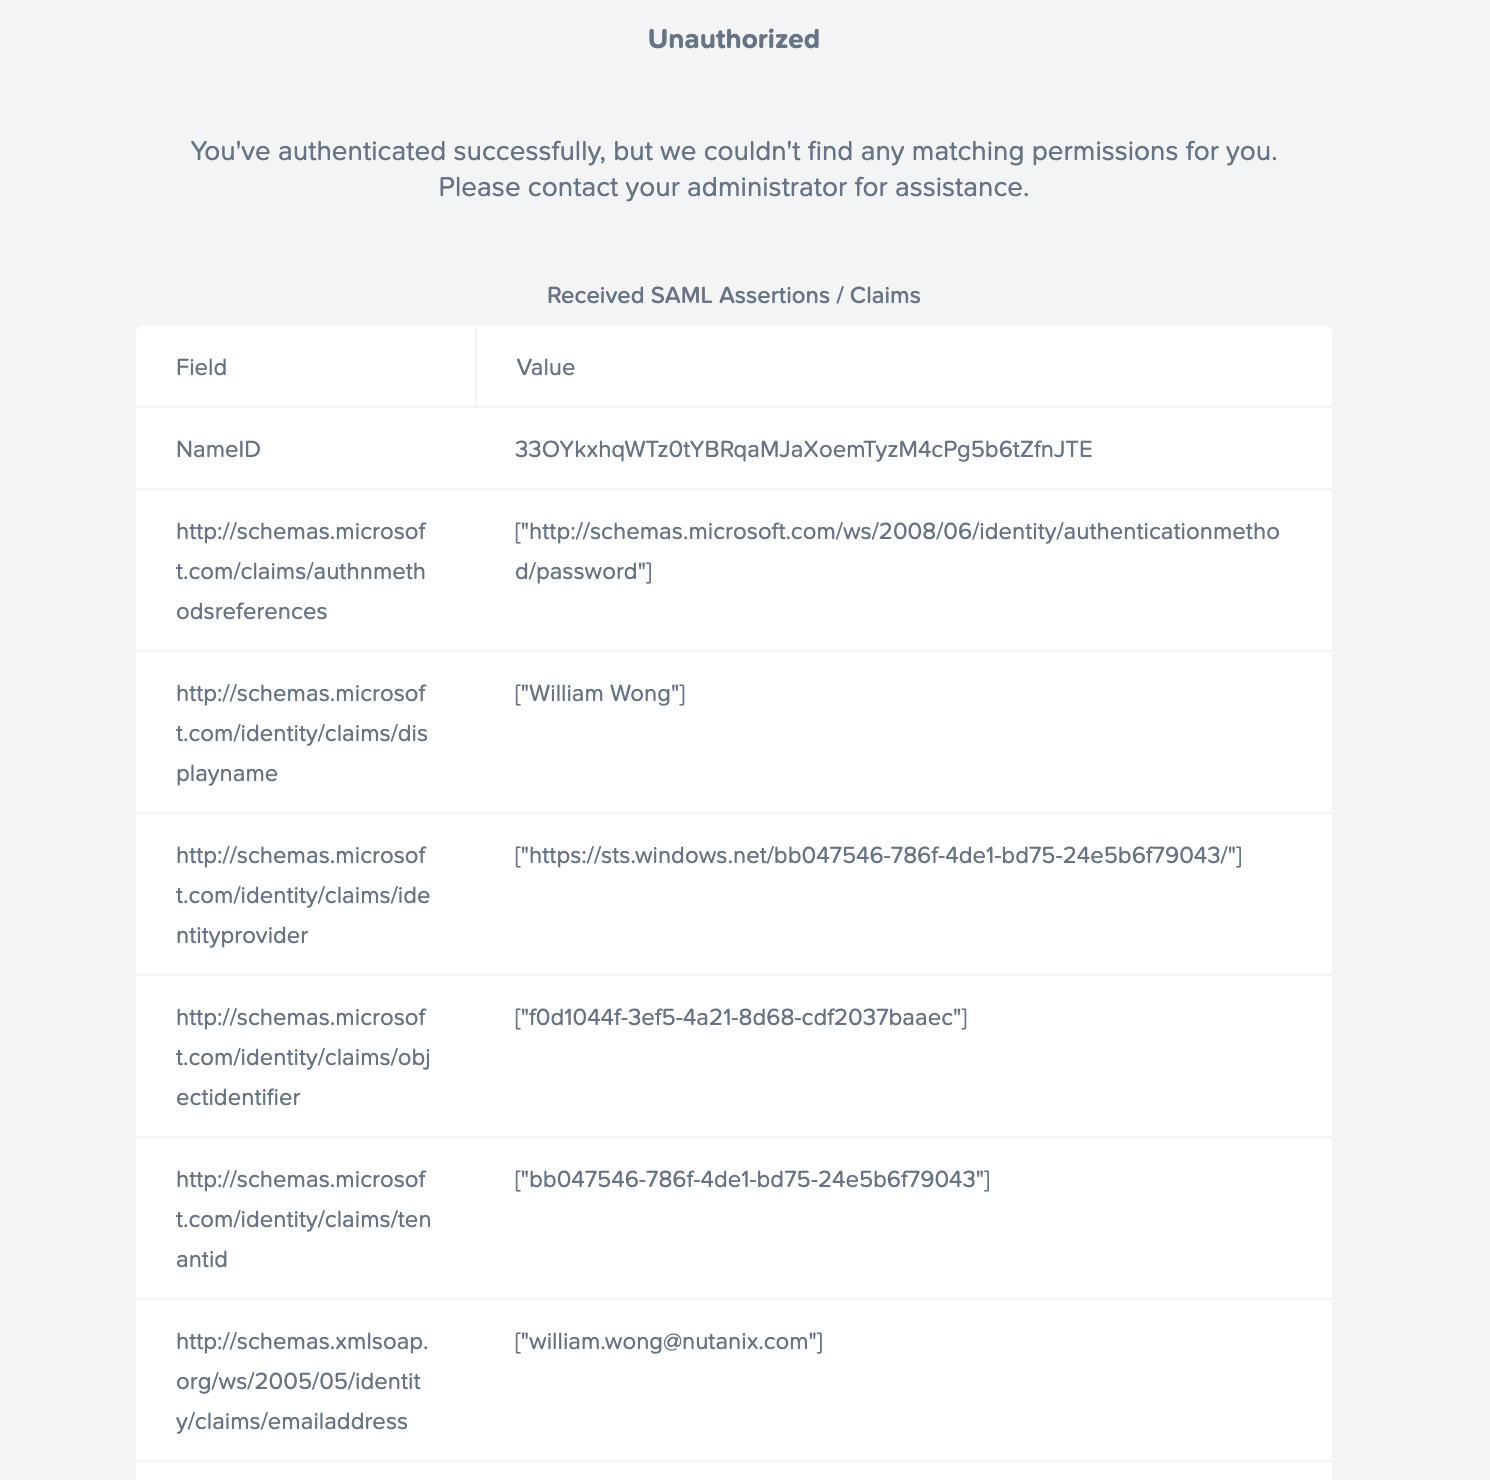
To address this issue, the Frame Administrator must:
- Confirm the correct SAML2 attribute names and values are being provided in the SAML2 Authentication Response message after the user has successfully authenticated to the SAML2 identity provider.
- Review the list of SAML2 attribute names (under the Field column) and corresponding SAML2 attribute values (under the Value column) on the Unauthorized page and determine which SAML2 attribute name and corresponding SAML2 attribute value should be used to define a SAML2 Permission authorization rule.
Authorization rules are defined in the SAML2 Permissions tab on the appropriate Frame Customer, Organization, or Account. Once the Frame Administrator confirms the right SAML2 attributes and values are listed on the Unauthorized page, they can then create a SAML2 Permission rule for the user (or group of users).
As an example, based on the information provided in Unauthorized page image, the Frame Administrator could replace SAML2_Attribute_Name with http://schemas.xmlsoap.org/ws/2005/05/identity/claims/emailaddress and SAML2_Attribute_Value with william.wong@nutanix.com in the SAML2 Permission page below to create a SAML2 Permission rule specific to one individual's email address.
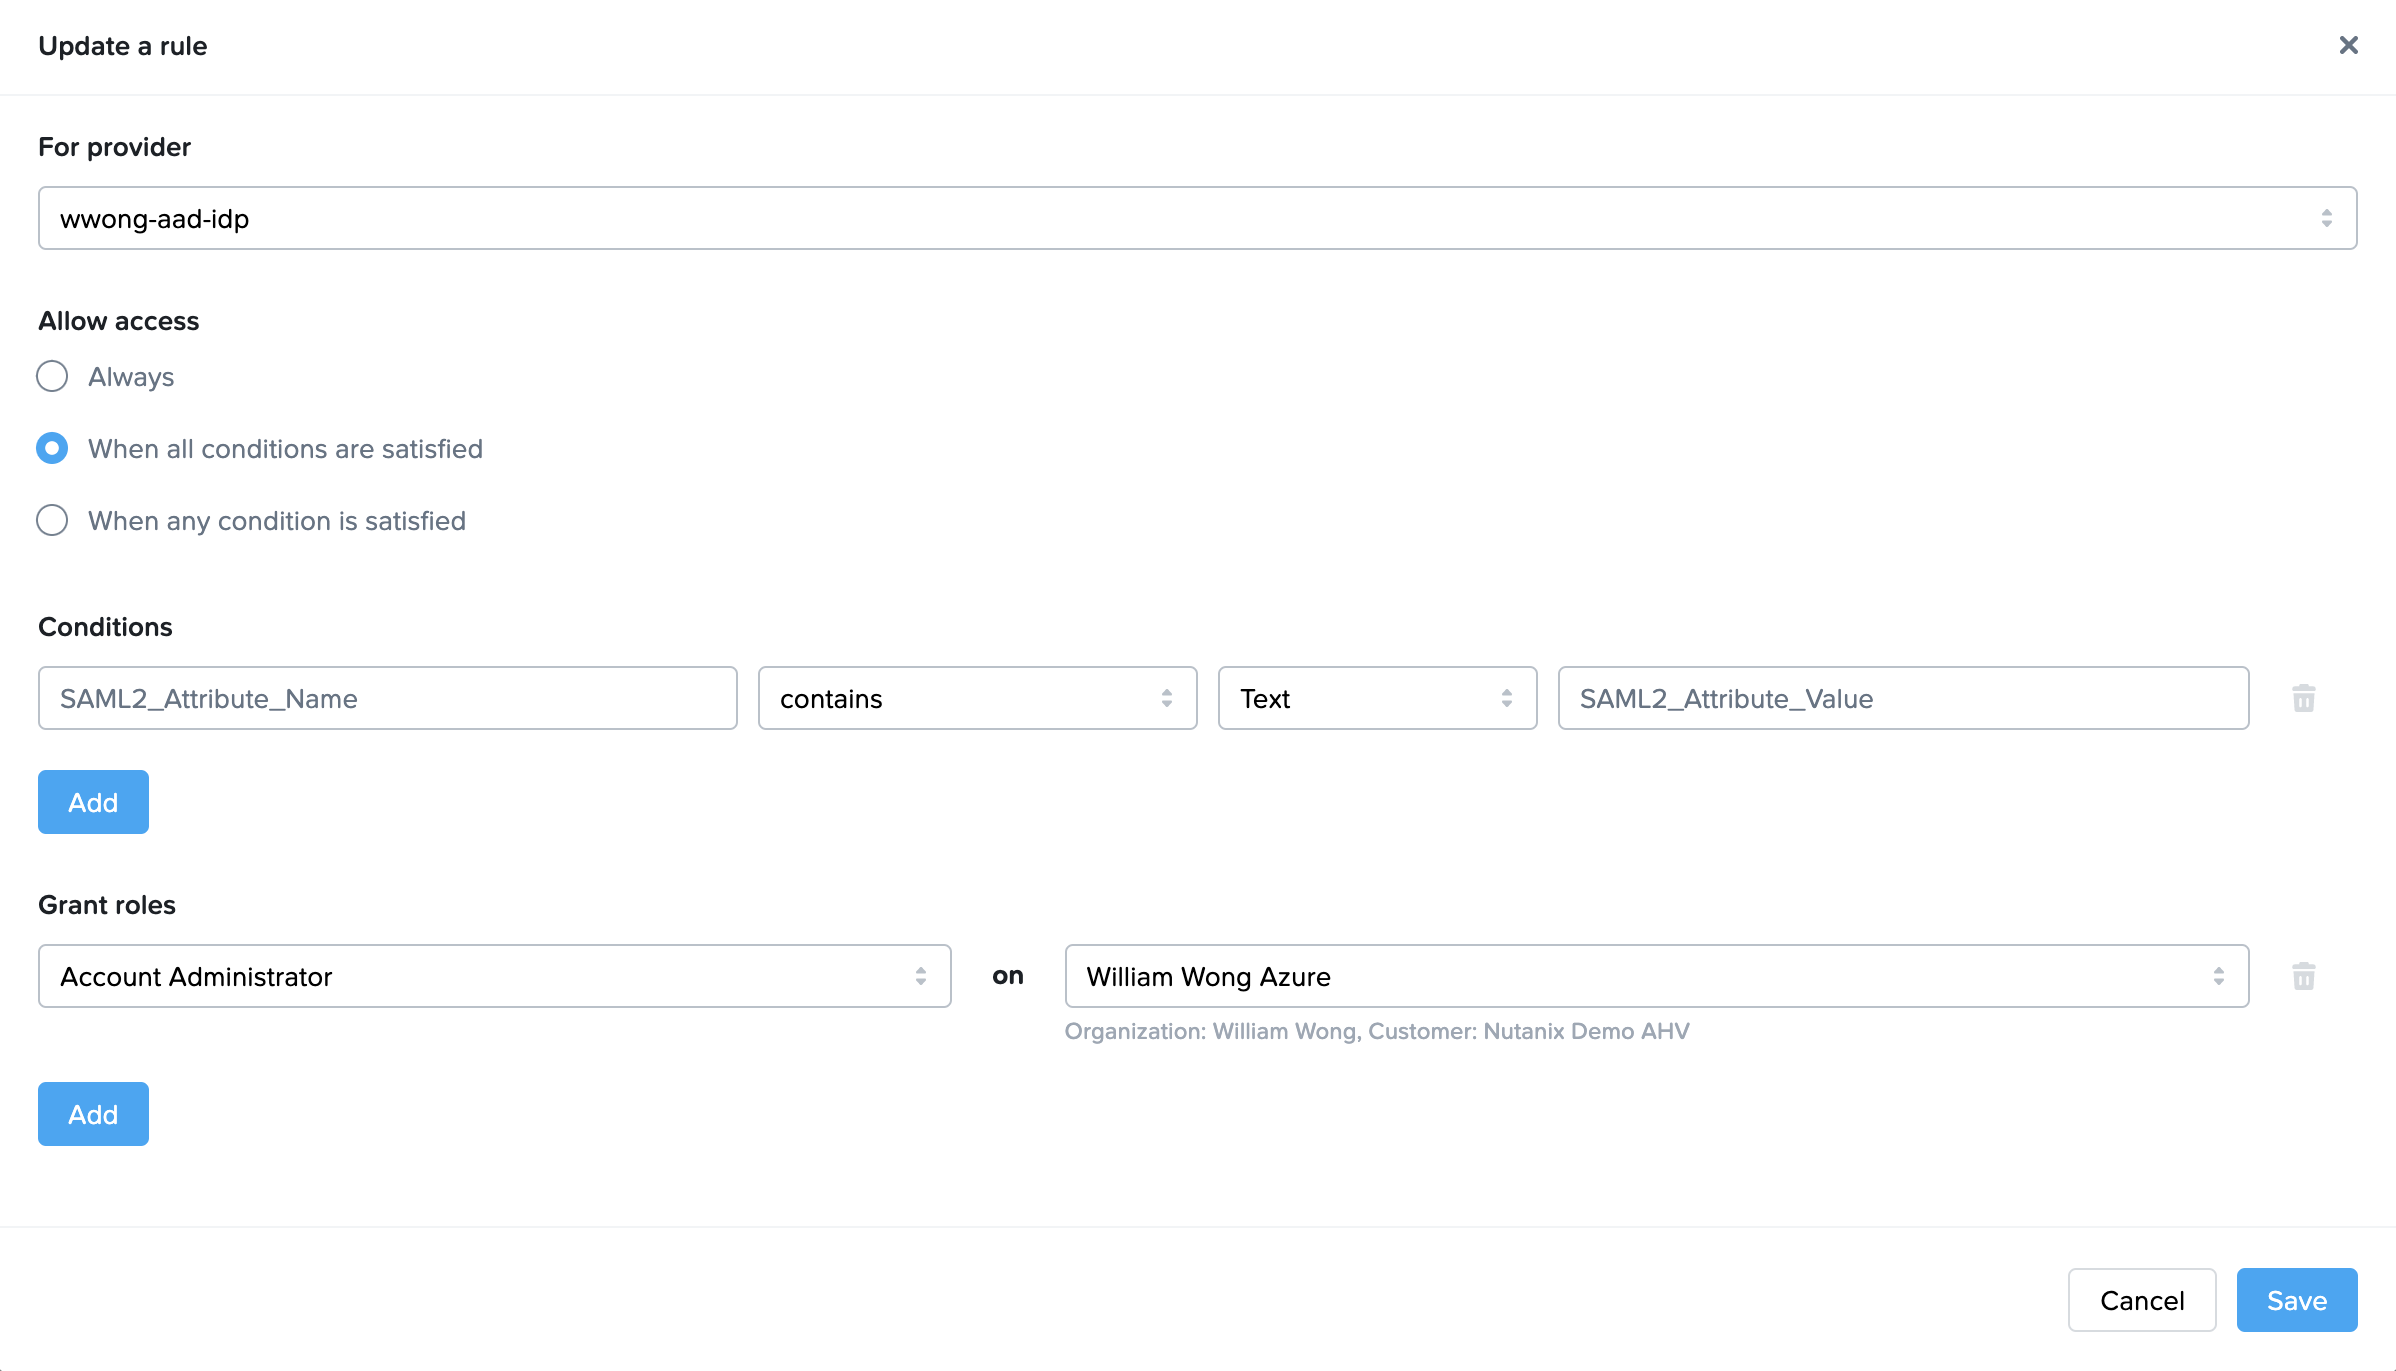
In general, use the contains operator as SAML2 identity providers typically provide SAML2 attribute values as a list/array of values.