General SAML2 Integration
The administrative workflow for setting up a SAML2 identity provider (IdP) consists of the following steps:
- Enable SAML2 Providers at the desired entity level (Customer, Organization, or Account).
- Create a SAML2 identity provider in Frame.
- Enter the necessary configuration information for your new SAML2 identity provider in Frame.
- Enter the configuration information in your actual SAML2 identity provider.
- Verify that both sides of the IdP integration are properly configured by attempting to login using your identity provider.
- Add SAML2 Permissions (authorization rules) at the Customer, Organization, or Account entity level to authorize users to specific roles.
Depending on the specific SAML2 identity provider, you may need to perform Step 4 before Step 3.
Frame supports both IdP-initiated and SP-initiated authentication workflows. In general, most customers implement SP-initiated authentication workflows by directing users to a Frame URL and letting Frame redirect the user to the SAML2 identity provider.
Getting started
To begin, let's create a URL-friendly SAML2 Integration Name that we'll use in a few places throughout our setup. Continue below for help and examples that you can use in your SAML integration.
Integration Name examples for SAML2 Identity Providers
Your SAML2 Integration Name is a case-sensitive, URL-friendly, unique, and descriptive value that represents the integration between your SAML2 Identity Providers and Frame. This value can have only letters, numbers, and the dash symbol; no spaces or punctuation are allowed.
We recommend using something that includes descriptive information, such as your company and identity provider's names. This integration name is tied to your SAML2 endpoints on Frame and using descriptive names can be useful for debugging.
Optionally, fill out the information below to get a recommendation of what you could use.
Using the values copied from above and following the steps below, we'll create and gather these details to configure proper communication between your IdP and Frame.
-
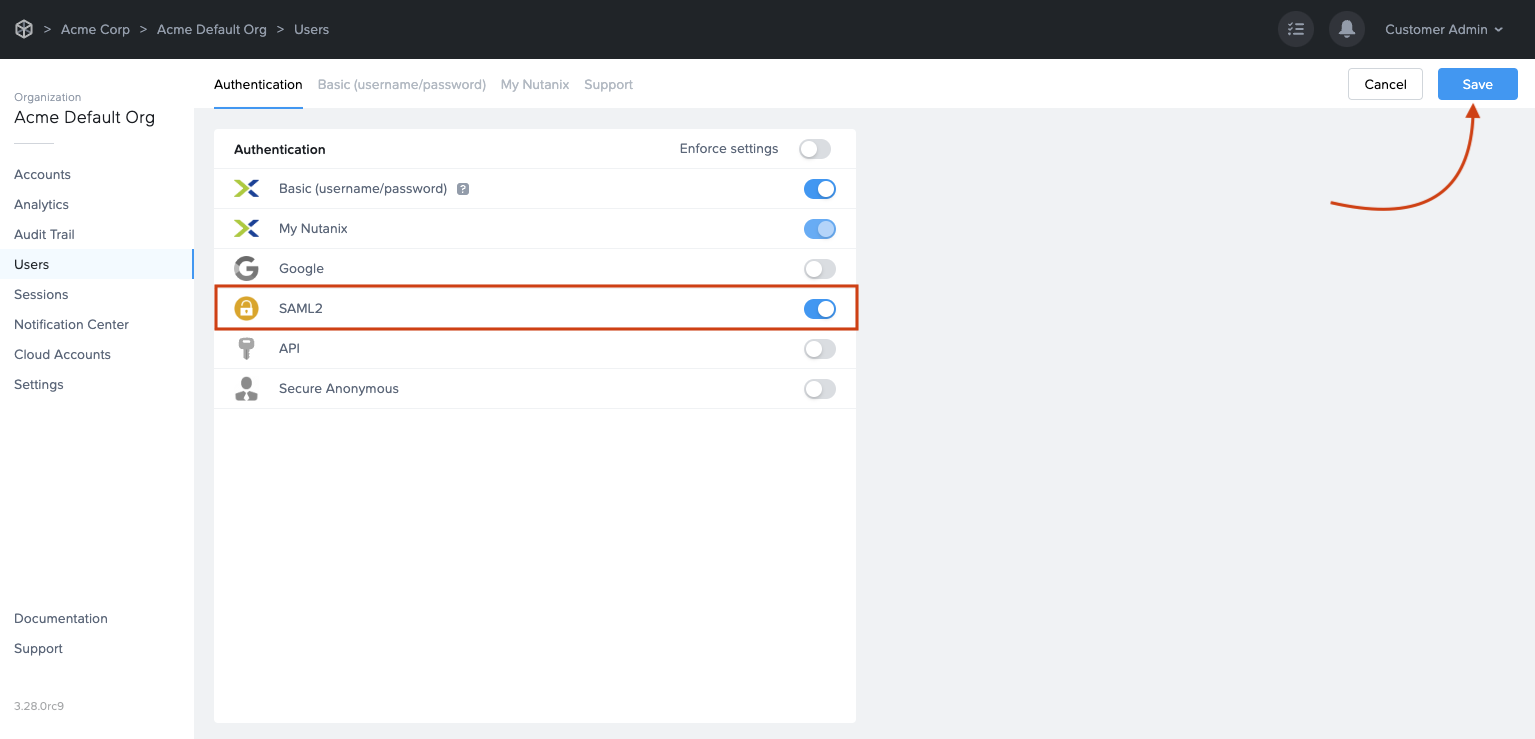
Before a SAML2 identity provider can be added, the administrator must enable SAML2 Providers at a given level by navigating to the Admin Console. From there, navigate to the Customer or Organization page (depending on where you wish to add the IdP). Select Users from the left-hand menu.
noteUnless there is a specific reason to do otherwise, adding the SAML2 Provider at the Customer or Organization level is best practice.
-
Enable the SAML2 toggle under the Authentication tab and click Save.

-
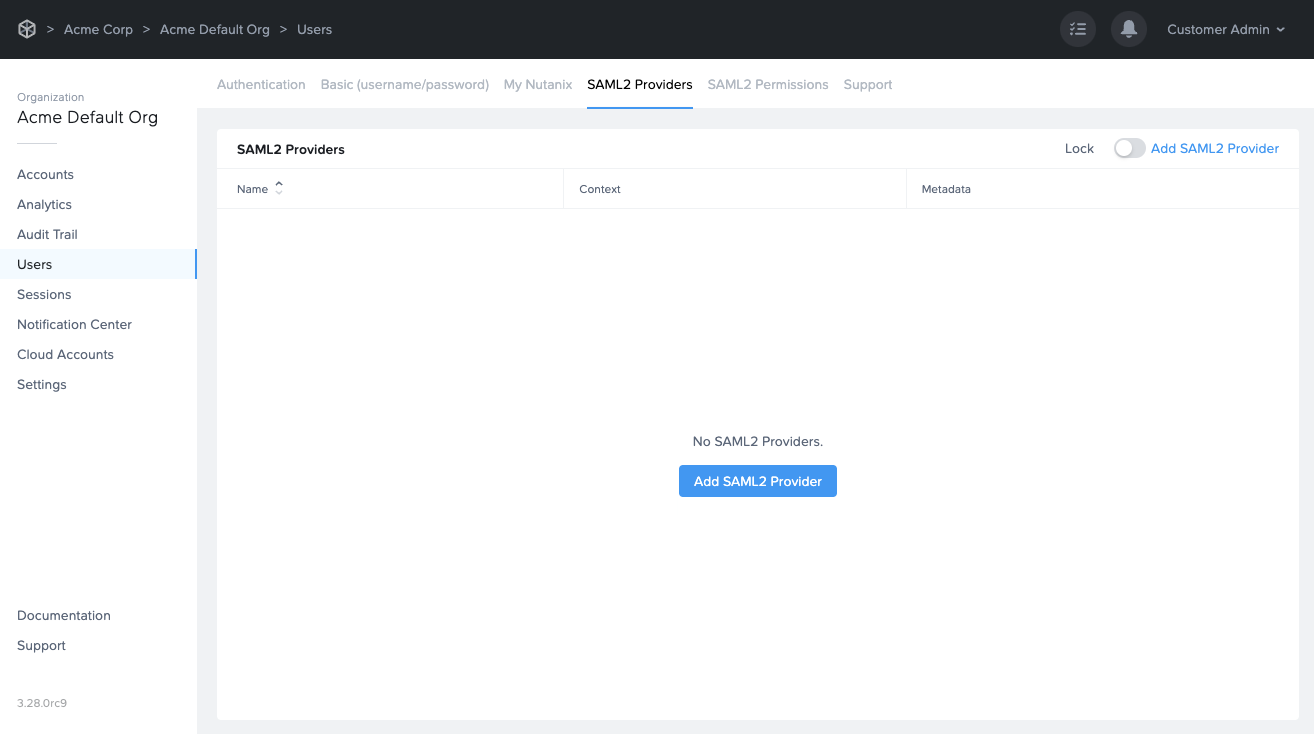
You'll see a new "SAML2 Providers" tab appear; click it and you'll see a Add SAML2 provider button.

Creating a SAML2 Provider
-
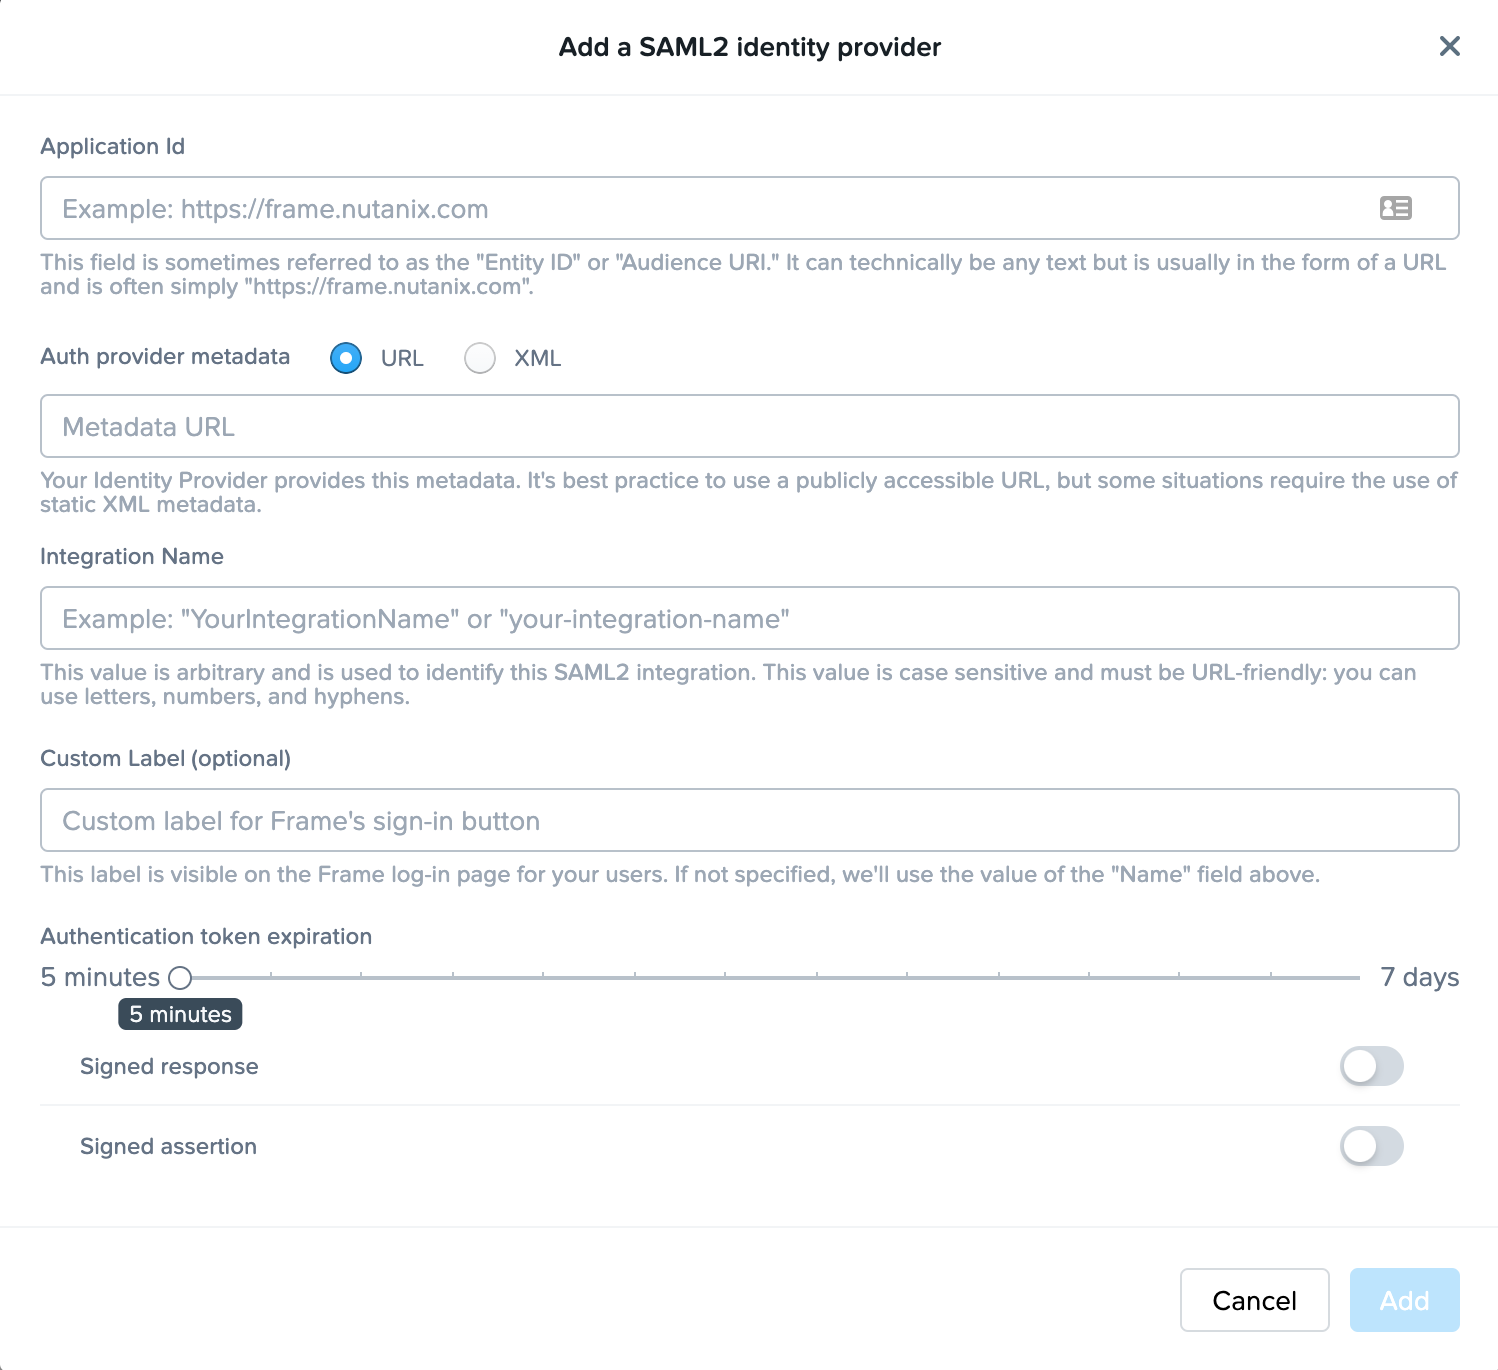
In the SAML2 Providers tab, click Add SAML2 Provider at the top right. A dialog to add a SAML2 provider will appear.

- Application Id: This field is sometimes referred to as Service Provider (SP) "Entity ID" or "Audience URI". It can technically be any text but is usually in the form of a URL and is often simply
https://frame.nutanix.com. For successful authentication, it is important that value entered in this field matches at least one of the values within "Audience Restriction" list that is part of the SAML2 assertion created by Identity Provider (IdP). - Auth provider metadata: Check the "URL" option and paste the Identity Provider metadata URL from your SAML2 IdP. The metadata URL must be publicly accessible to Frame Platform on the Internet.
- Integration Name: Enter your unique SAML2 Integration name here. This is defined in the Getting Started section at the beginning of this page.
- Custom Label: When specified, this value will be used in the login page as
Sign in with <Custom Label>. - Authentication token expiration: Set the desired expiration time for the authentication token. This can range from 5 minutes to 7 days. If the user is inactive for the configured amount of time, Nutanix Console will logout the user from Nutanix Console. If the user is active within the console (e.g., clicks on hyperlinks, moves the mouse/cursor, scrolls, or presses keys), the token will be renewed just before the user token expires. If the user is in a Frame session, the token is automatically renewed so the user is not disconnected while in session.
- Signed response: Disable or enable based on your SAML2 identity provider.
- Signed assertion: Disable or enable based on your SAML2 identity provider.
noteThe SAML2 identity provider is typically configured to sign the SAML2 Authentication Response message or the SAML2 Assertion embedded within the Authentication Response message (and not both). The choice of what is signed by the SAML2 IdP must be the same choice in the Frame SAML2 IdP configuration. Otherwise, Frame will return a identity provider misconfiguration error when Frame processes the SAML2 Authentication Response from the SAML2 IdP.
- Application Id: This field is sometimes referred to as Service Provider (SP) "Entity ID" or "Audience URI". It can technically be any text but is usually in the form of a URL and is often simply
-
Click Add when ready to create the SAML2 Provider definition.
Configure your SAML2 IdP
-
Each SAML2-compliant identity provider will have its own configuration requirements. However, there are some common configuration parameters used by SAML2 identity providers:
-
Frame Metadata URL: This URL is in the form:
https://img.frame.nutanix.com/saml2/metadata/[SAML2_INTEGRATION_NAME]/. -
Single Sign-on URL or Assertion Consumer Service (ACS) URL: This URL is in the form:
https://img.frame.nutanix.com/saml2/done/[SAML2_INTEGRATION_NAME]/. The SAML2 IdP will send the SAML2 Authentication Response to this URL.
cautionAdministrators choosing to cache or store the Frame public key certificates in their SAML2 IdP will need to update those public key certificates when Dizzion renews them.
noteFrame does not support the SAML2 Single Logout Request.
-
Mandatory SAML2 Attributes
-
In order for Frame to display properly the user's first name, last name, and email address in the Dashboard and Launchpad, your SAML2 identity provider configuration must provide these four mandatory user attributes/values using the specified SAML2 attribute names, as described in the following table:
User attributeSAML2 attribute name First name Use givenName,/urn:mace:dir:attribute-def:givenName/, orhttp://schemas.xmlsoap.org/ws/2005/05/identity/claims/givenname
SAML2 nameFormat:urn:oasis:names:tc:SAML:2.0:attrname-format:basicLast name Use sn,/urn:mace:dir:attribute-def:sn/, orhttp://schemas.xmlsoap.org/ws/2005/05/identity/claims/surname
SAML2 nameFormat:urn:oasis:names:tc:SAML:2.0:attrname-format:basicEmail address Use mail,/urn:mace:dir:attribute-def:mail/,http://schemas.xmlsoap.org/ws/2005/05/identity/claims/emailaddress, orhttp://schemas.xmlsoap.org/ws/2005/05/identity/claims/name
SAML2 nameFormat:urn:oasis:names:tc:SAML:2.0:attrname-format:basicName ID NameID
SAML2 nameFormat:urn:oasis:names:tc:SAML:2.0:nameid-format:persistent
Optional SAML2 Attributes
Customers can configure their SAML2 IdP to include additional SAML2 attributes in the SAML2 Authentication Response messages to Frame Console. These SAML2 attributes and their user-specific values can then be referenced when configuring Frame SAML2 Permissions to enforce role-based access control (RBAC).
The most common SAML2 attribute included by administrators in SAML2 Authentication Response messages would be a SAML2 attribute that is associated with a list of groups, such as a list of Active Directory groups, that the user is a member of. This allows the administrator to the SAML2 Permissions based on groups (and not individual user email addresses) and then associate the users to those groups in their IdP (or Active Directory, if their SAML2 IdP is connected to their Active Directory).
Frame also supports two Frame-specific SAML2 attributes to customize the logout/login workflow:
-
frame_logout_url: user is directed to this URL when the user logs out of the Launchpad or if they decide to leave Frame after being logged out due to inactivity.
-
frame_login_url: user is directed to this URL when the user wants to log back into Frame after being logged out due to inactivity.
When adding additional SAML2 attributes, make sure to record the optional attribute name(s) to be used (and possible values). For example:
groupsDepartmenthttp://schemas.xmlsoap.org/claims/Grouphttp://schemas.microsoft.com/ws/2008/06/identity/claims/groups
as the exact attribute name must be referenced in the condition section with the appropriate values of a SAML2 Permissions authorization rule.
Configuring SAML2 Permissions
Once the SAML2 Provider is successfully configured in the Nutanix Console, administrators will need to add authorization rules from the SAML2 Permissions tab listed to the right of the SAML2 Provider tab.

Add roles/permissions for your users by following our Roles and User Permissions with a SAML2 IdP guides.
Once you've configured permissions for your users, that's it! You're ready to test signing into Frame at your Entity URLs (Launchpad, Account Dashboard, etc.)!
The Group claim, created in the prior section, must be referenced as http://schemas.xmlsoap.org/claims/Group when creating the SAML2 Permission authorization rule.
Customer Administrators have the option to lock SAML2 IdP configurations at the Customer level of the Frame tenant. When the toggle pictured below is enabled, SAML2 IdP integrations cannot be added from the Organization or Account levels of the Frame tenant.

Signing into Frame with your SAML integration
Your SAML integration will now appear to your users as a sign in button on your specific Frame Sign in Page.