Management
Management of SGA 4 Nodes and Clusters is on the Streaming Gateway page at either the Customer or Organization entity level. The SGA management functionality will depend on whether you have deployed the SGA Cluster using Frame (Automatic Deployment) or manually (Manual Deployment).
Automatic Deployment
With automatic deployment of an SGA Cluster, Frame is responsible for the lifecycle of all network resources and the SGA VMs. The Frame Accounts must have been created using Frame-managed networking in order for administrators to use Automatic Deployment of SGA. If a Frame account was created using customer-managed networking, then the administrator must manually deploy the SGA cluster and nodes following the instructions under Manual Deployment.
If you are creating an SGA 4 cluster with the expectation of upgrading from existing SGA 3.x Frame accounts, please ensure you use a non-overlapping CIDR for the SGA 4 cluster. To accomplish this, enable the "Use custom CIDR range" slider in the Create Streaming Gateway Cluster configuration form.
Create Cluster
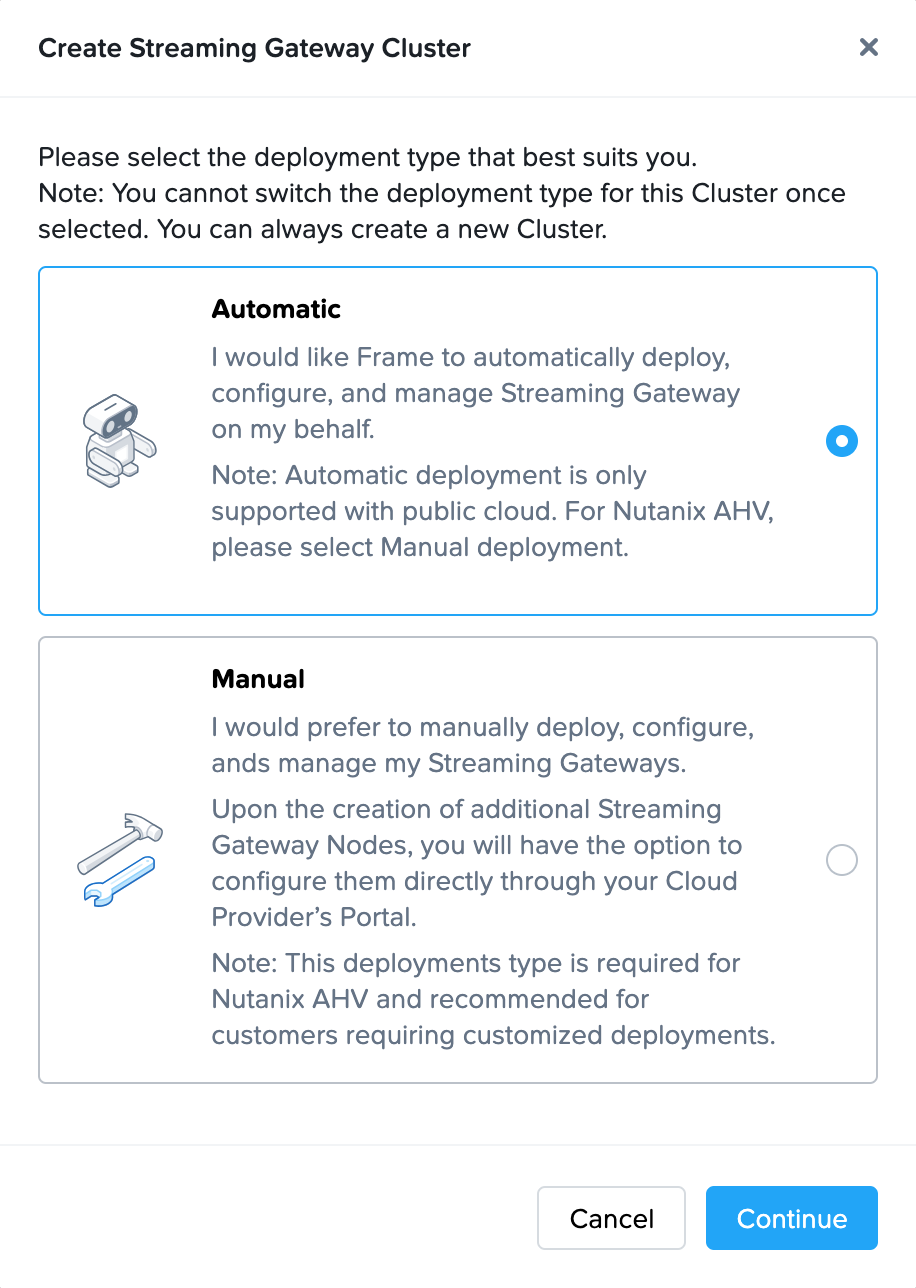
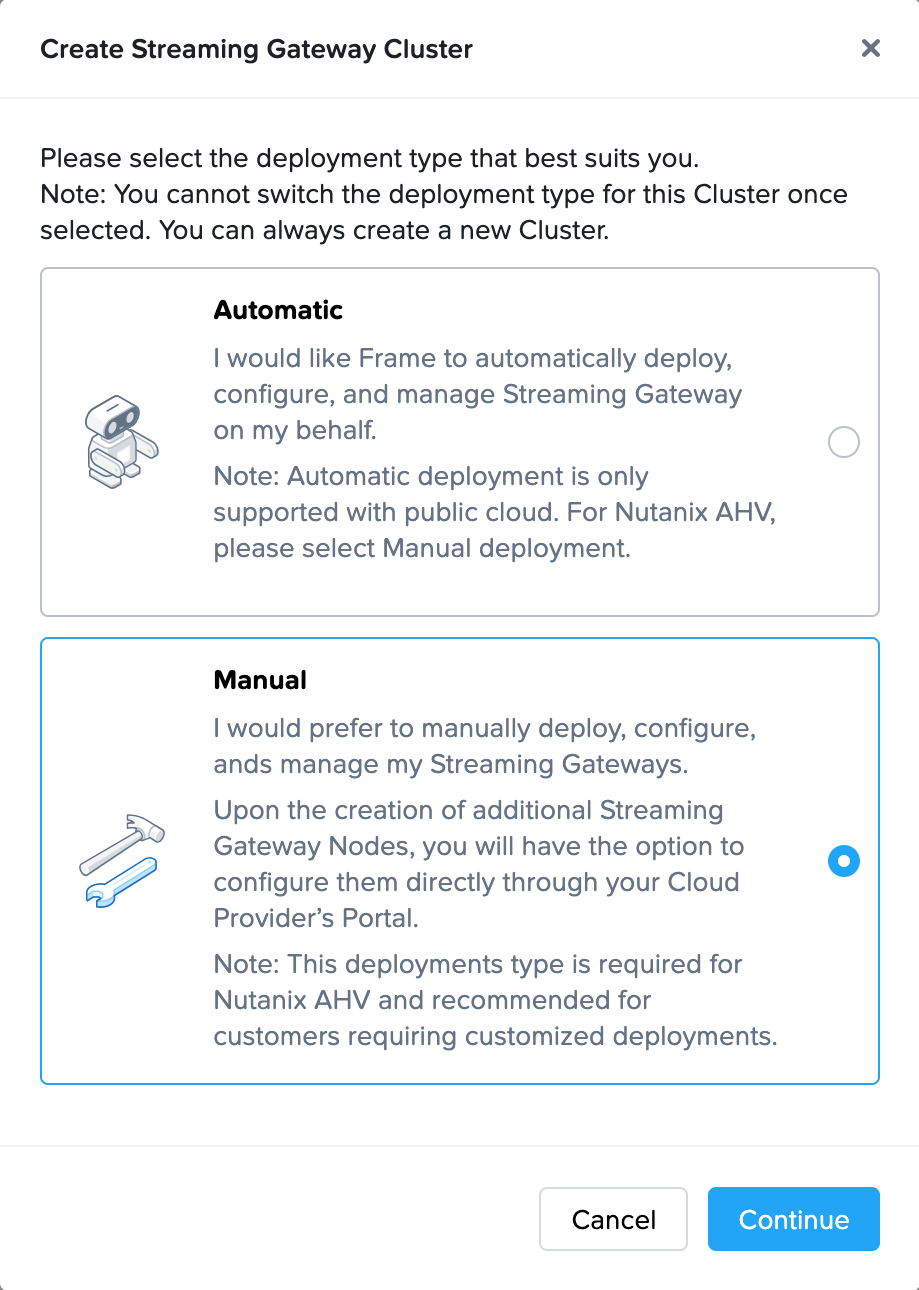
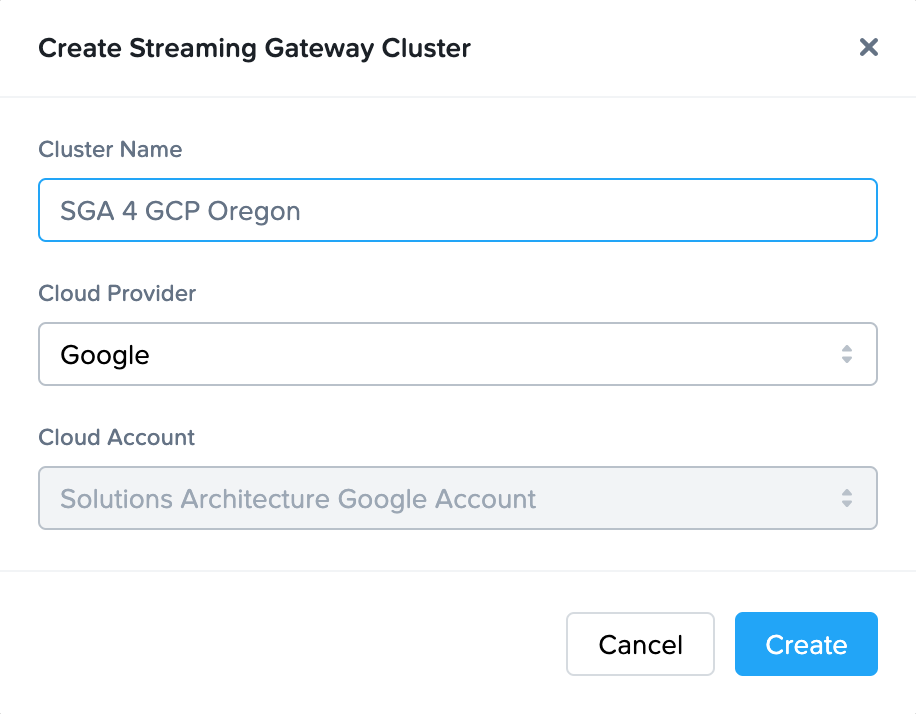
- To create a new SGA cluster, go to the Frame Console and at the Frame Customer or Organization entity level, click on Streaming Gateways on the lefthand menu.
- Click on Create New Cluster in the upper right corner.
-
Select “Automatic” (Frame creates all resources) and then click the Continue button.
-
Complete the Create Streaming Gateway configuration form.
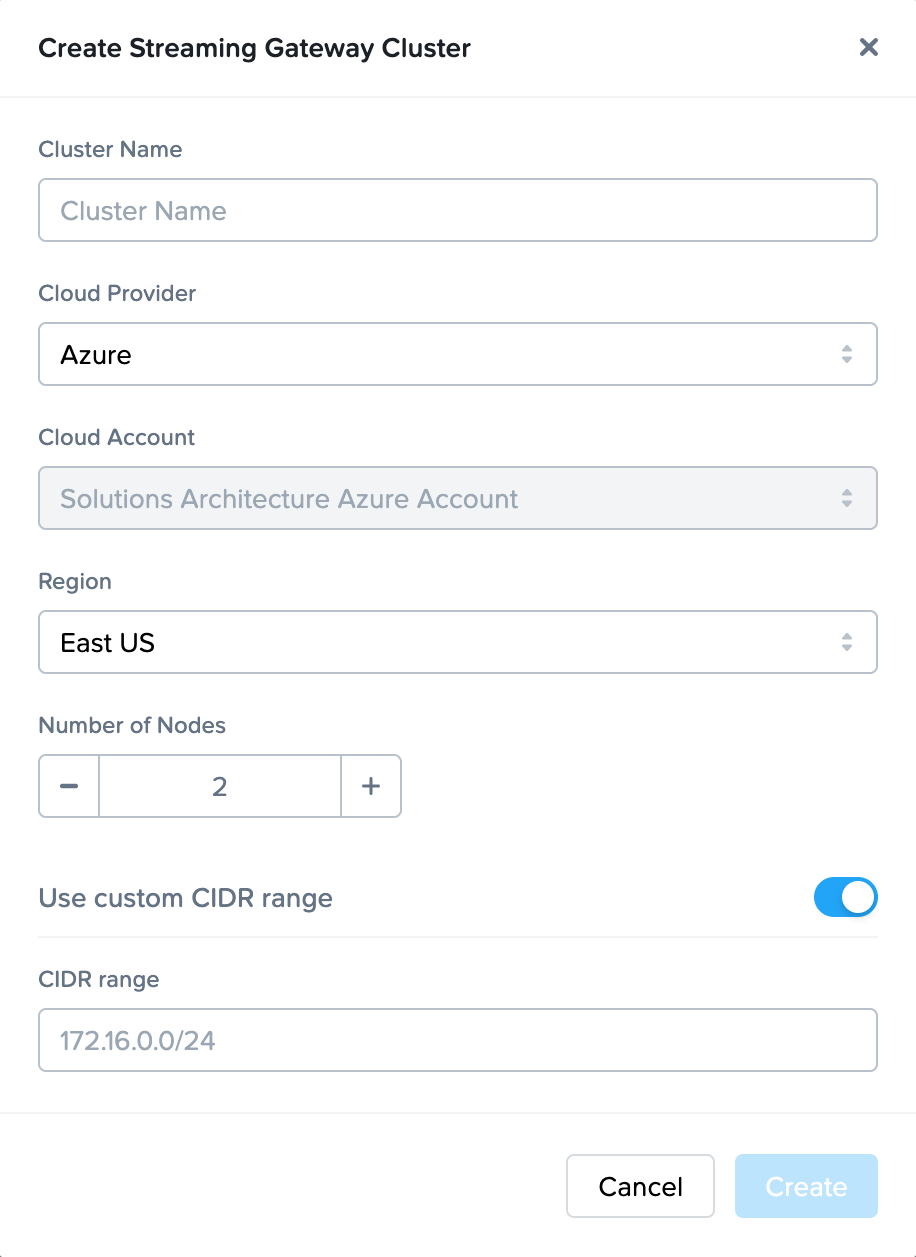
- Name: Name of the SGA cluster. The name of each SGA node will be the SGA cluster name appended with a unique ID.
- Cloud Provider: Select the cloud provider you wish to use for this SGA cluster.
- Cloud Account: Select the Cloud Account where the public cloud resources for this cluster will be provisioned.
- Region: Select the cloud region where the SGA cluster will reside.
- Number of VMs: Specify the number of SGA nodes (VMs) to be provisioned.
- Custom CIDR: Specify the CIDR range where the SGA nodes will be provisioned (default 172.16.0.0/24).
- Once the required field values have been specified, click on the Create button to create the SGA Cluster and the SGA Nodes. You can view the status of the SGA Cluster on the Streaming Gateways page.
After your SGA cluster and SGA nodes have been created, you can then reference the SGA Cluster when creating your Frame Account so that your newly created Frame account uses the SGA Cluster.
Delete Cluster
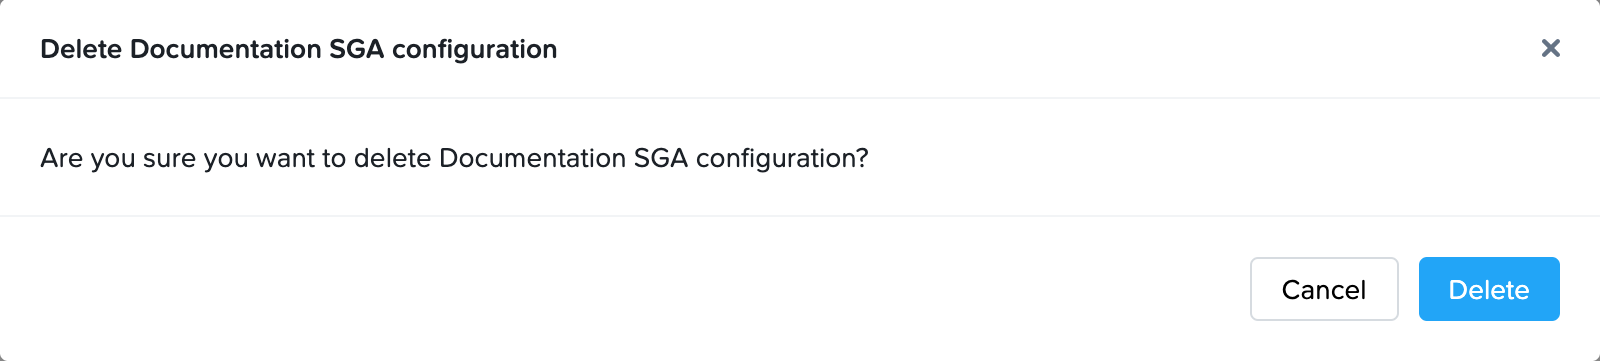
A SGA Cluster can be deleted only if there are no Frame Accounts attached to the cluster.
-
To delete an SGA cluster, go to the Frame Console and at the Frame Customer or Organization entity level where the SGA Cluster is defined, click on Streaming Gateways on the lefthand menu.
-
Click on the kebab menu to the right of the SGA Cluster and select Delete.

- You will be asked to confirm that you wish to delete the SGA cluster. Click Cancel or Delete.
For SGA 4 clusters that were automatically deployed, Frame Console will terminate the SGA Nodes and the related SGA network resources (subnets, VPC/VNET) in the infrastructure and then delete the SGA Cluster.
Add Node
Customer administrators can add another SGA 4 Node to their SGA Cluster at any time.
- For automatically deployed SGA Clusters, navigate to the Streaming Gateways page and locate the SGA Cluster you wish to add a new SGA Node.

- Click on + Add a Node. Frame will provision a new SGA VM and wait for the VM to register.

- The Status of the SGA Node will change from
Pending registrationtoAvailableonce the SGA Node registers.
Frame Platform will provision SGA VM(s) on the following instance/machine types. These VMs will run 24x7 since users need to be able to access the workload VMs at any time. Administrators can manually power off and power on SGA VMs that are auto deployed.
- AWS: c5.xlarge, 30 GB disk
- Azure: D4 v3, 30 GB disk
- GCP: e2-standard-4, 50 GB disk
- IBM: cx3d-4x10, 130 GB disk
Delete Node
Customer administrators can delete an existing SGA 4 Node from their SGA Cluster at any time, except when:
- The SGA 4 node is powered on.
- There is only one SGA 4 node left and there are one or more Frame accounts attached to the SGA Cluster.
- For automatically deployed SGA Clusters, navigate to the Streaming Gateways page and locate the SGA Cluster you wish to delete one of the existing SGA Nodes. Note that the SGA Node to be deleted must be powered off with status
Unavailable.

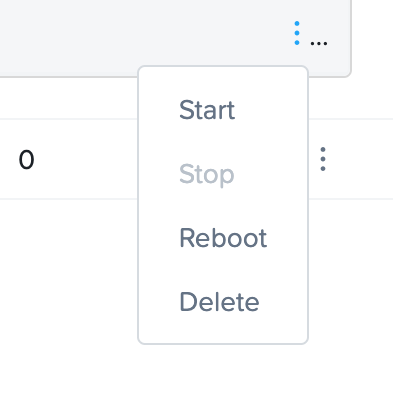
- Click on the kebab menu for the powered off SGA node and select Delete.
- Confirm that you wish to delete the SGA Node by clicking on the Delete node button.
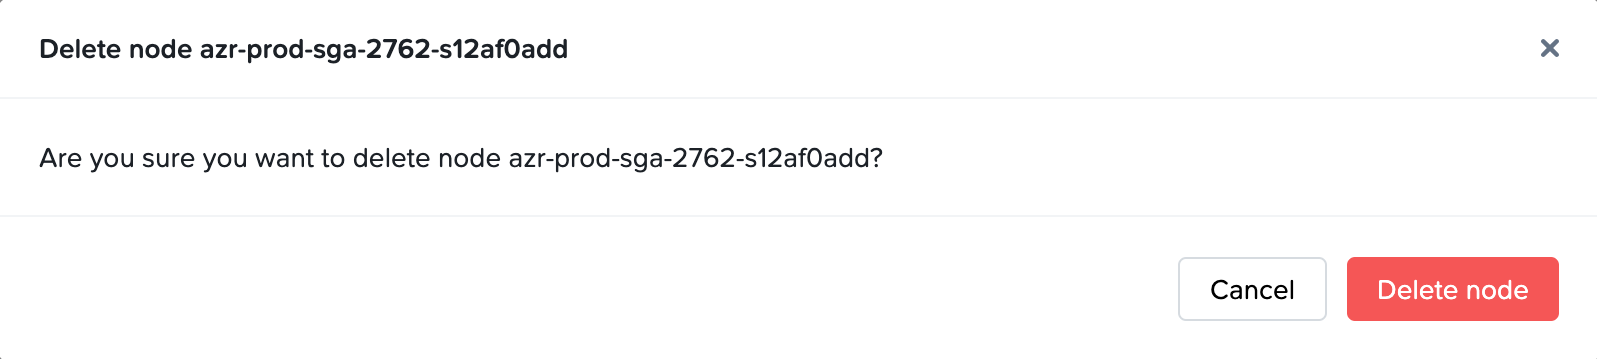
- Once the SGA Node is deleted, the SGA Node will be removed from the list of nodes for the SGA Cluster.

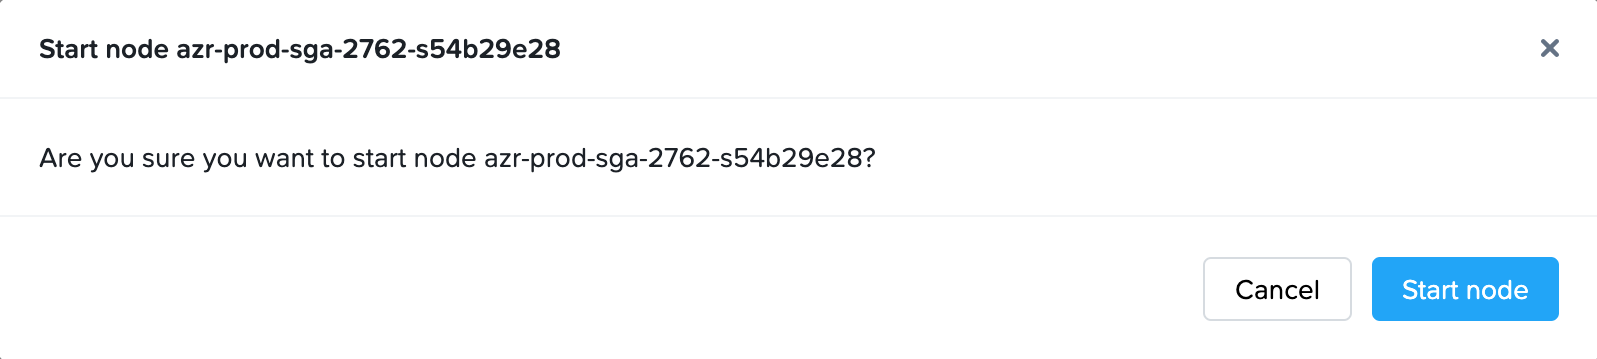
Power On Node
With automatically deployed SGA 4 Clusters, customer administrators can power on an existing automatically deployed SGA 4 Node, if the VM is powered off.
- Navigate to the Streaming Gateways page and locate the SGA Cluster containing one or more SGA Nodes you wish to power on.

- Click on the kebab menu and select Start.
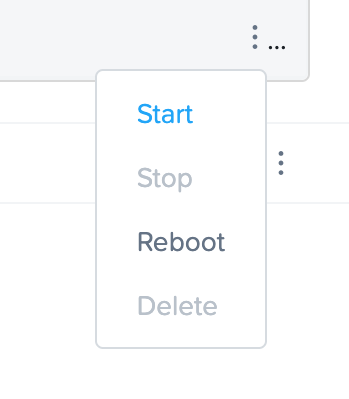
- You will be asked to confirm that you wish to power on the SGA Node.
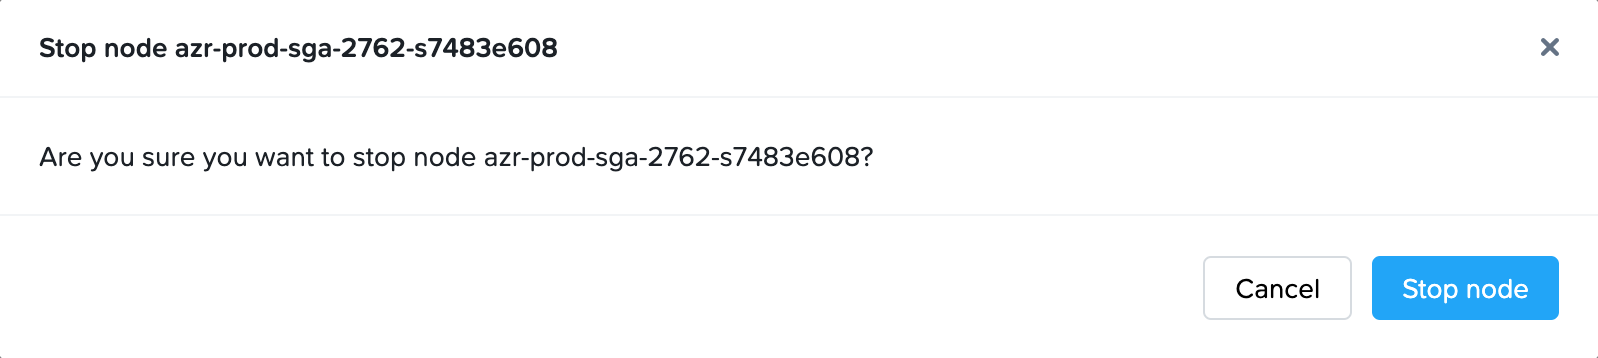
Power Off Node
With automatically deployed SGA 4 Clusters, customer administrators can power off an existing automatically deployed SGA 4 Node, if the VM is powered on.
- Navigate to the Streaming Gateways page and locate the SGA Cluster containing one or more SGA Nodes you wish to power off.

- Click on the kebab menu and select Stop.
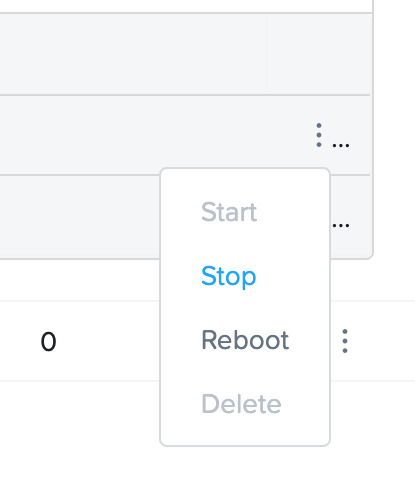
- You will be asked to confirm that you wish to power off the SGA Node.
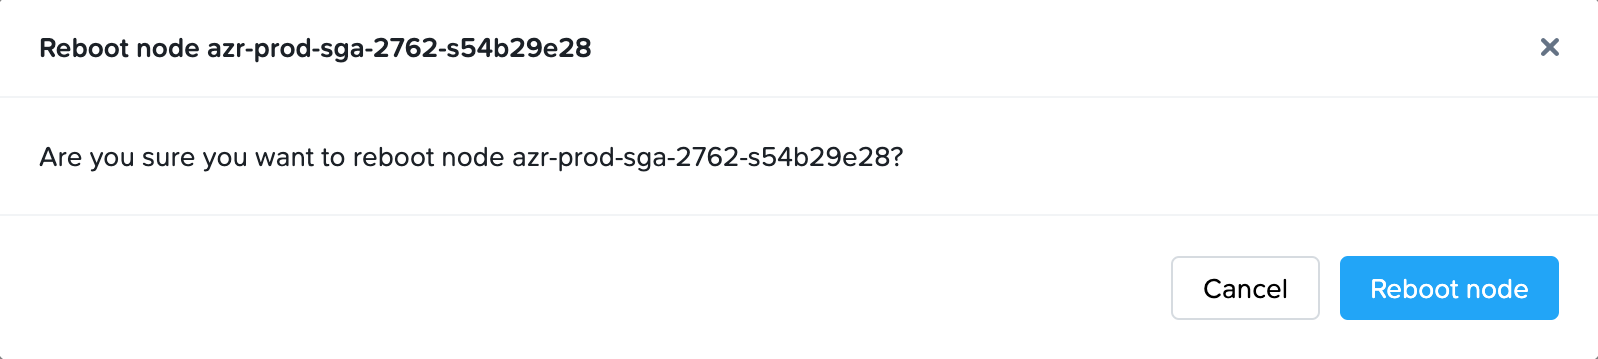
Reboot Node
With automatically deployed SGA 4 Clusters, customer administrators can reboot an existing automatically deployed SGA 4 Node.
- Navigate to the Streaming Gateways page and locate the SGA Cluster containing one or more SGA Nodes you wish to power off.
- Click on the kebab menu and select Reboot.
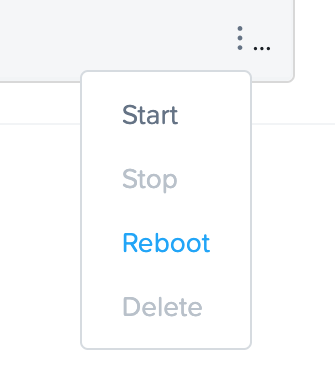
- You will be asked to confirm that you wish to reboot the SGA Node.
Manual Deployment
With manual deployment of an SGA Cluster, the customer is responsible for the lifecycle of all network resources and the SGA VMs. The Frame Accounts must have been created using customer-managed networking in order for administrators to use Manual Deployment of SGA. If a Frame account was created using Frame-managed networking, then the administrator must follow the instructions under Automatic Deployment of an SGA Cluster.
Create Cluster
- To create a new SGA cluster, go to the Frame Console and at the Frame Customer or Organization entity level, click on Streaming Gateways on the lefthand menu.
- Click on Create New Cluster in the upper right corner.
-
Select “Manual” and then click the Continue button.
-
Complete the Create Streaming Gateway configuration form.
- Name: Name of the SGA cluster. The name of each SGA node will be the SGA cluster name appended with a unique ID.
- Cloud Provider: Select the cloud provider you wish to use for this SGA cluster.
- Cloud Account: Select the Cloud Account where the public cloud resources for this cluster will be provisioned.
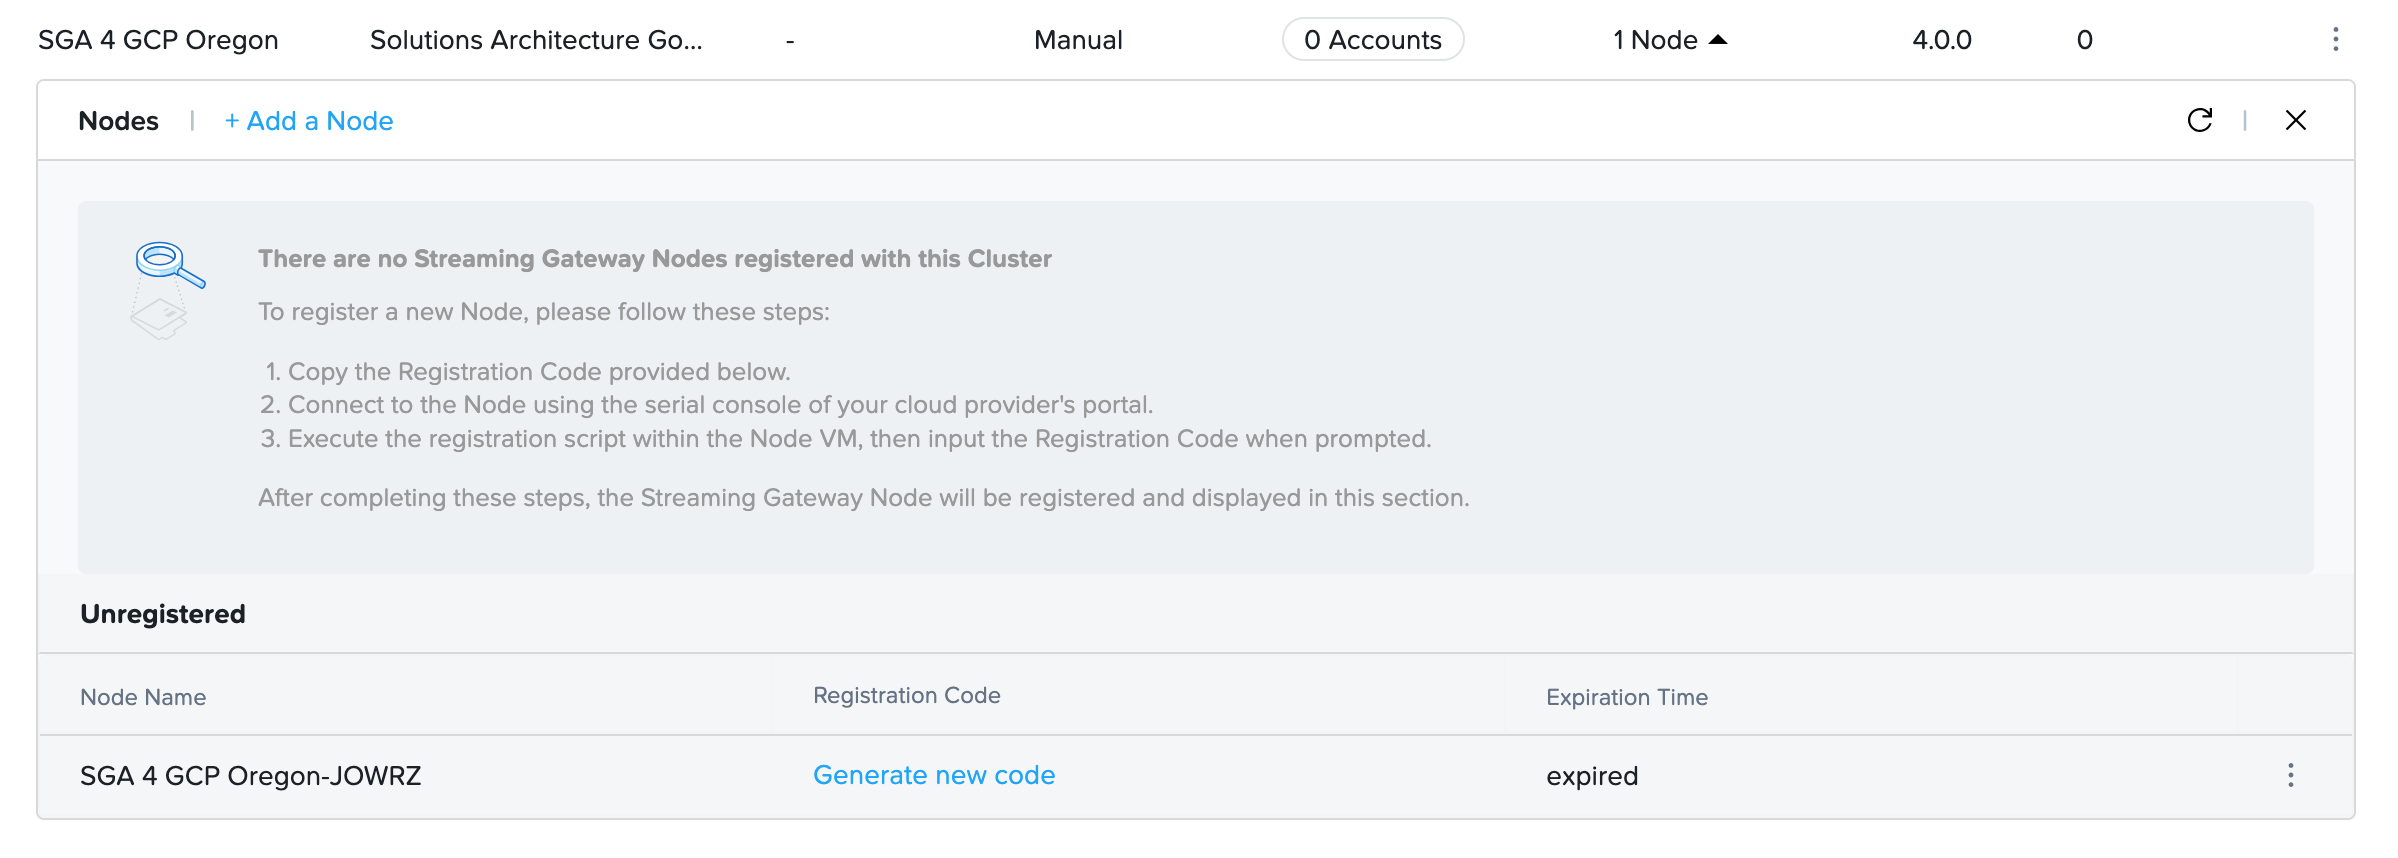
- Frame Console will display the newly created SGA Cluster and one SGA Node entry. Notice that Frame Console provides the Activation Code for this first SGA Node. You will need this Activation Code to register the SGA Node you manually provision.
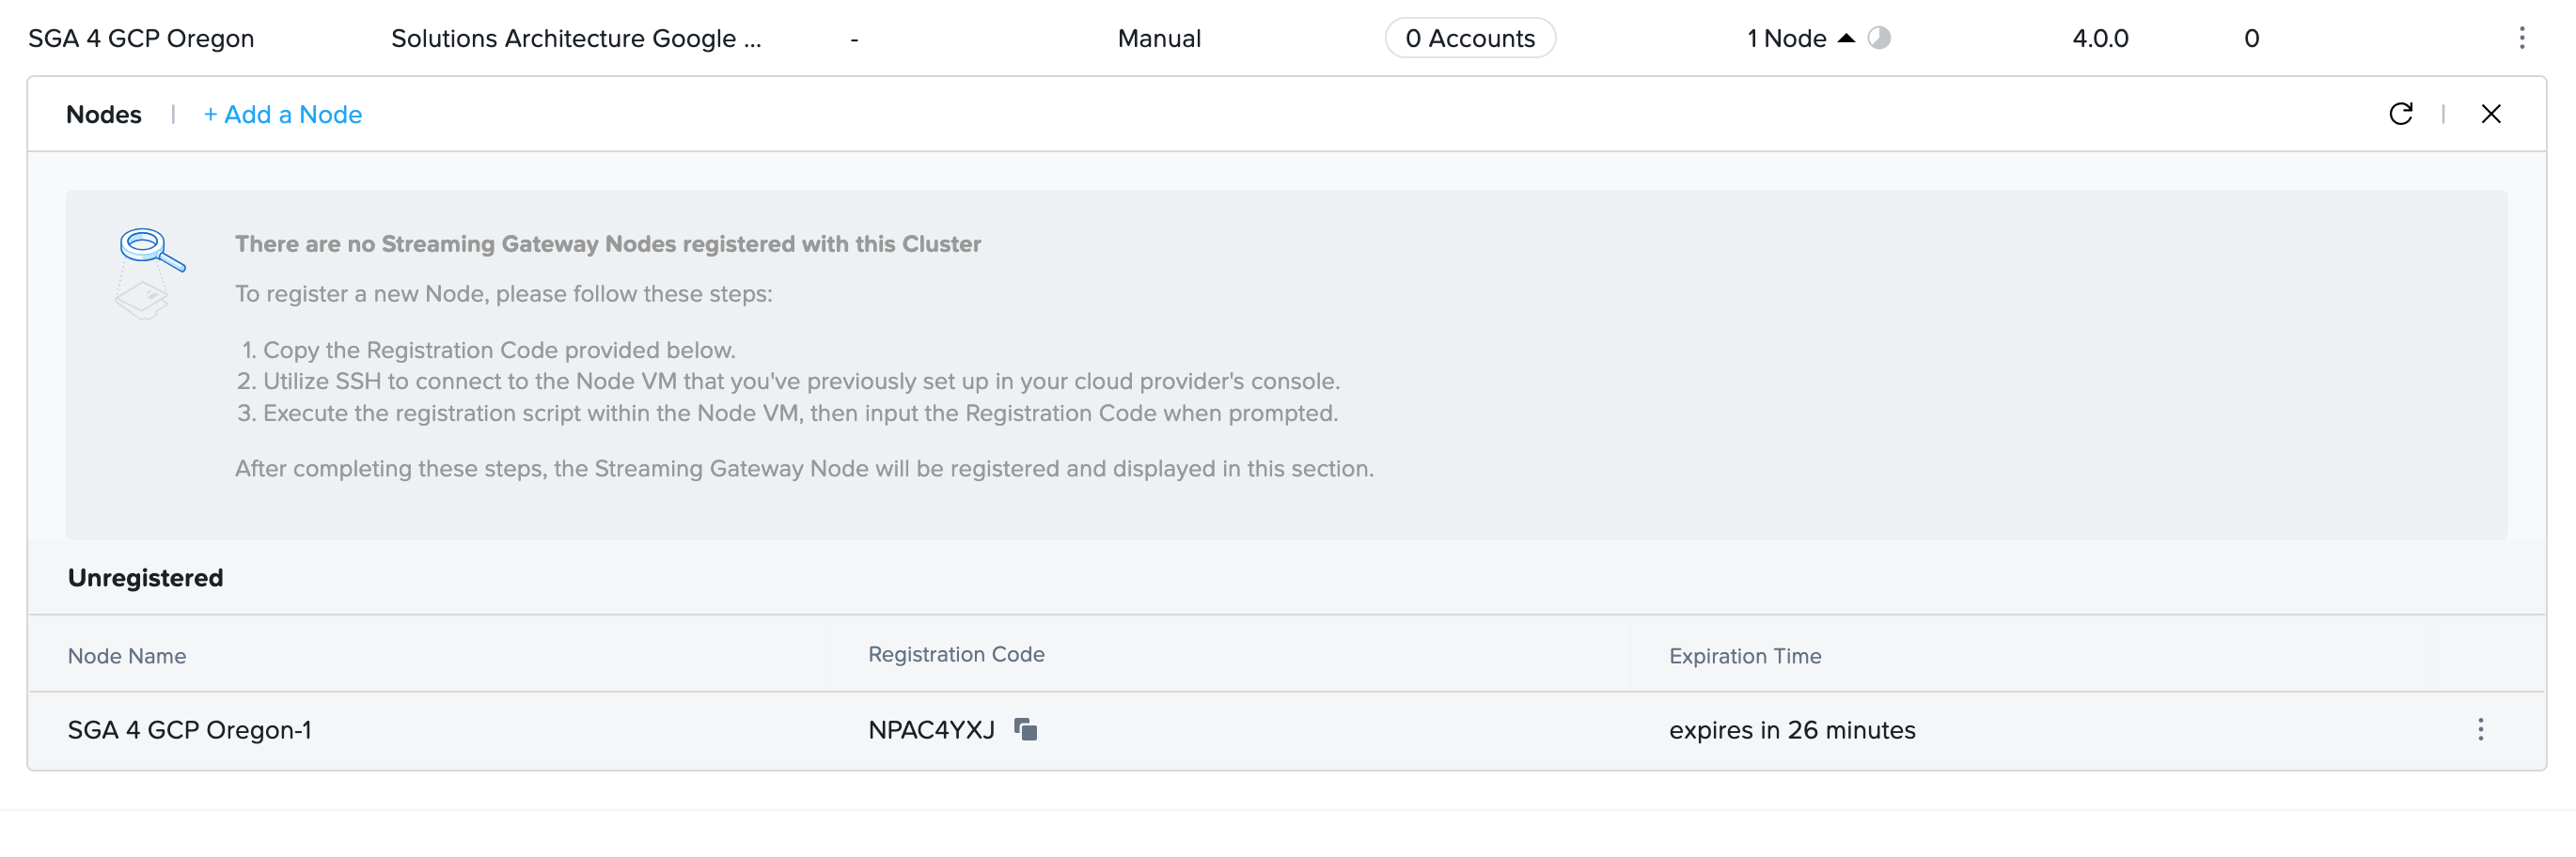
Once the SGA Cluster has at least one registered SGA Node, you can then reference the SGA cluster when creating new Frame accounts.
The Activation Code must be used within 30 minutes of creation. If the Activation Code expires, you may click on Generate new code on the SGA Node line to obtain a new Activation Code.
Delete Cluster
A SGA Cluster can be deleted only if there are no Frame Accounts attached to the cluster.
-
To delete an SGA cluster, go to the Frame Console and at the Frame Customer or Organization entity level where the SGA Cluster is defined, click on Streaming Gateways on the lefthand menu.
-
Click on the kebab menu to the right of the SGA Cluster and select Delete.
- You will be asked to confirm that you wish to delete the SGA cluster. Click Cancel or Delete.
If the SGA 4 cluster was manually deployed, Frame Console will delete the SGA Cluster in Frame Console. However, the customer is responsible for terminating the SGA Nodes and any related SGA network resources in their infrastructure.
Add Node
For customers who are manually deploying an SGA Cluster, you must manually provision and configure the SGA Nodes from within your infrastructure console.
Prerequisites
SGA 4 prerequisites are as follows:
- Download the Frame SGA disk image from the Downloads Page for the hypervisor/infrastructure on which you wish to deploy the SGA.
- Determine which data center or public cloud region where the SGA Nodes for the SGA Cluster will be provisioned. To minimize network latency for the best user experience, the SGA Nodes for an SGA Cluster and the associated Frame accounts using that SGA Cluster should be in the same data center or public cloud region.
- Configure the firewall(s) and networking to support the required FRP8 protocols/ports from the Internet to the SGA Cluster and from the SGA Cluster to the workload network (e.g., VLAN or VNET/VPC and subnet) as well as from the workload network back to the Internet via the SGA Cluster.
- Assign a static private IP address to each SGA VM.
- Assign a static public IP address to each SGA VM. The public IP address can be configured in a firewall or load balancer with network address translation (NAT) to the SGA VM private IP address.
Step 1: Provision the SGA Node
- To manually create an SGA Node, go to the Streaming Gateways page and find the Manually Deployed SGA Cluster that will have this new SGA Node. You may need to click on + Add a Node to add a new SGA Node to the SGA Cluster.
-
Look for the Activation Code for that unregistered SGA Node and copy it. You may need to click on Generate new code.
noteYou must enter the Activation Code into the unregistered SGA VM or provision the SGA VM using the SGA VM Cloud Configuration file within 30 minutes of the Activation Code being generated. Otherwise, you will need to generate a new Activation Code when the Activation Code expires.
The Activation Code will be provided to the SGA Node after you provision the SGA VM using your infrastructure provider's console and access the SGA VM via the serial console.
-
For manually deployed SGA VMs on AHV only, you must prepare an SGA VM cloud configuration file (YAML file) using the following template.
#cloud-config

runcmd:
- set_sga_env SGA_CLOUD_PROVIDER nutanixnoteYou will use this file during VM creation in AHV Step 10 below.
Verify that you have
#cloud-configas the first line in your SGA VM cloud configuration file.
- AHV
- AWS
- Azure
- GCP
- IBM
The following instructions assume you have already identified the AHV VLAN that the SGA will be placed in. The VLAN containing the SGA Nodes will need to be “public” (have a route from/to the Internet) and will need network connectivity to the private VLAN where the workloads are placed.
-
Create a new VM in Prism Central (or Prism Element), enter a name and set timezone to UTC.
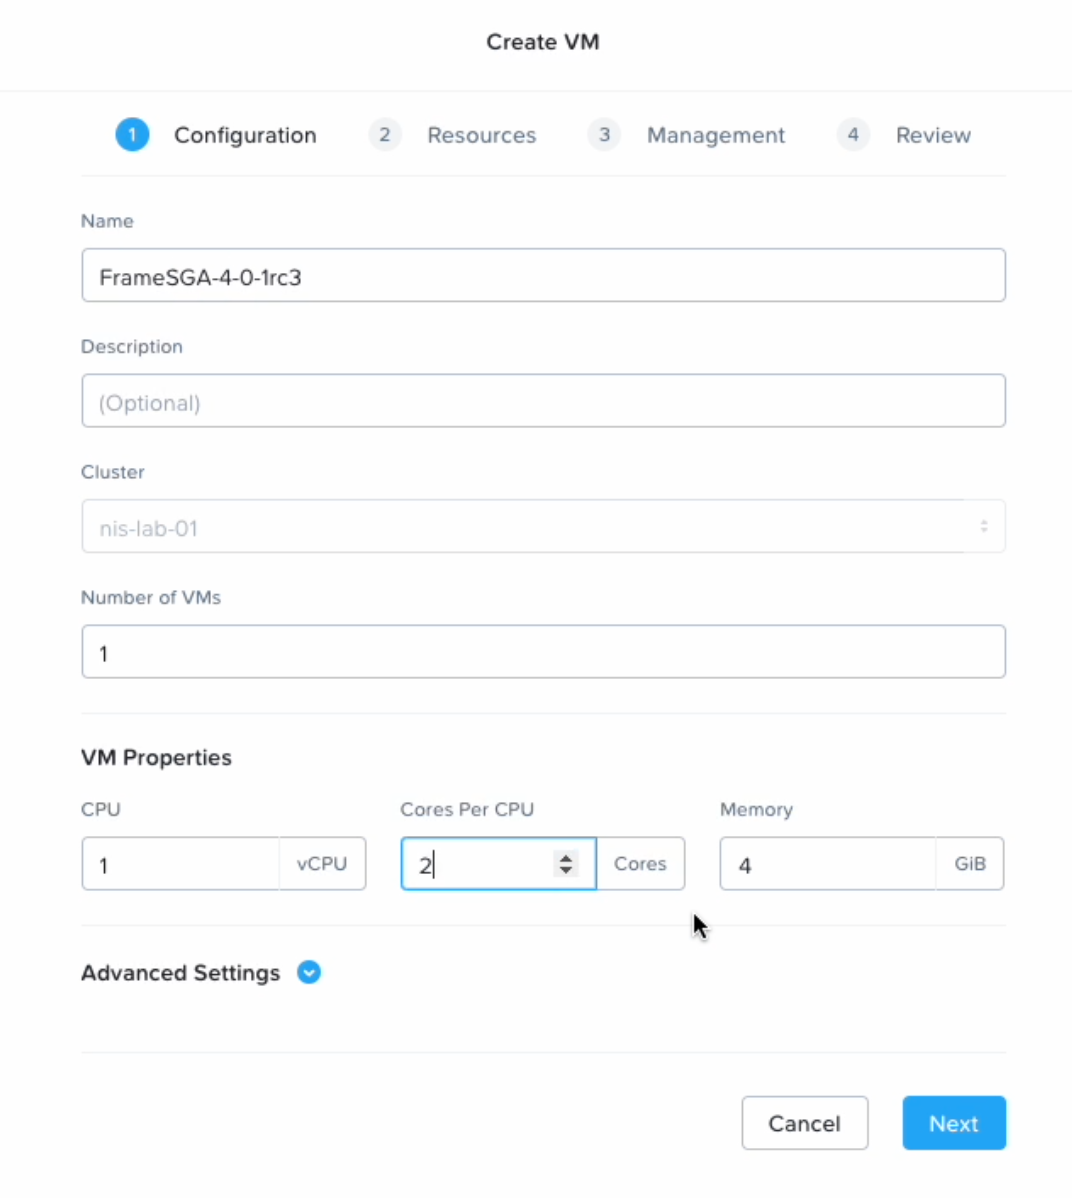
SGA VM Creation - VM Creation
The timezone must be set to UTC.
-
Configure Compute Details: SGA VMs should have at least two (2) vCPUs and 4GB RAM. This configuration supports up to 500 concurrent user sessions. Click Save.
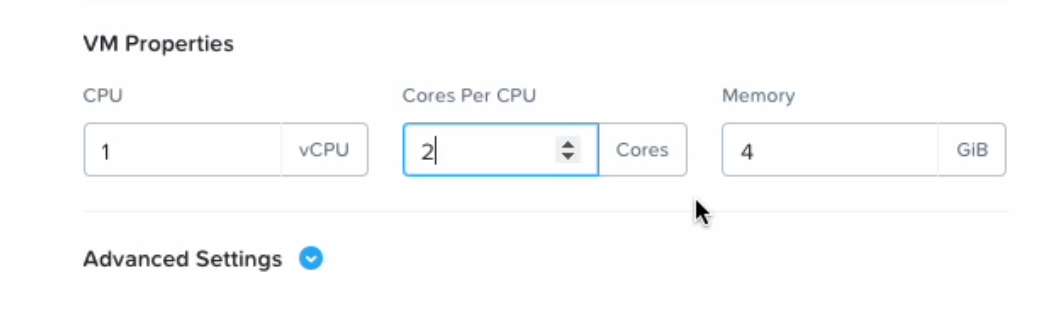
SGA VM Creation - VM Configuration -
Add the SGA disk image by clicking Attach Disk.
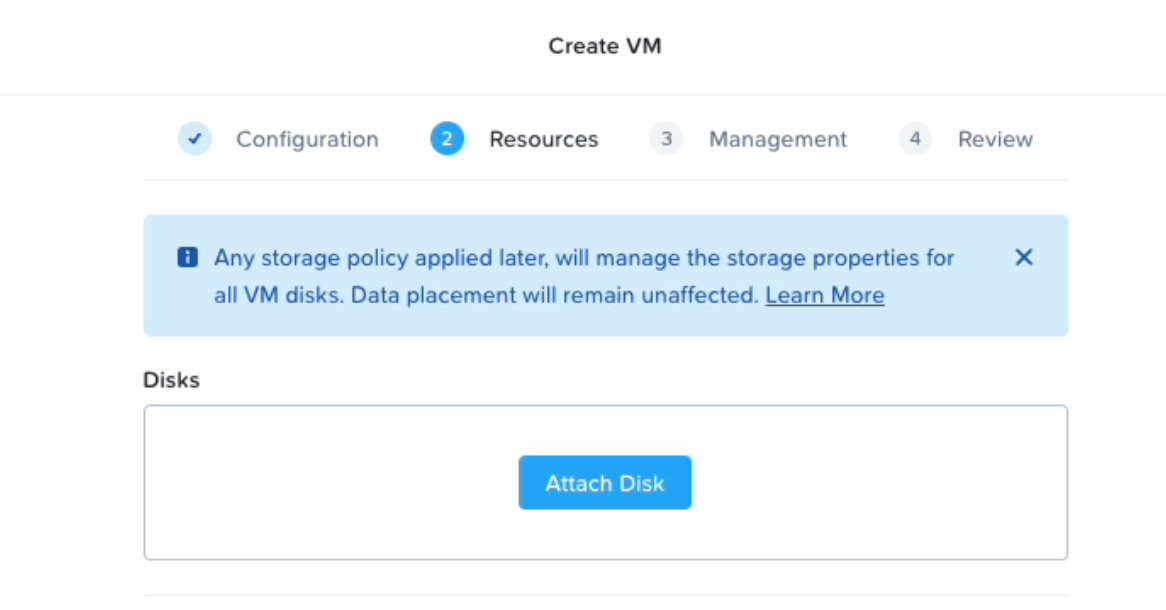
SGA VM Creation - Attach Disk -
Specify your Frame SGA disk image. Click Save.
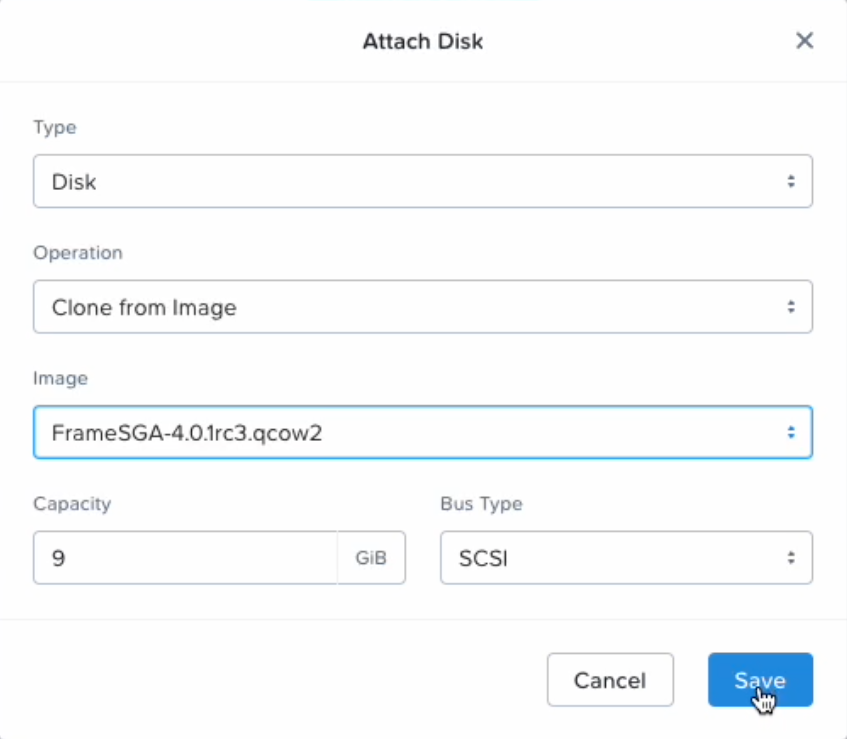
SGA VM Creation - Attach Disk -
Under “Networks,” click Attach to Subnet to assign the appropriate VLAN to the new VM. You can set a static private IP address of the SGA VM at this point or use Option 4, as discussed below, once the VM has been provisioned.
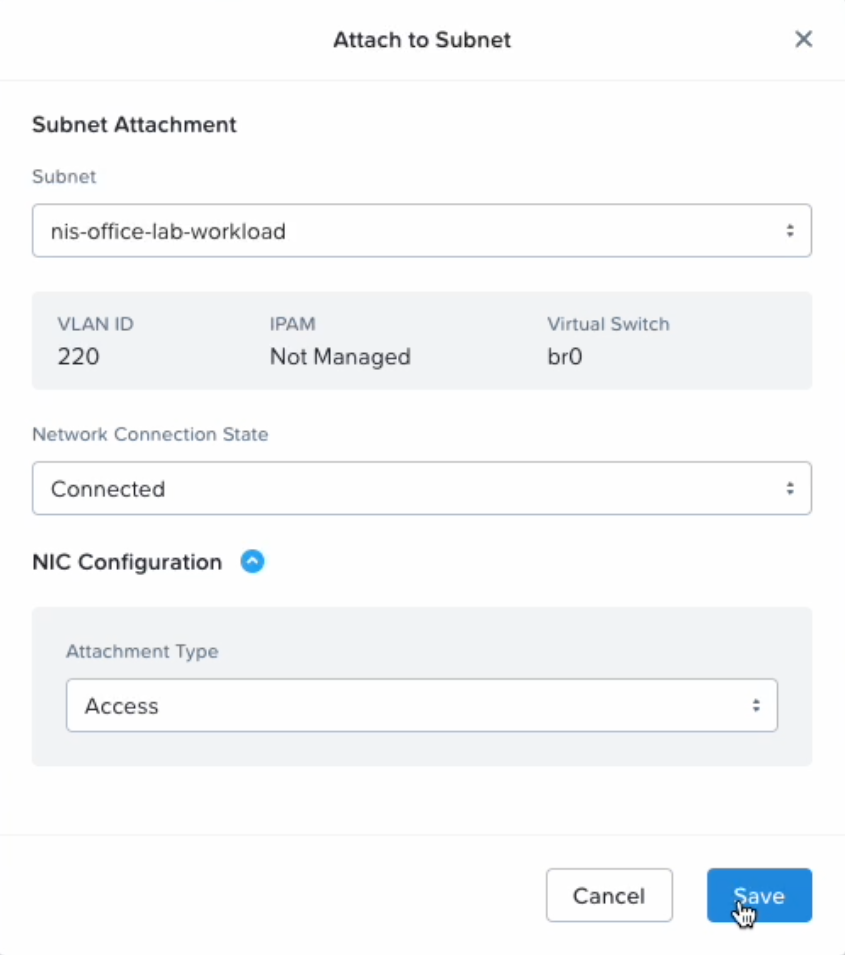
SGA VM Creation - Attach Subnet -
Click on "Legacy BIOS Mode" and click the "Confirm" button.
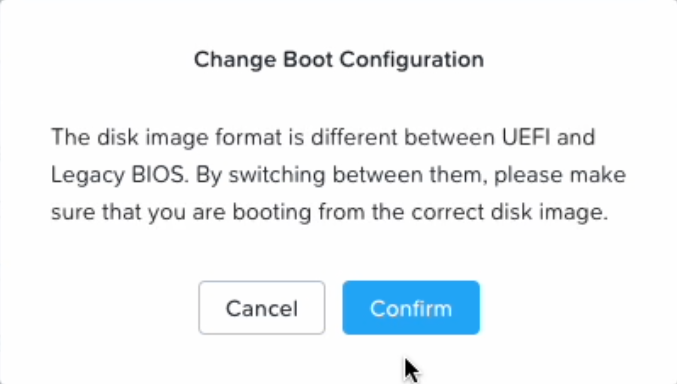
SGA VM Creation - Legacy BIOS Mode -
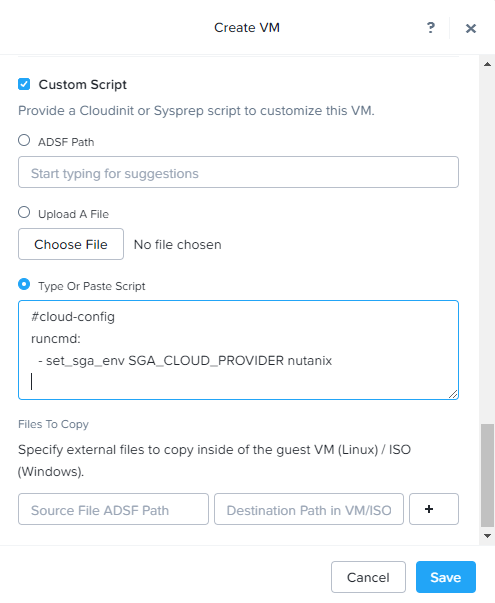
Under Guest Customization, set Script Type to
Cloud-initand enable the Custom Script option.
-
Paste in the SGA VM Cloud Configuration file from Step 3.
#cloud-config

runcmd:
- set_sga_env SGA_CLOUD_PROVIDER nutanix
- Select Next and then click Create VM on the final Review step.
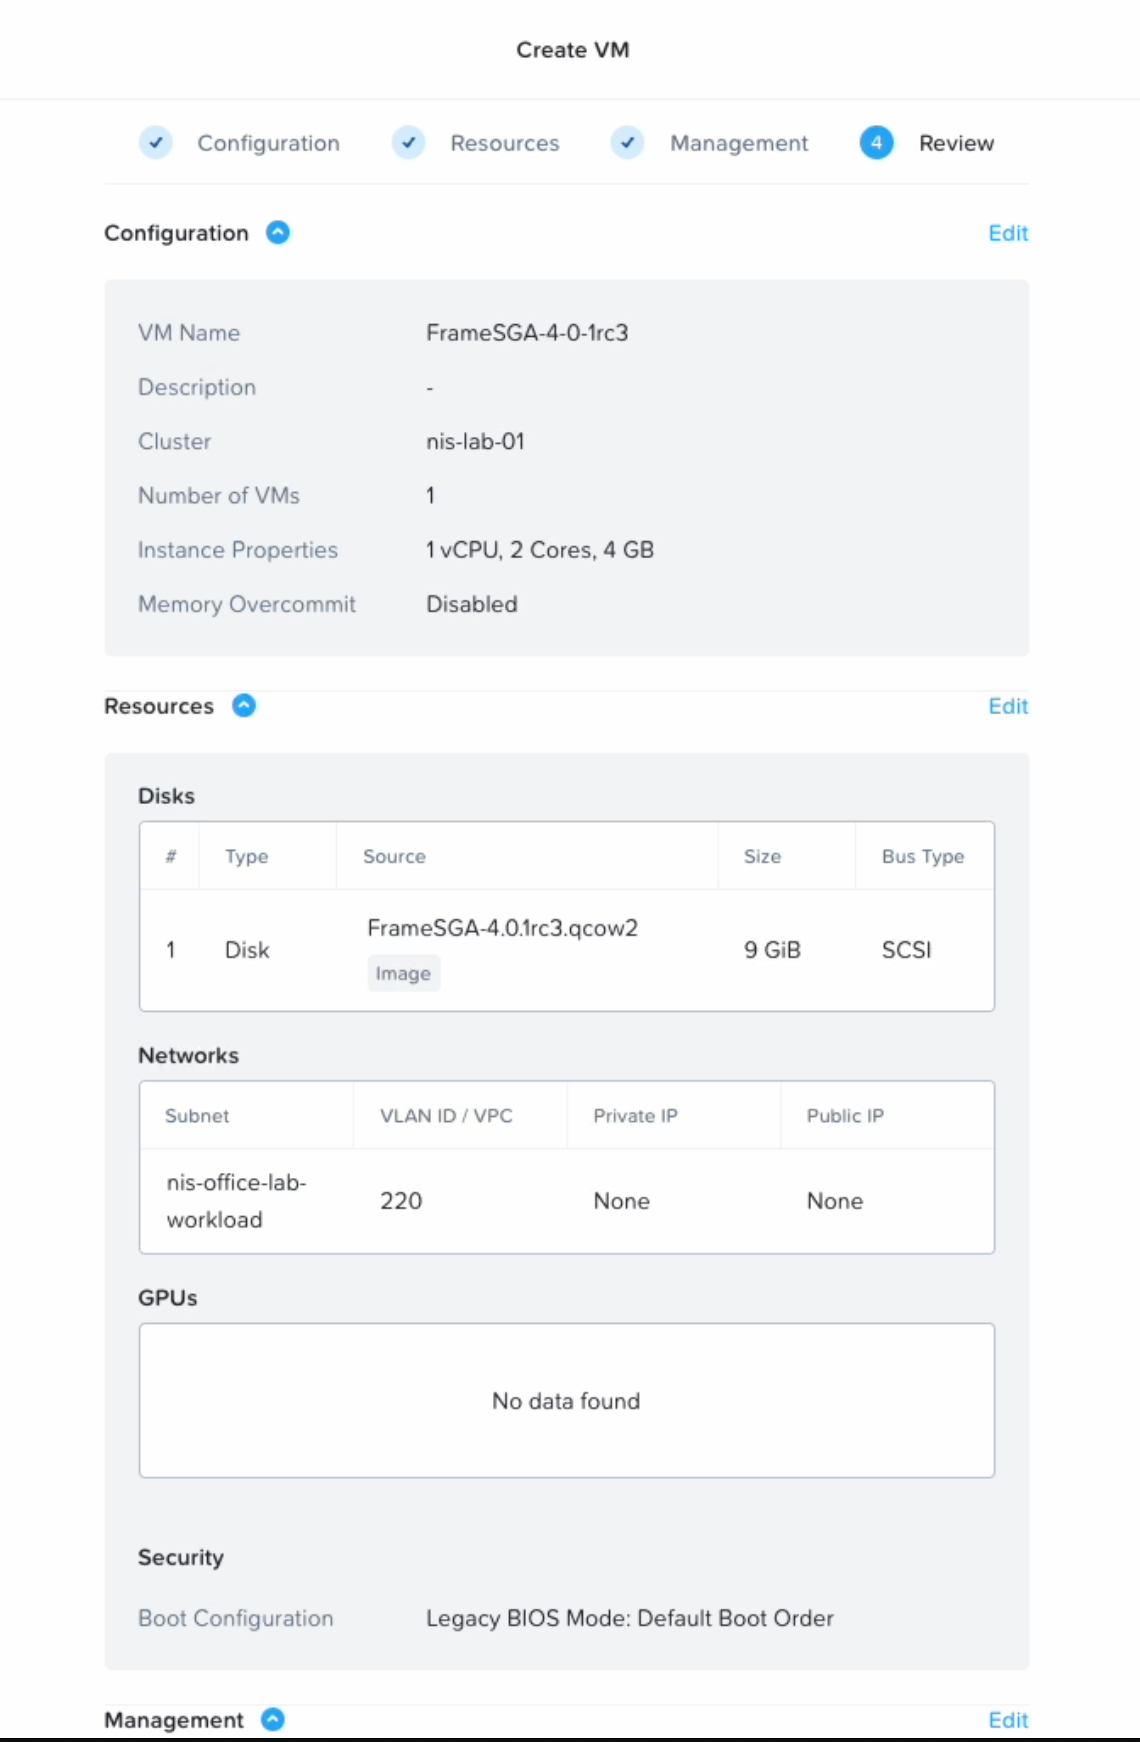
-
You should now be able to see the newly created VM in Prism.
SGA VM Creation - SGA VM in Prism -
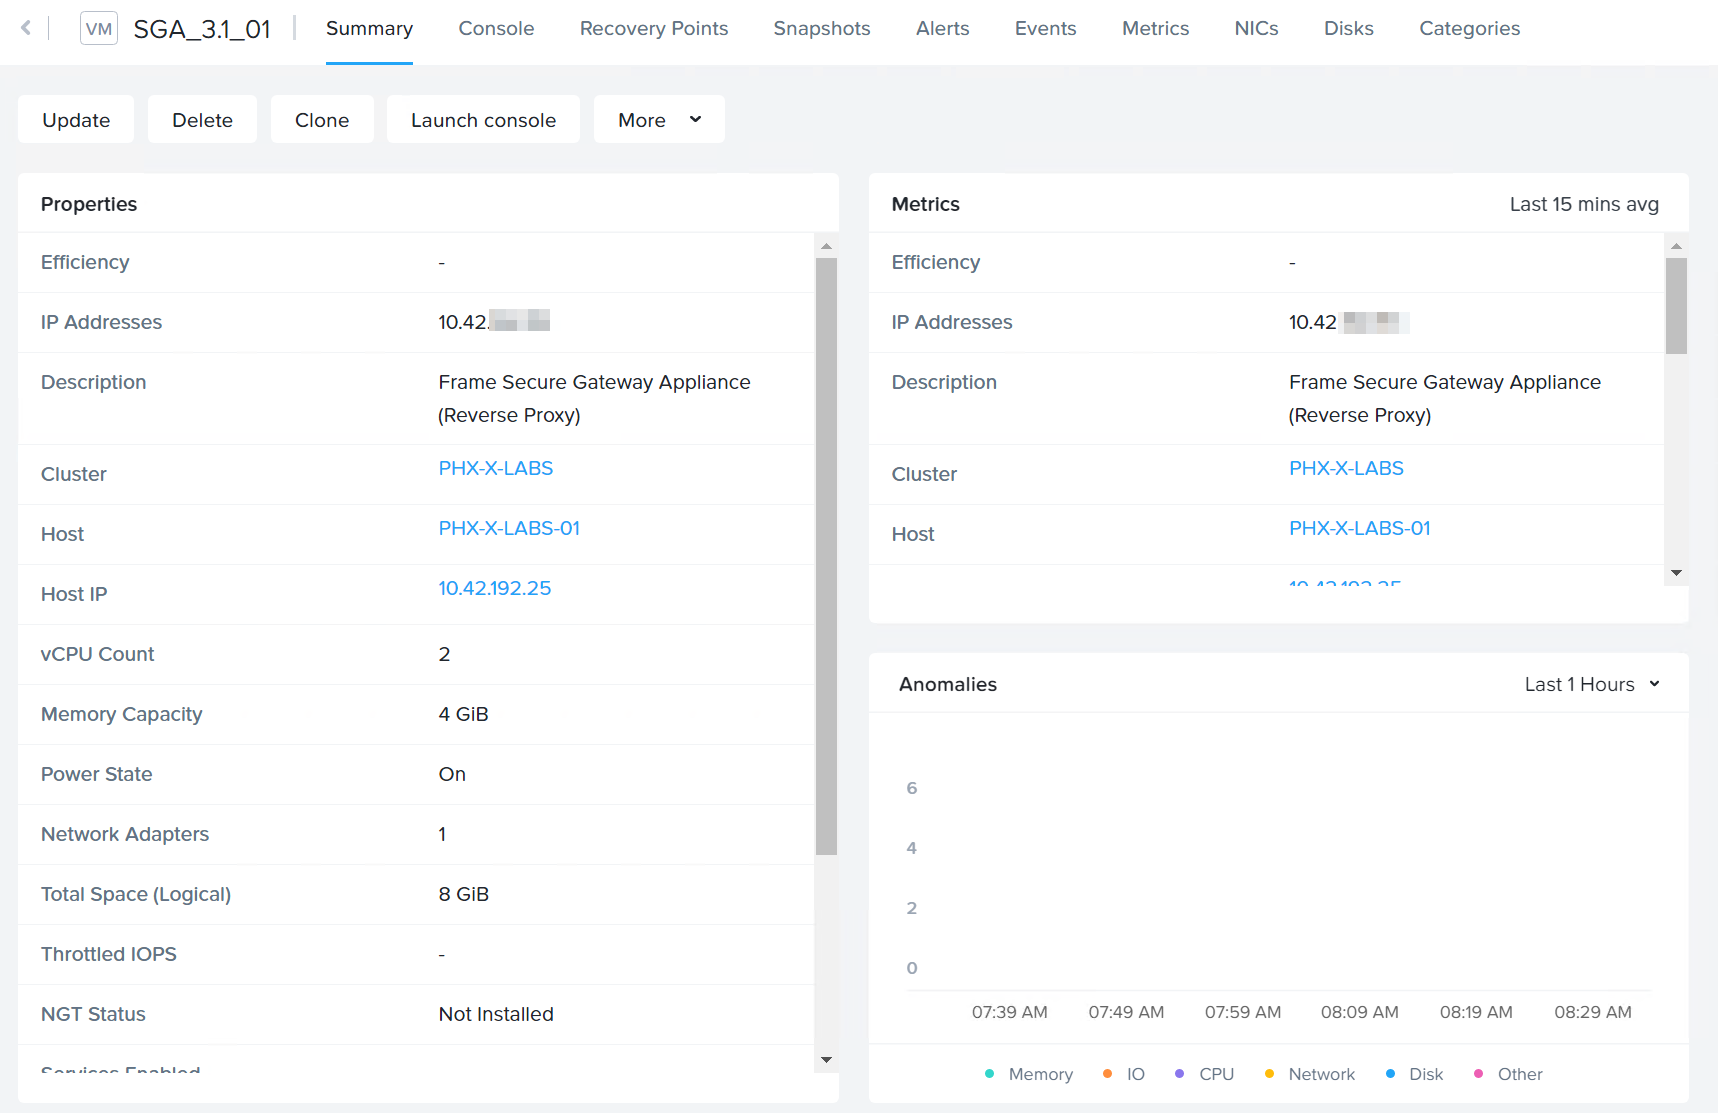
Power on the SGA VM. Connect to the SGA VM by clicking on the Launch console button near the top of the Prism dashboard to access the Virtual Network Console (VNC).

SGA VM Console Access - AHV
The following instructions assume you have already identified the AWS VPC and subnet that the SGA will be placed in. The subnet will need to be “public” (have a route from/to the Internet) and will need network connectivity to the private VPC and subnet(s) where the workloads are placed.
Before provisioning SGA VMs in AWS, ensure you enable serial console access to your SGA VMs. Otherwise, you will not be able to access the SGA VM. Consult AWS documentation on EC2 Serial Console for further details.
-
Download and Import an SGA Image: With access to the AWS Command Line Interface (CLI) and an AWS Access Key, you can download and import the SGA image into your AWS account.
- Download the AWS SGA image file (.raw.gz) from the Downloads page.
- Decompress the .gz file.
- Create an S3 bucket and upload the uncompressed .raw file to the S3 bucket. The S3 bucket should be in the region where you plan to deploy the SGA. The image size is ~10 GB, so it may take some time to upload.
- Create a
vmimportrole as described in this documentation - Create an import configuration file using the template below. Name the file “sgaimport.json” and place that file in the directory where the uncompressed raw file is. The description string can be customized. We recommend the description contain the name of the image and version number.
[
  {
    "Description": "SGA 4.0.1",
    "Format": "raw",
    "UserBucket": {
      "S3Bucket": "<Name of SGA Bucket>",
      "S3Key": "FrameSGAAWS.aws.raw"
    }
  }
]- Use AWS Configure to set up your AWS CLI. Ensure you choose the region used in the steps above.
- To import the AMI, run the command below from the same directory that the sgaimport.json and raw image files are located.
aws ec2 import-image --description "SGA 4.0" --disk-containers "file://sgaimport.json"You should see a response containing:
...
"StatusMessage": "pending",
"ImportTaskId": "import-ami-031f8724e05c24af9"- You can use
importTaskIdto check on the status of the import with the following command:
aws ec2 describe-import-image-tasks --import-task-ids <ImportTaskId>Once completed, the AMI should be available for you to launch and use.
-
Configure an Elastic IP: Deploying an SGA requires a static public IP, which Amazon calls an “Elastic IP” or “EIP.” The public IP address can be configured on your network security device with a corresponding NAT to the SGA VM's public IP address. If you wish to configure the public IP address on the SGA VM itself, you either need to obtain a static IP address from Amazon or set up a static IP addres you already own as an Elastic IP address. For more information, see AWS Official Documentation.
-
Create a Security Group: Next, administrators will want to create a security group for the SGA(s) they plan to deploy. The security group access should allow inbound connections to the SGA on
udp/3478andtcp/3478, outbound connections betweenudp/49152-65535from the SGA to the Internet, and outbound connections betweenudp/4503-4509from the SGA to the workload VM network.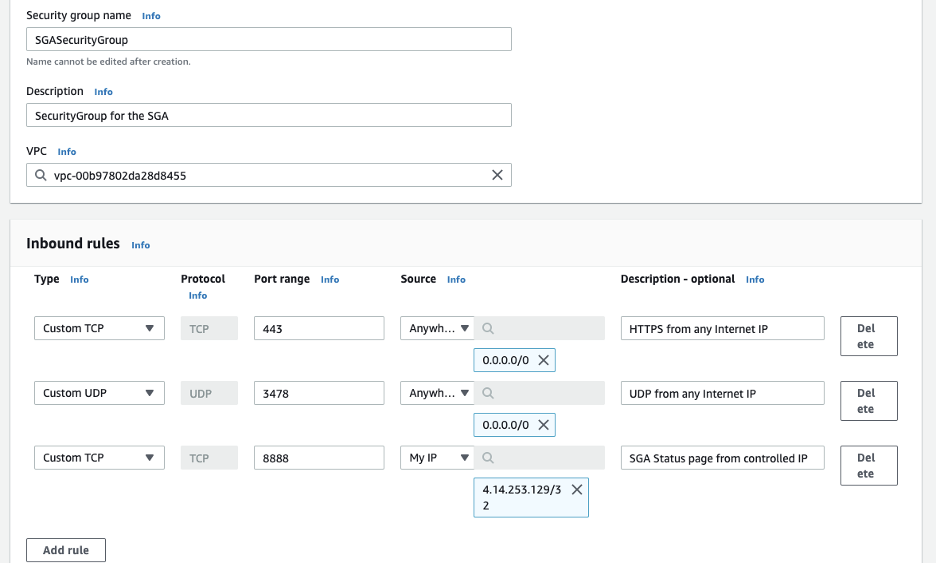
AWS Security Group -
Create an Elastic Network Interface (ENI): Create an Elastic Network Interface that can be associated with the recently created EIP. The Elastic Network Interface should be placed in the proper subnet and assigned to the recently created security group.
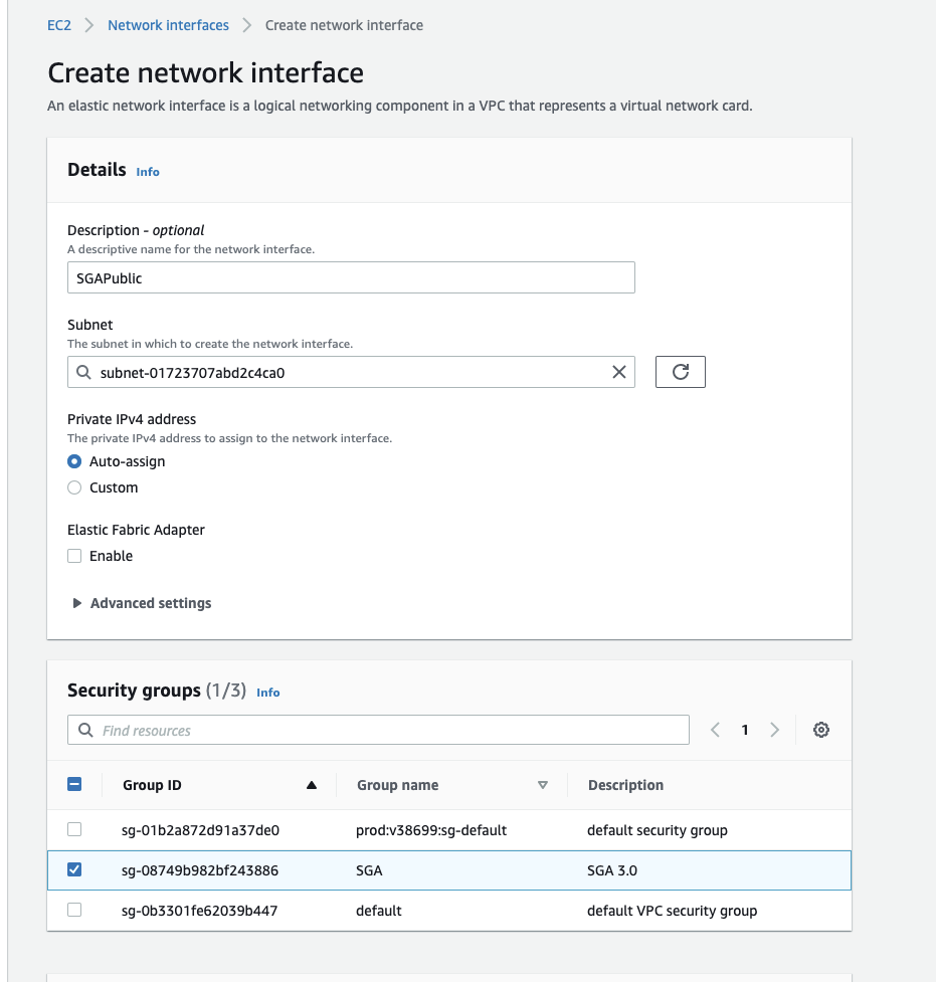
AWS Network Interface Creation ImportantCapture the ENI ID since it will need to be used later in the creation process.

Successful AWS Network Interface Creation -
Associate the EIP with ENI: Administrators should now be able to associate the newly-created EIP with the ENI.
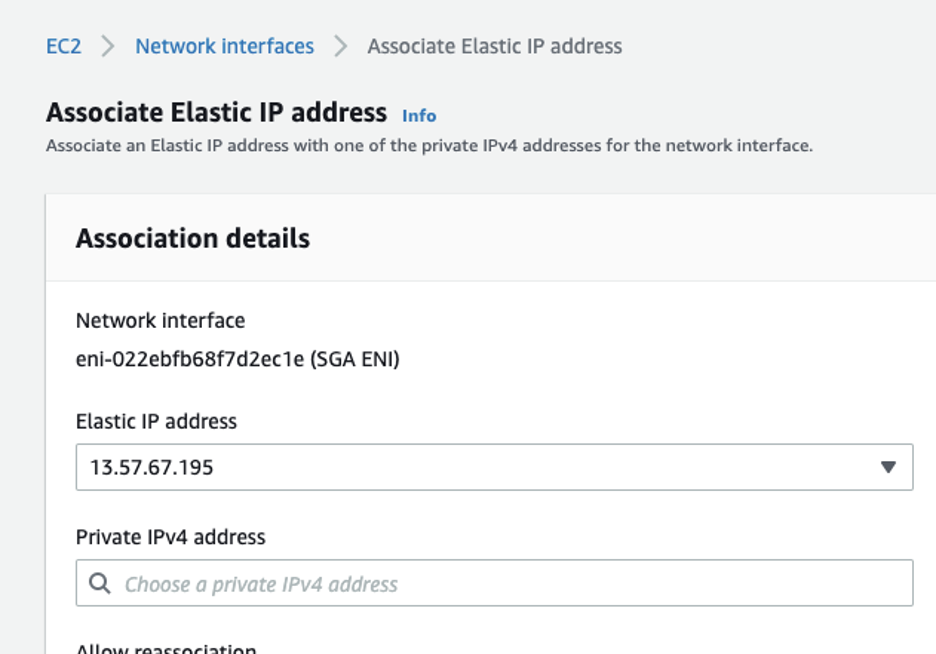
Associate AWS Network Interface -
Launch the EC2 Instance:
- From the Amazon EC2 console dashboard, click “Launch instance” and select the AMI.
- Select the instance type. Frame recommends the c5.xlarge instance type. A lower vCPU and RAM configuration can be used if you plan to have more SGA Nodes in your SGA Cluster. When configuring the instance details, select the VPC and subnet.
- Switch to the newly-created ENI under “Network Interfaces."
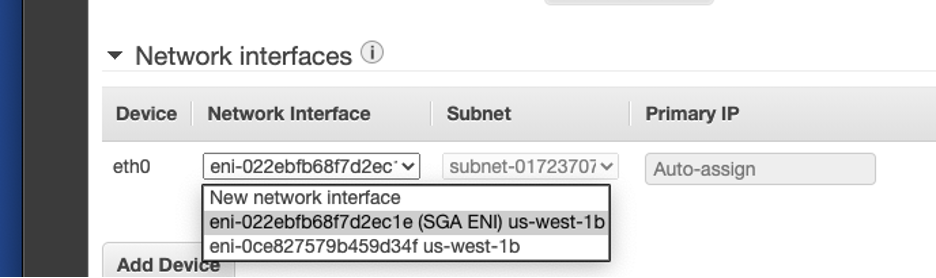
Launch EC2 Instance - Specify Network Interface - Click "Review and Launch".
- Once the SGA VM has been provisioned and is running, connect to the SGA VM by selecting the SGA VM instance in the Instances page and clicking the "Connect" button near the top of the AWS Console.
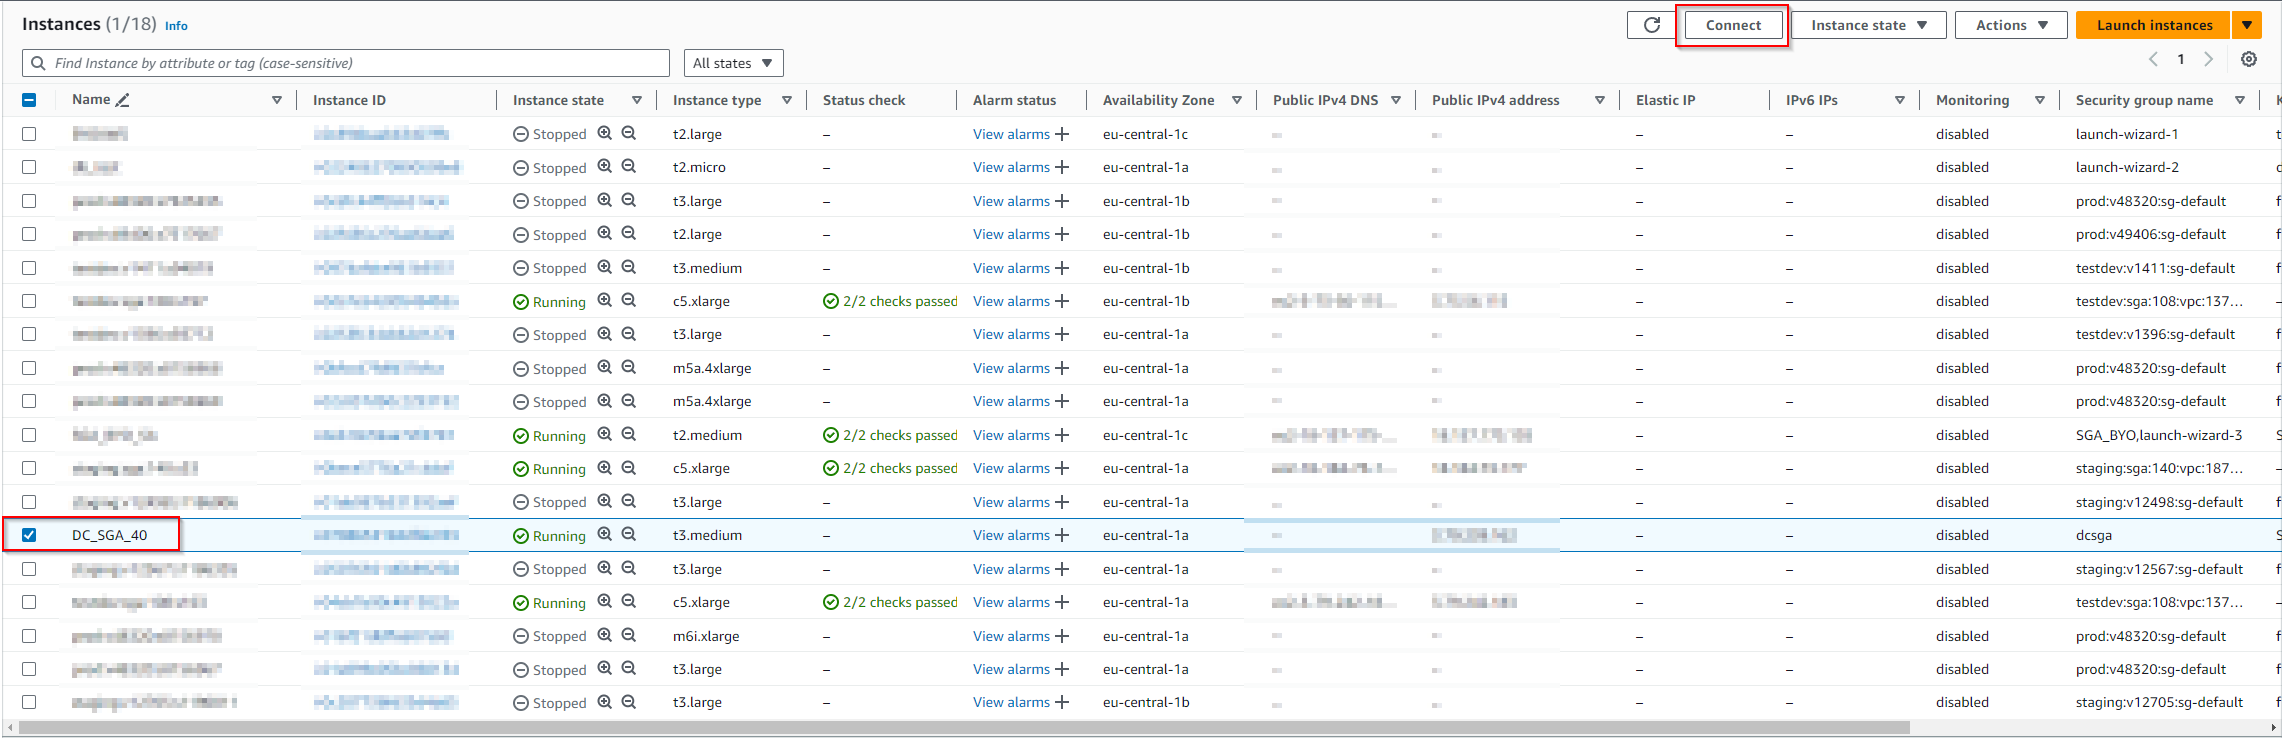
-
Select "EC2 serial console" tab and then "Connect".
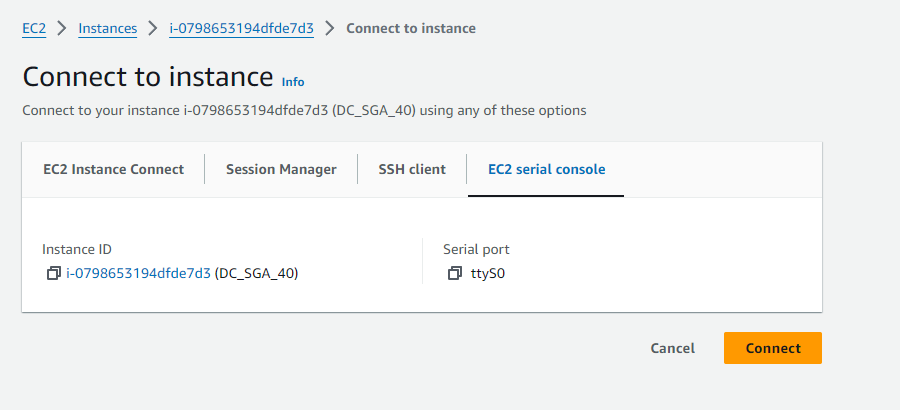
SGA VM Console Access - AWS
The following instructions assume you have already identified the Azure VNet and subnet that the SGA will be placed in. The subnet will need to be “public” (have a route from/to the Internet) and will need network connectivity to the private VNet and subnet(s) where the workloads are placed.
-
Download the SGA (.vhd.gz) file and and unzip.
-
Create a new Resource Group by clicking on "Resource Groups" in the Azure portal sidebar and clicking the "+ Add" button.

Azure Resource Group Creation -
Create a Storage Account and Blob Container.

Azure Storage Container Creation -
Upload the .vhd file as a page blob to Azure Storage. Ensure the “Upload .vhd files as page blobs (recommended)” box is checked.
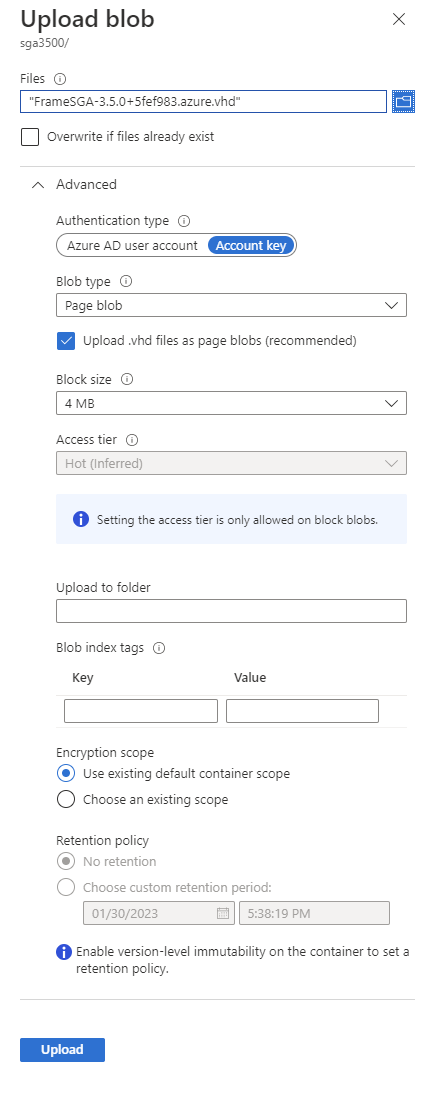
SGA .vhd Upload -
Create an image from the .vhd blob. Be sure to choose Linux for the OS type, and navigate to the previously uploaded .vhd blob for the Storage blob.
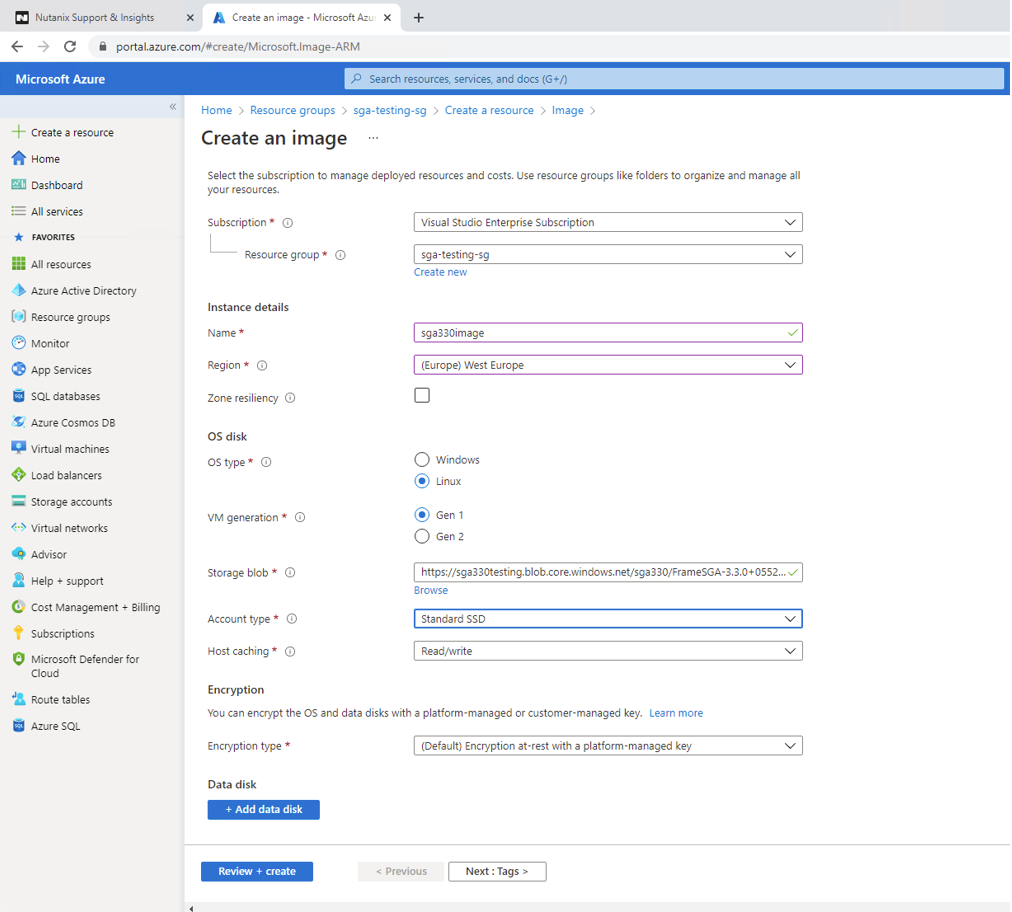
Create Azure Image -
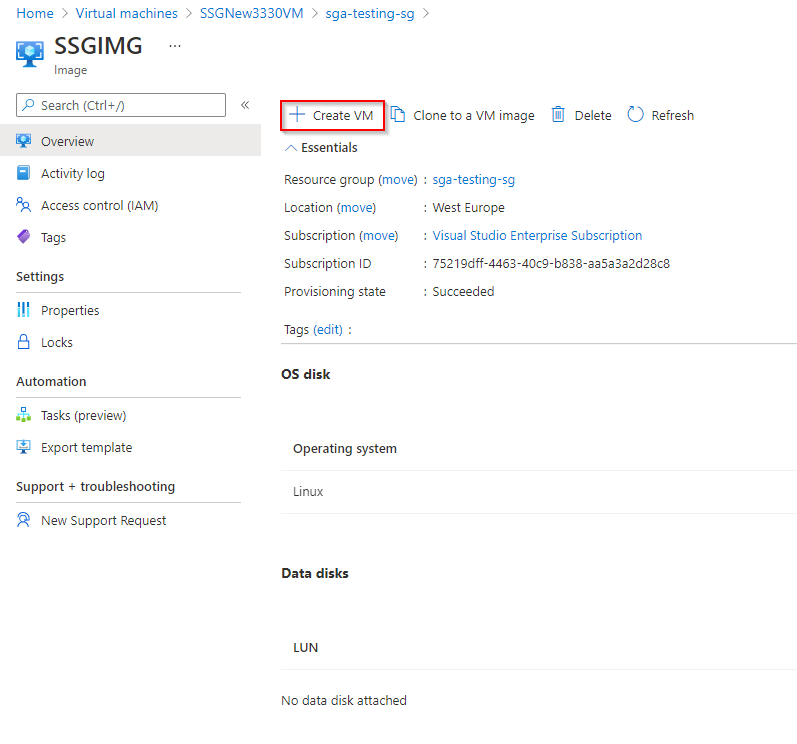
Create a VM from the image.
-
Locate your image and click on the image name.

Azure Image -
Click the "Create VM" button in your Azure Console.
Create Azure VM from Image -
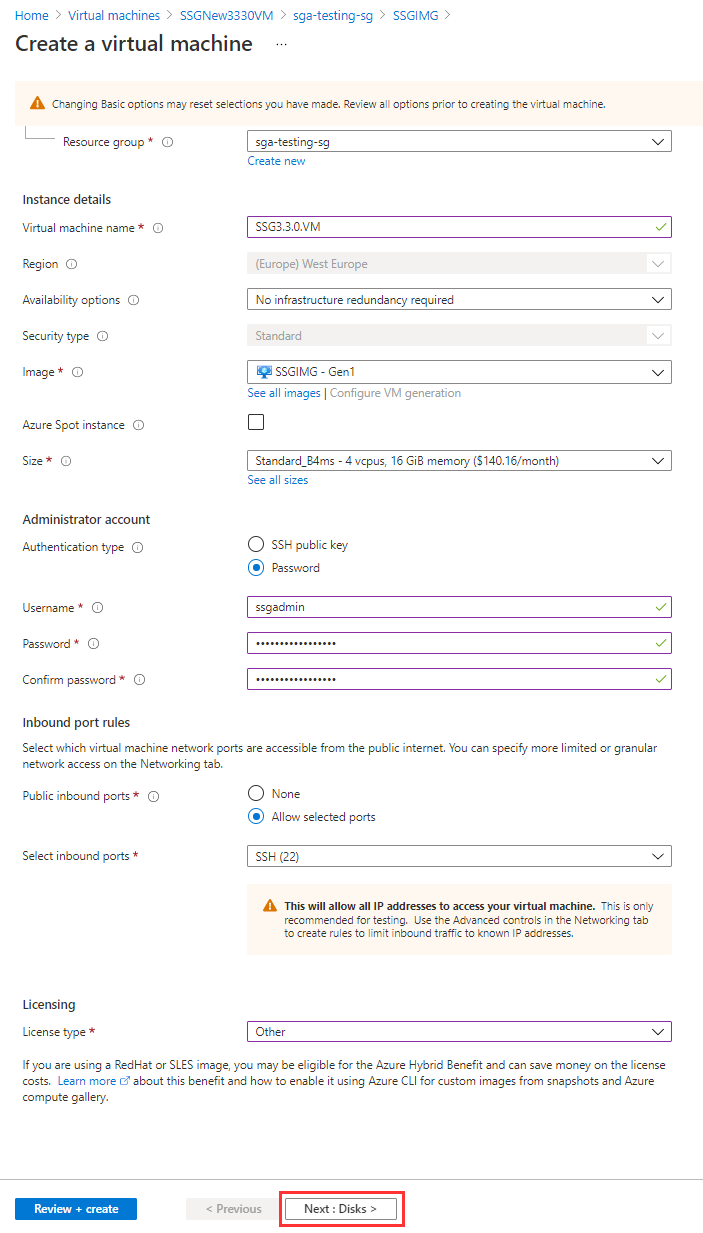
Configure your Virtual Machine by choosing a name, size (instance type), authentication model, and licensing type. Frame recommends a D4s v5 instance type. A lower vCPU and RAM configuration can be used if you plan to have more SGA Nodes in your SGA Cluster.
You should also specify an Administrator user account (SSH public key or password) so you can administer your SGA VM in the future. Click “Next:Disks>” when you're done.
Azure VM Configuration -
Next, configure the disks by selecting the OS disk type and encryption type.
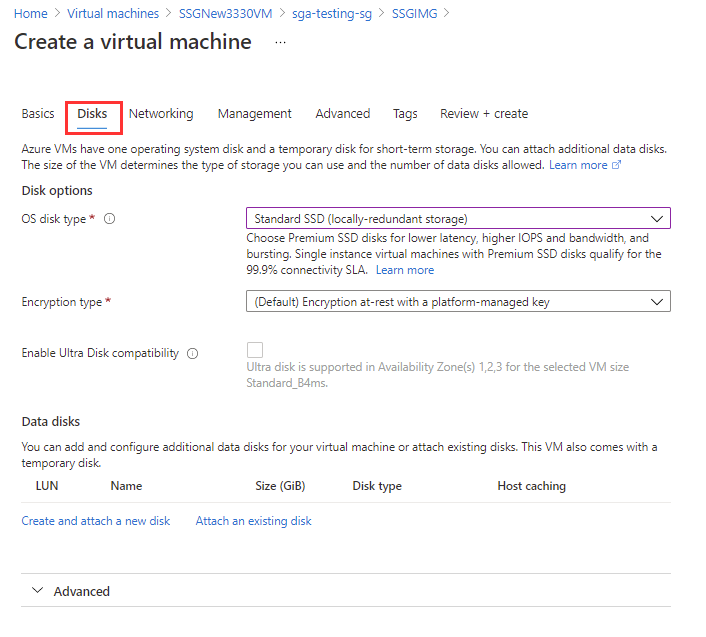
Azure VM Configuration - Disks -
Move on to the "Networking" tab. Configure the networking for the VM. Either choose an existing VNet or create a new VNet. Ensure you are using a /18 CIDR block or smaller, and that your SGA has a public IP address (either on the SGA VM or on the firewall).

Azure VM Configuration - Networking -
Next, configure your management options as desired in the "Management" tab.
-
Finish up the VM creation process by going through the rest of the wizard before the Activation Code expires.
-
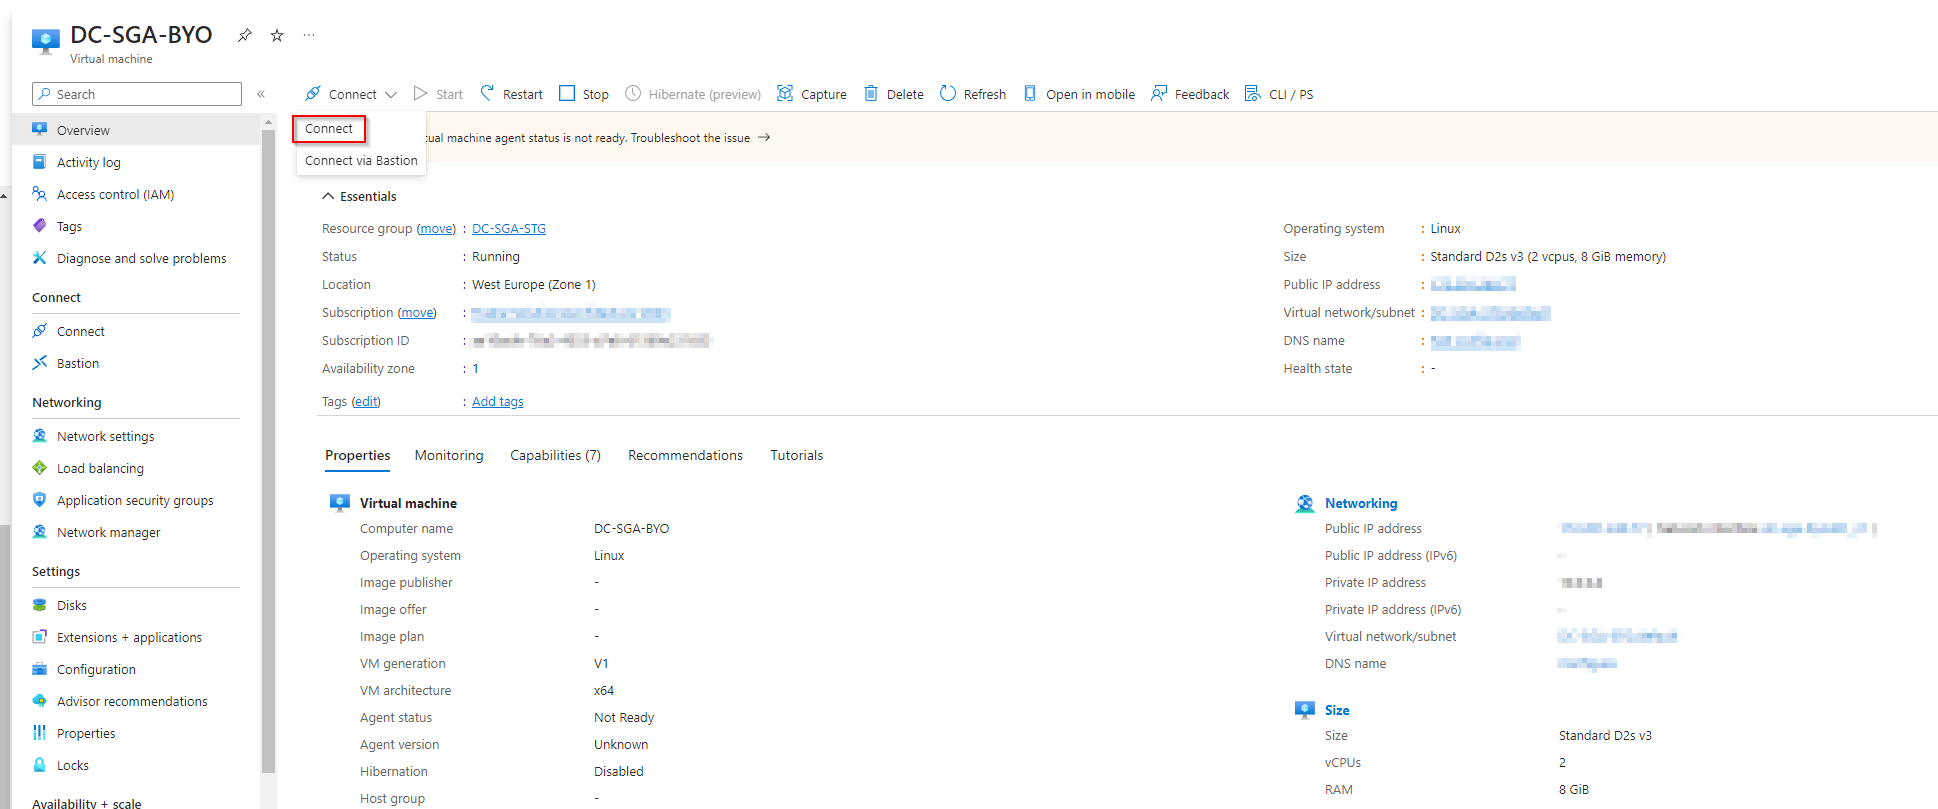
- Once the SGA VM has been provisioned and is running, locate the SGA VM instance and click the "Connect" button near the top of the Azure Console.
-
On the Connect page, select "More ways to connect" and then "Go to serial console".
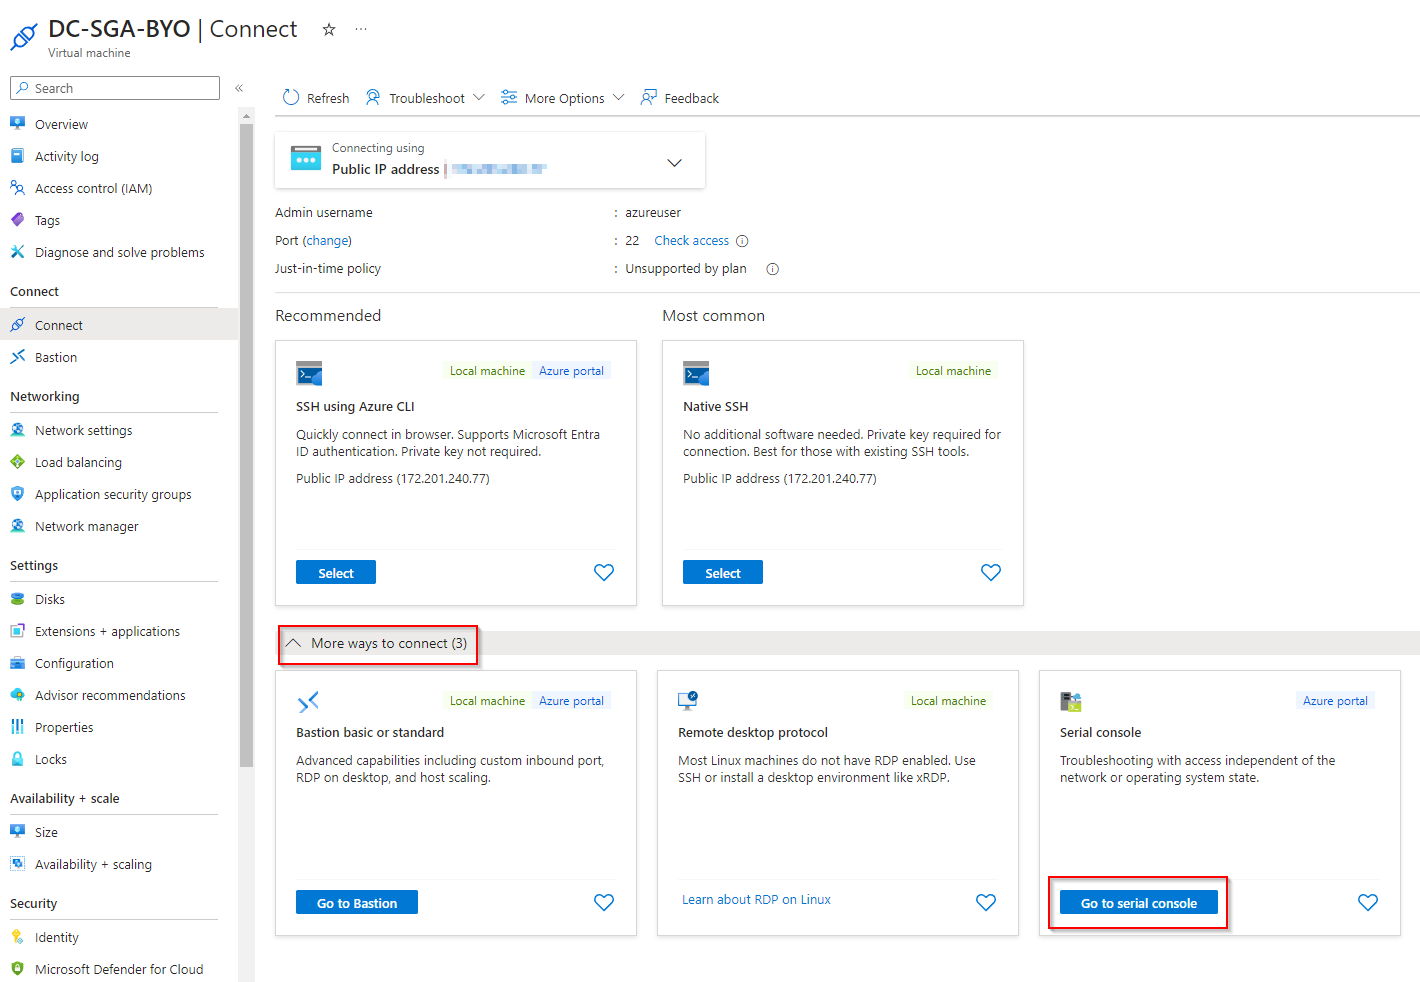
SGA VM Console Access - Azure
The following instructions assume you have already identified the GCP VPC and subnet that the SGA will be placed in. The subnet will need to be “public” (have a route from/to the Internet) and will need network connectivity to the private VPC and subnet(s) where the workloads are placed.
-
Download the SGA (.tar.gz) file.
-
Create a Cloud Storage bucket. The bucket should be in the region where you plan to deploy the SGA. Upload the .tar.gz file to the bucket, following Google's official instructions.
noteThe compressed image is under 1 GB, so it may take awhile to upload.
-
Import the image from your bucket. This may take up to 30 minutes to complete.
-
External IP: Deploying an SGA requires a Static Public IP address, which Google refers to as an “External IP address”. So first, we will need to reserve an External IP.

Google External IP Address -
Firewall Rules: Next, we'll create a firewall rule for the SGA(s) you plan to deploy. The firewall rules should, at a minimum, allow the following:
- Ingress connections for the SGA on
udp/3478andtcp/3478. - Ingress connections from SGA to the workloads on
udp/4503-4509.
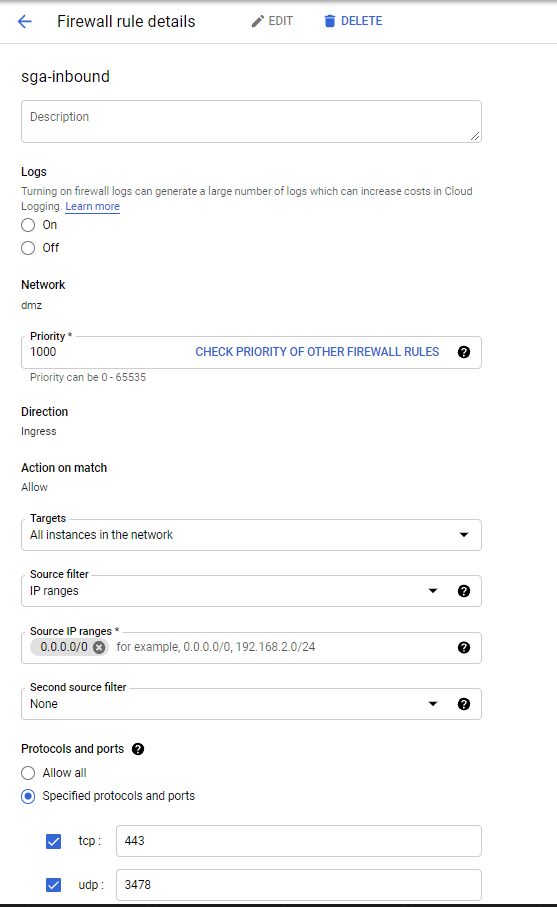
Google Firewall Rules - Ingress connections for the SGA on
-
Create the VM Instance: Now you are ready to create the custom SGA instance. Start the official instance creation process. Frame recommends an n2-standard-4 instance type. A lower vCPU and RAM configuration can be used if you plan to have more SGA Nodes in your SGA Cluster.
You will first want to change the boot disk for your SGA VM.
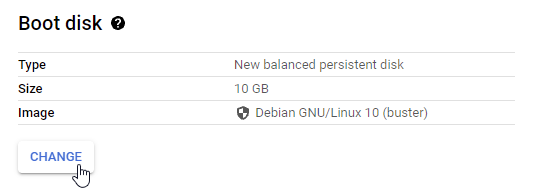
Create VM - Change Boot Disk Choose your SGA custom image as the boot disk.
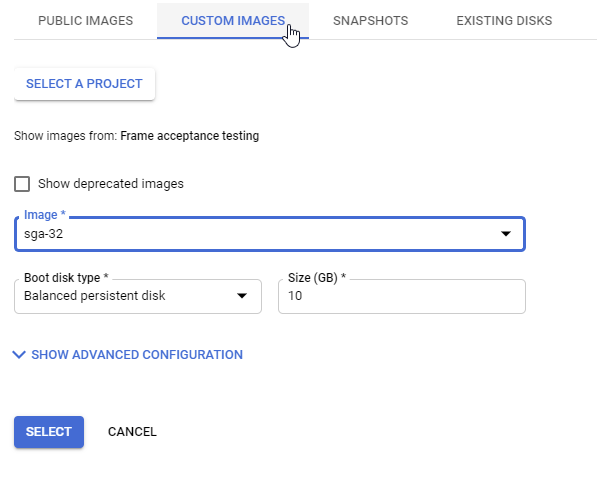
Create VM - Custom Images -
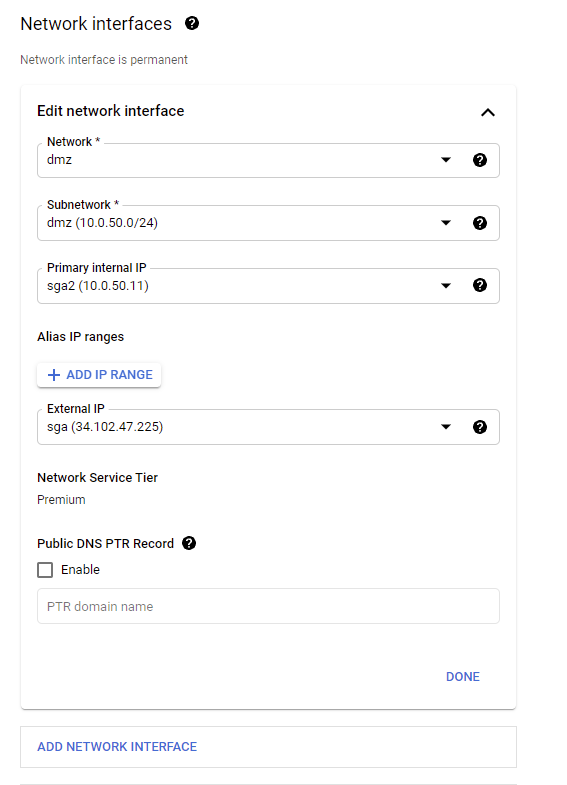
Reserve a static internal IP for your primary internal IP address, and then select your static External IP address from the drop-down menu as shown below.
-
Lastly, click “Create” to create the SGA VM.
-
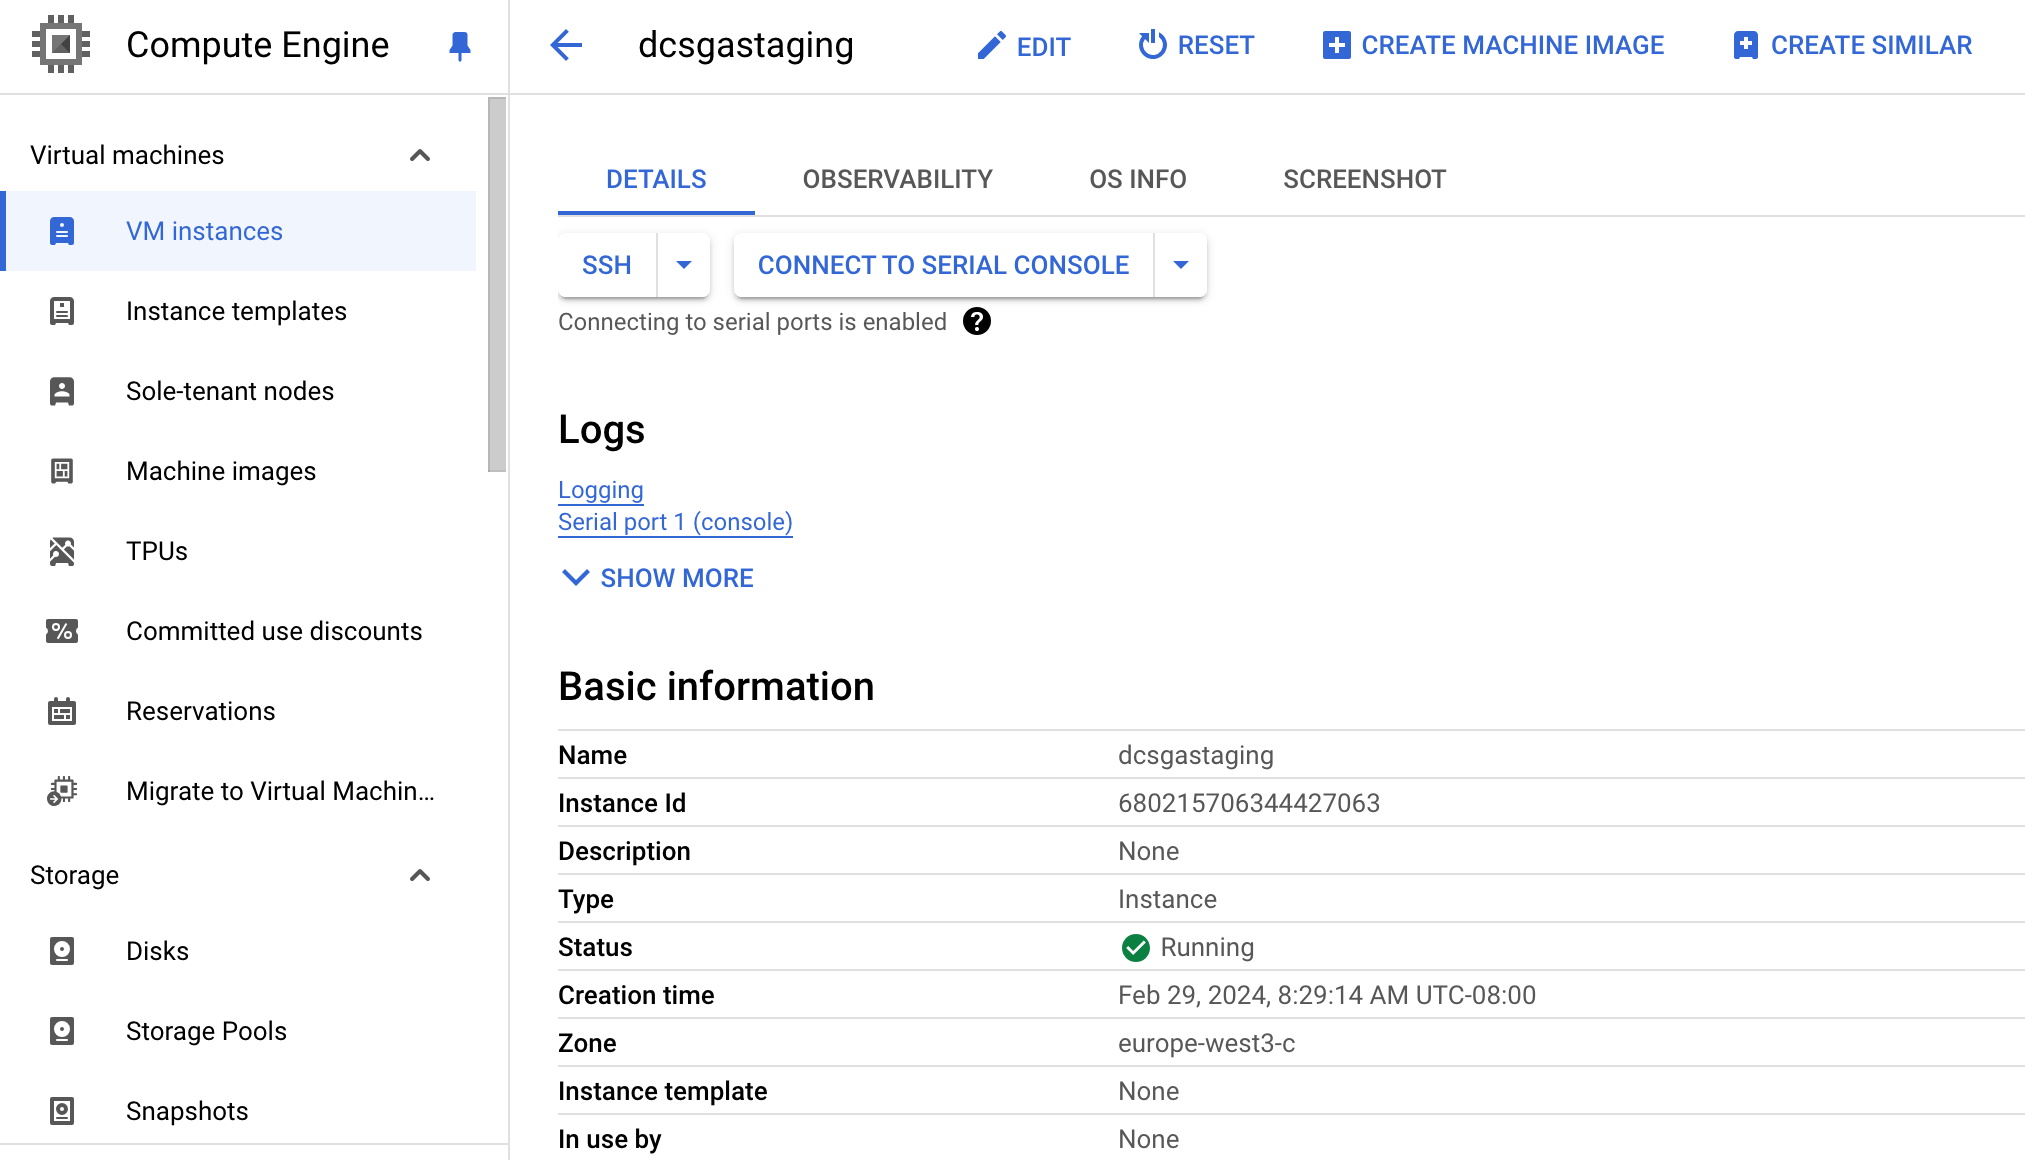
Once the SGA VM has been provisioned and is running, go to the VM instances page and locate the SGA VM instance. Verify that the SGA VM instance is enabled for you to connect to its serial console (under Remote access). Refer to Google Cloud documentation for further details.
SGA VM Console Access Configuration - GCP -
On the SGA VM instance page, click Connect to serial console. Refer to Google Cloud documentation for further details.
SGA VM Console Access - GCP
-
Download the SGA (.qcow2) file.
-
Order an IBM Cloud Object Storage (Standard tier) service instance.
-
Create a Cloud Object Storage bucket. The bucket must be in the region where you plan to deploy the SGA. Upload the .qcow2 file to the bucket.
-
Grant the VPC Infrastructure Services service
ReaderandWriteraccess to the Cloud Object Storage service containing the .qcow2 file.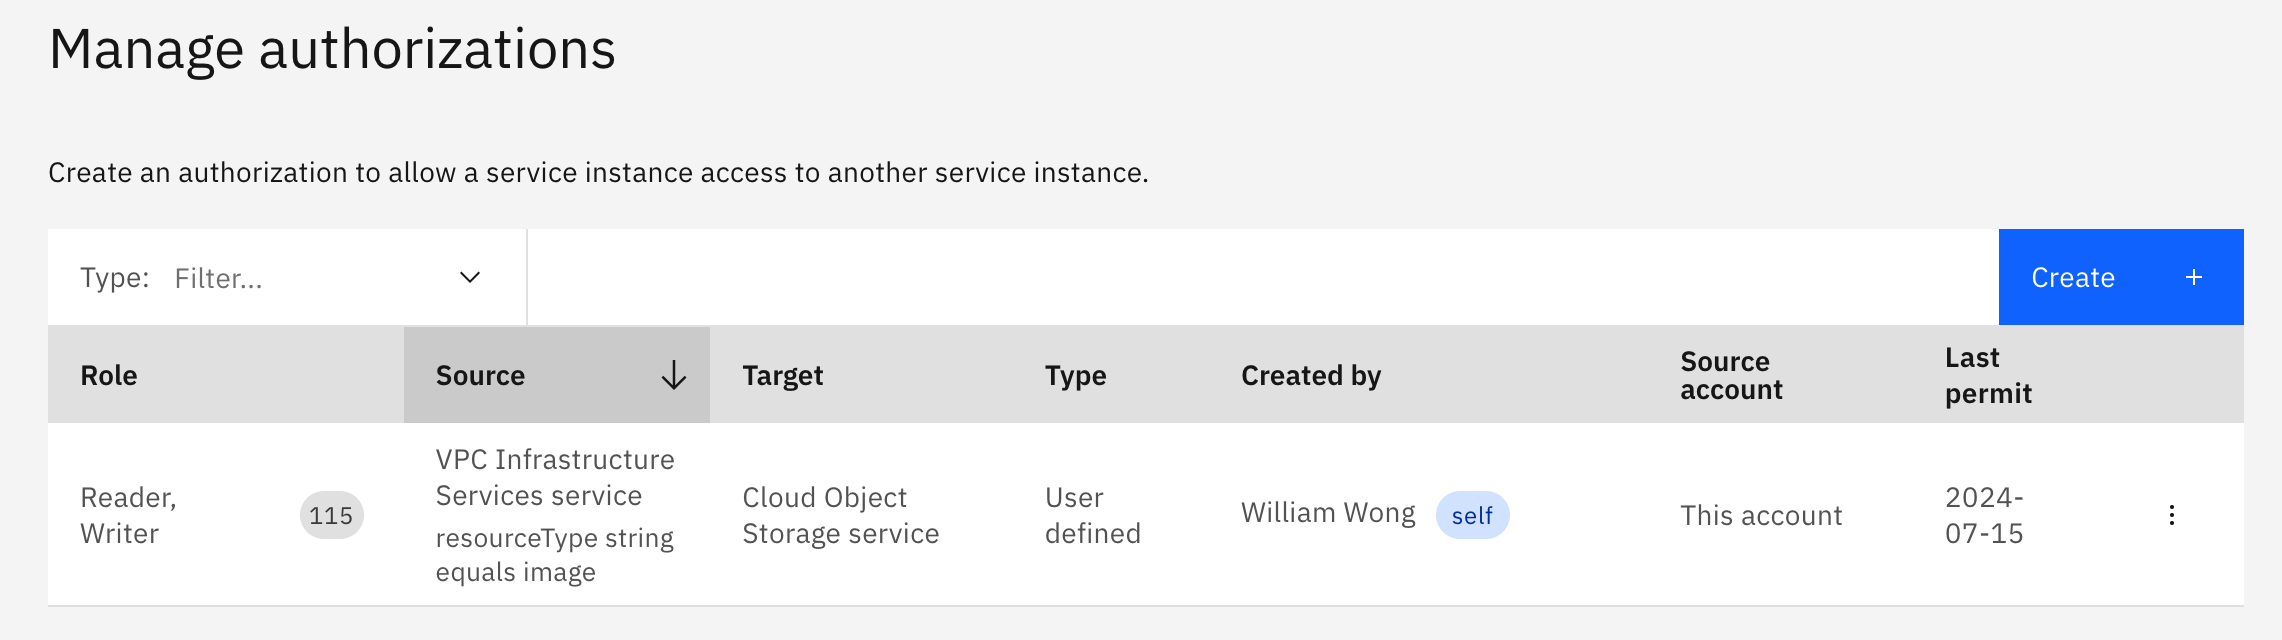
IBM Cloud - Authorization to Cloud Object Storage -
Create a custom image using the .qcow2 file in the Cloud Object Storage bucket.
a. Make sure it is in the region you plan to create a SGA VM.
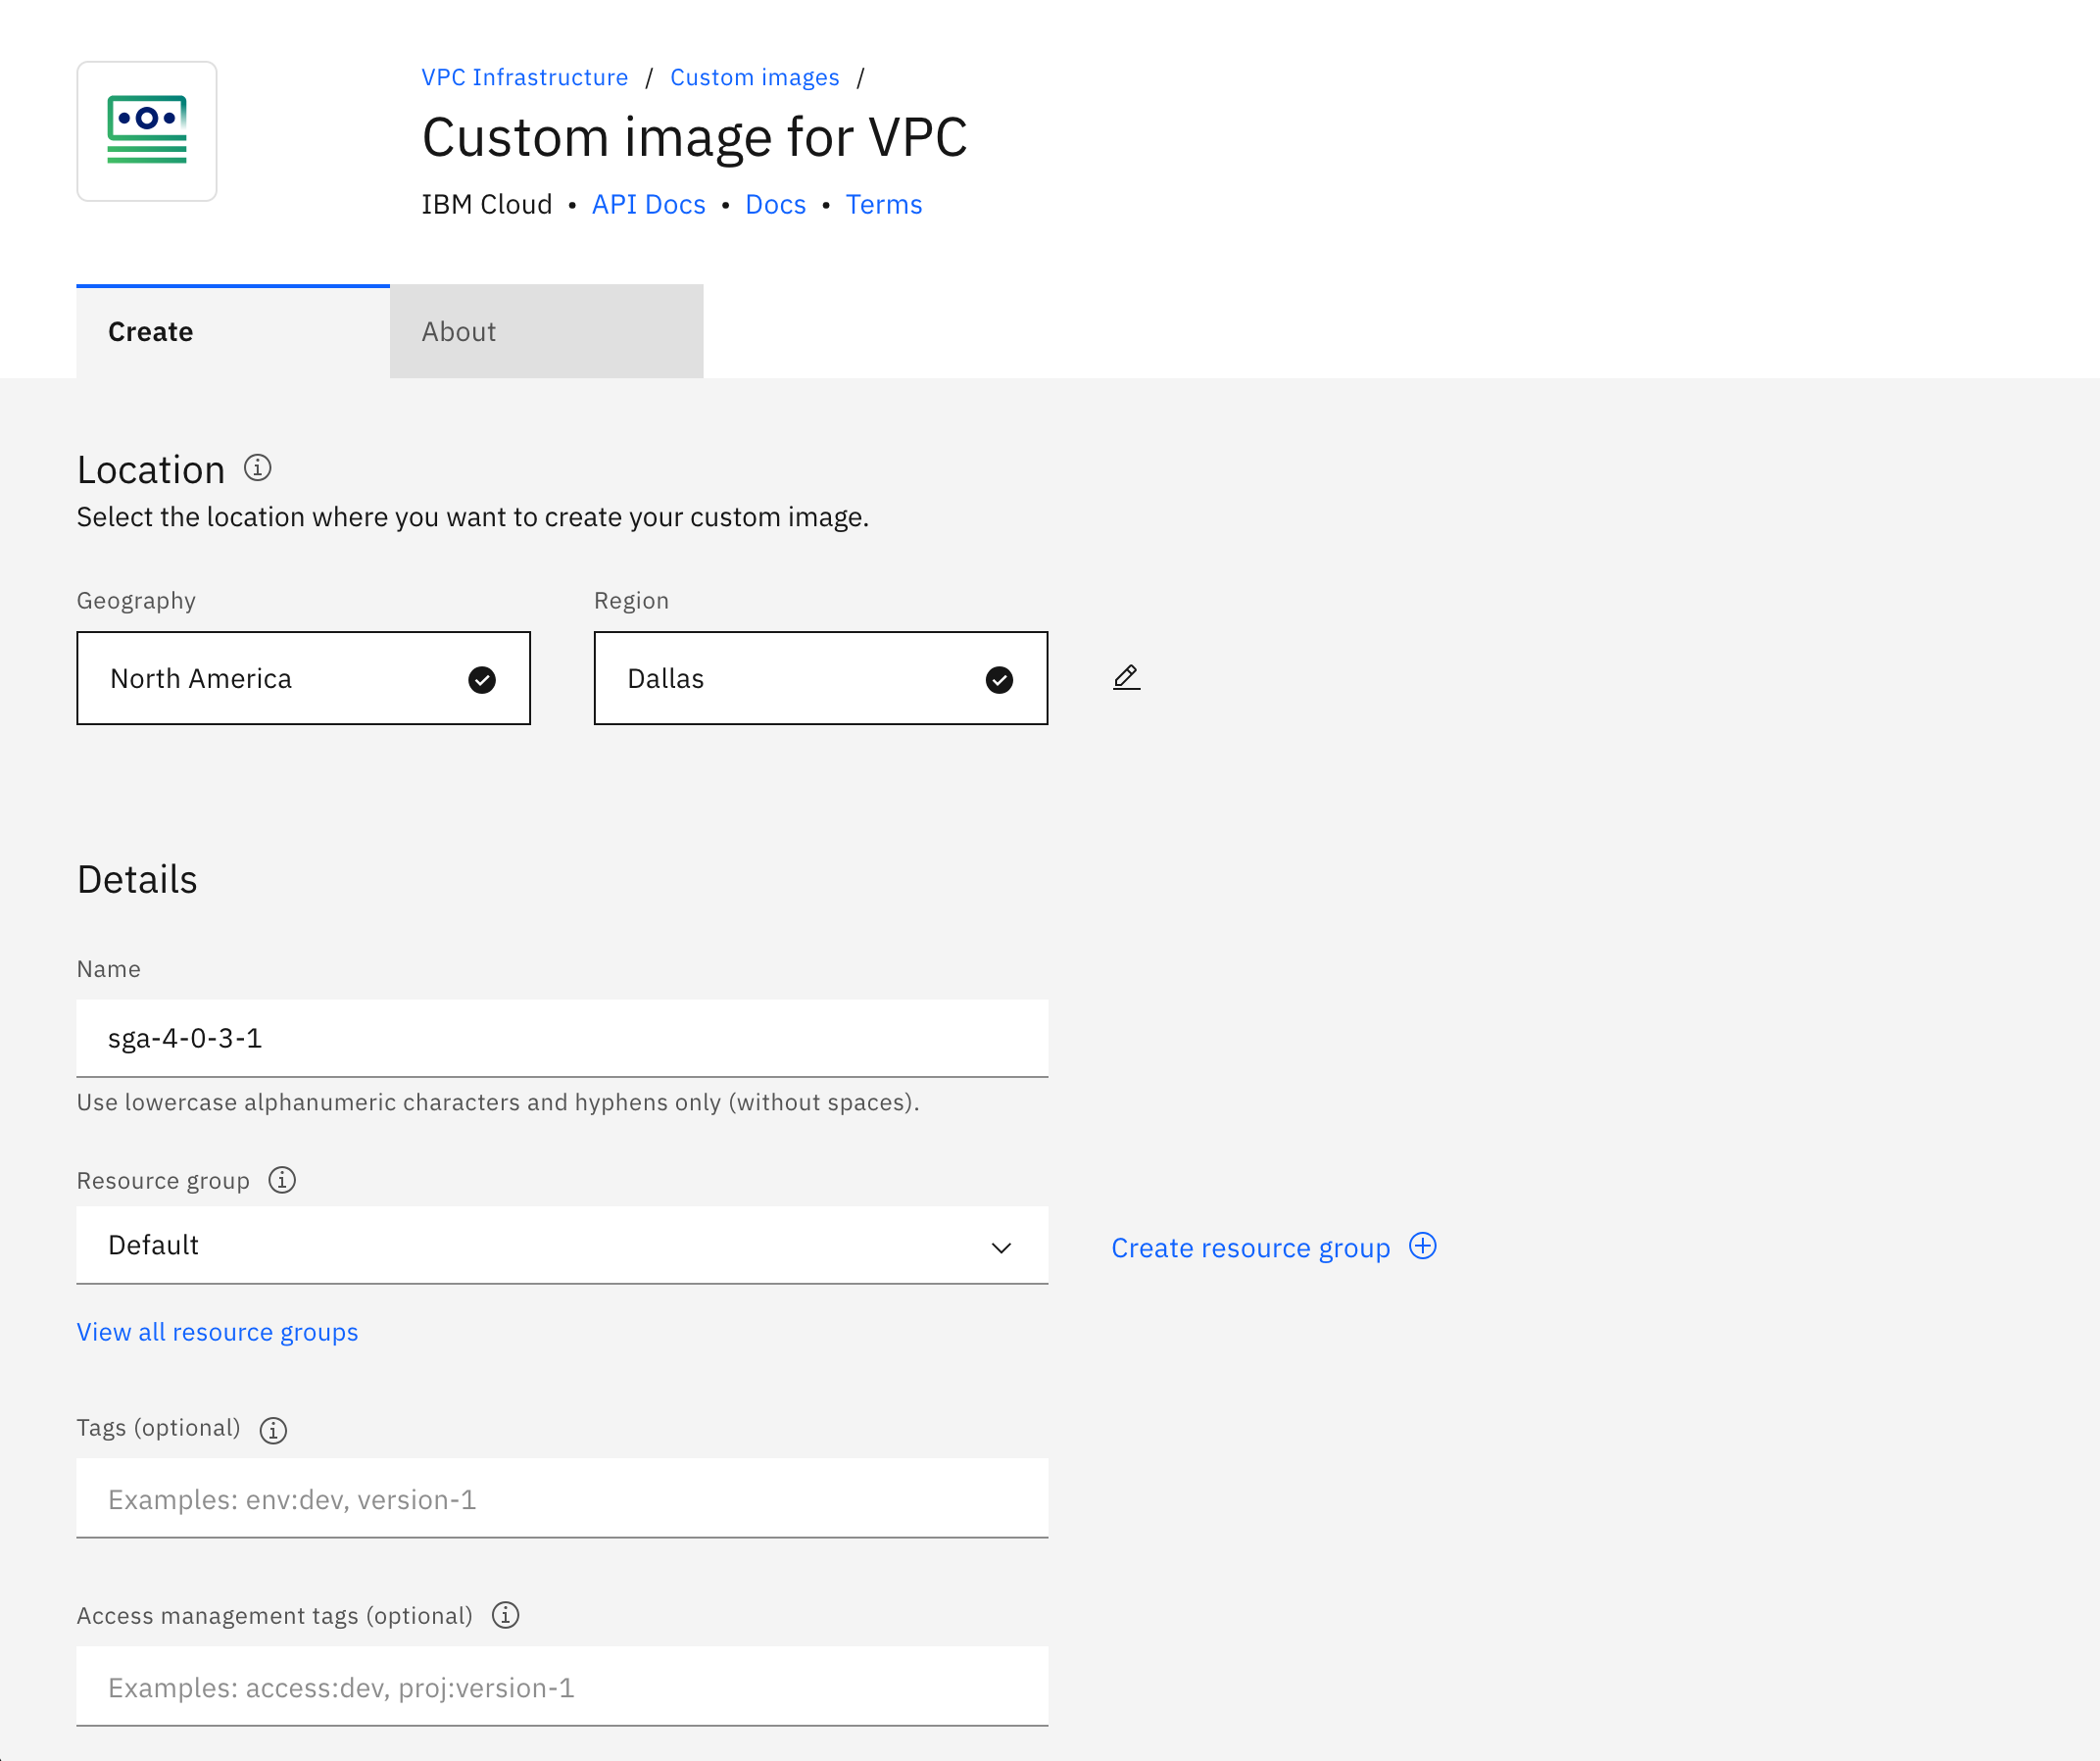
IBM Cloud - Create Custom Image - Location and Name b. For the image source, select
Cloud Object Storage, the Cloud Object Storage instance, Location, and Bucket where the image file is located. SelectUbuntu Linuxas the Operating system andubuntu-20-04-amd64as the Version.
IBM Cloud - Create Custom Image - Image File and Operating System -
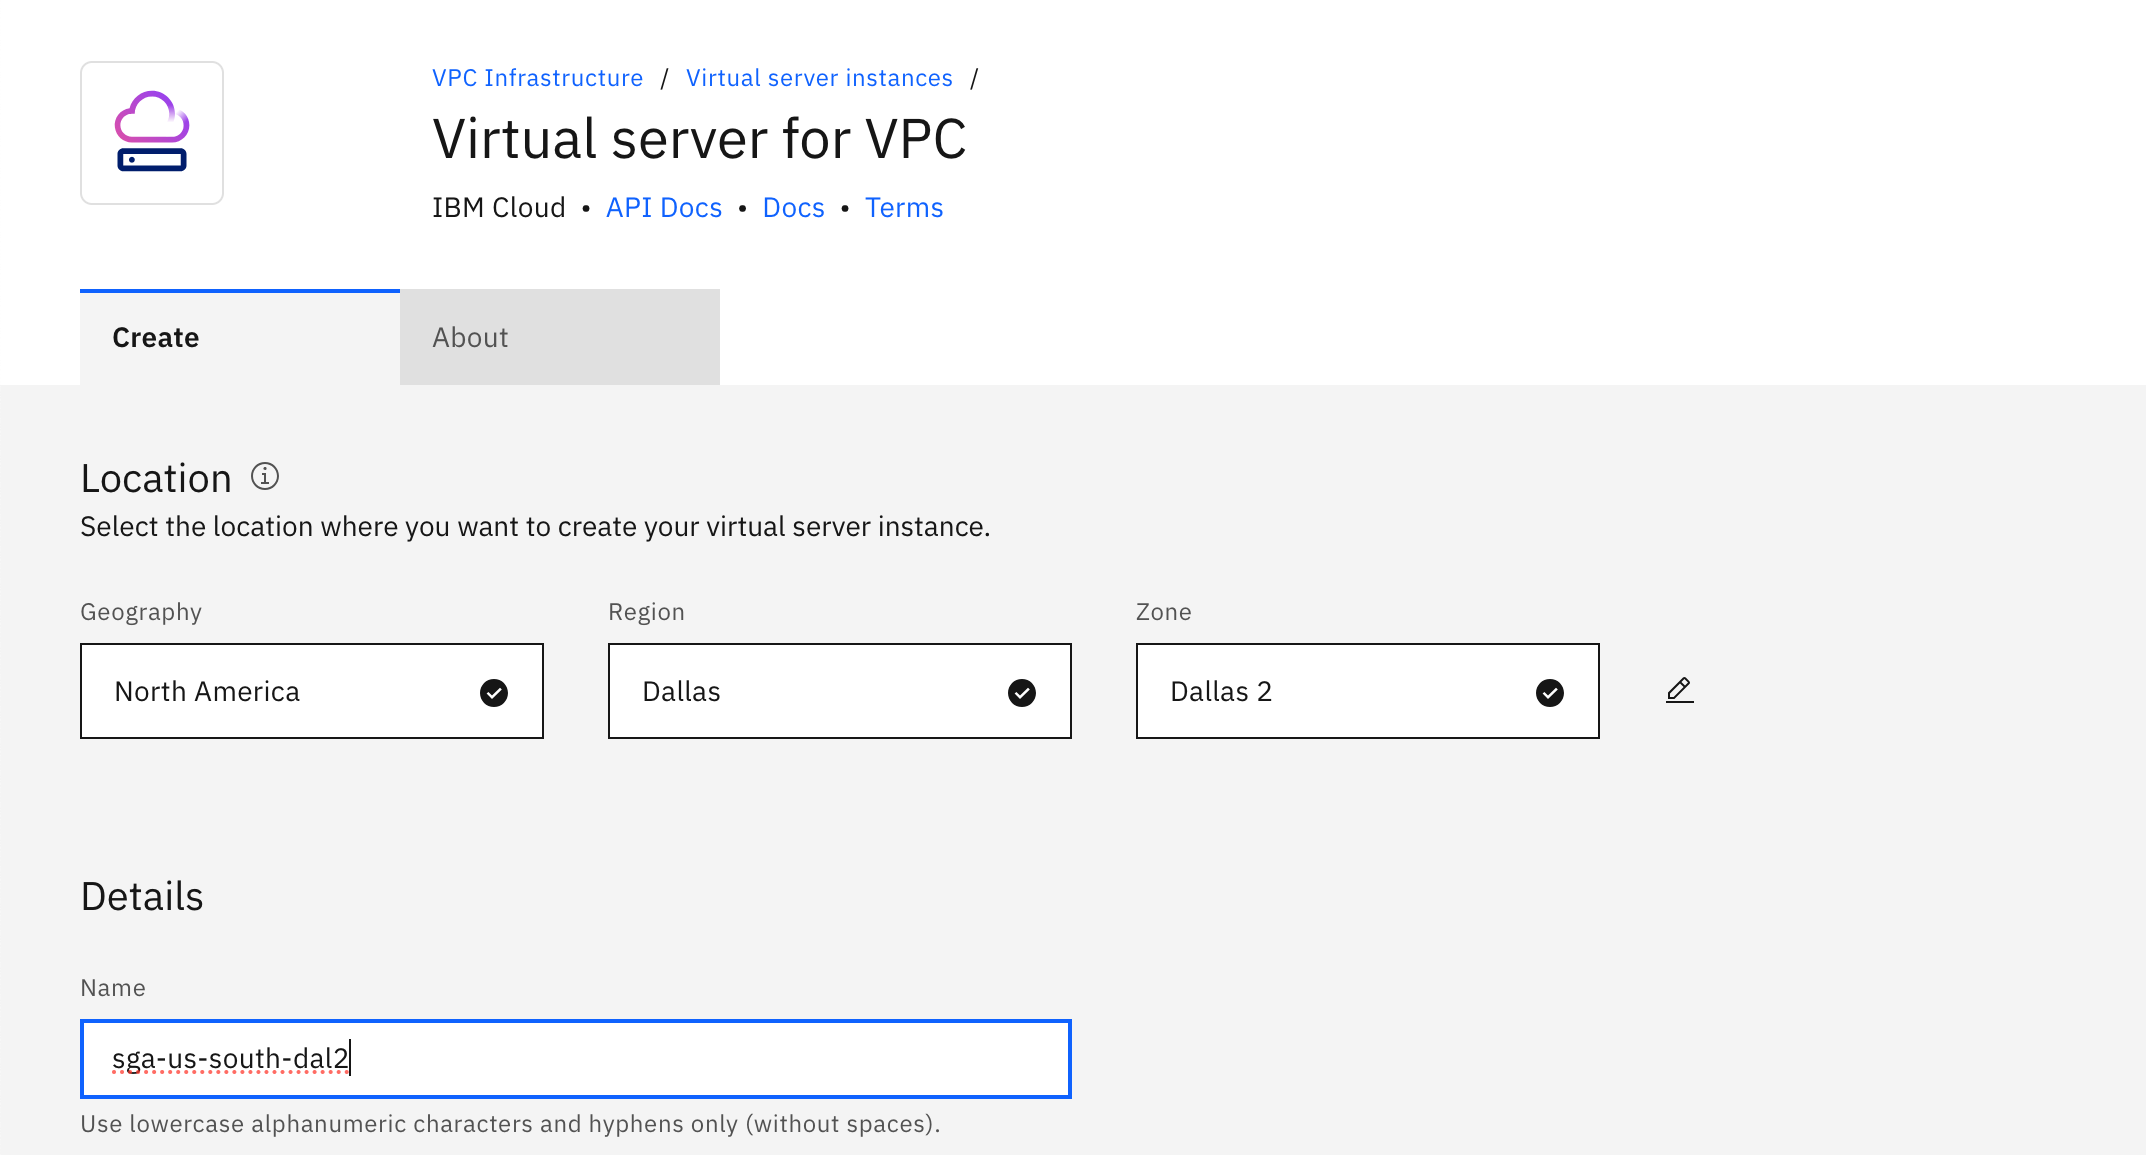
Create a virtual server instance.
a. Specify the region and zone, virtual server name.
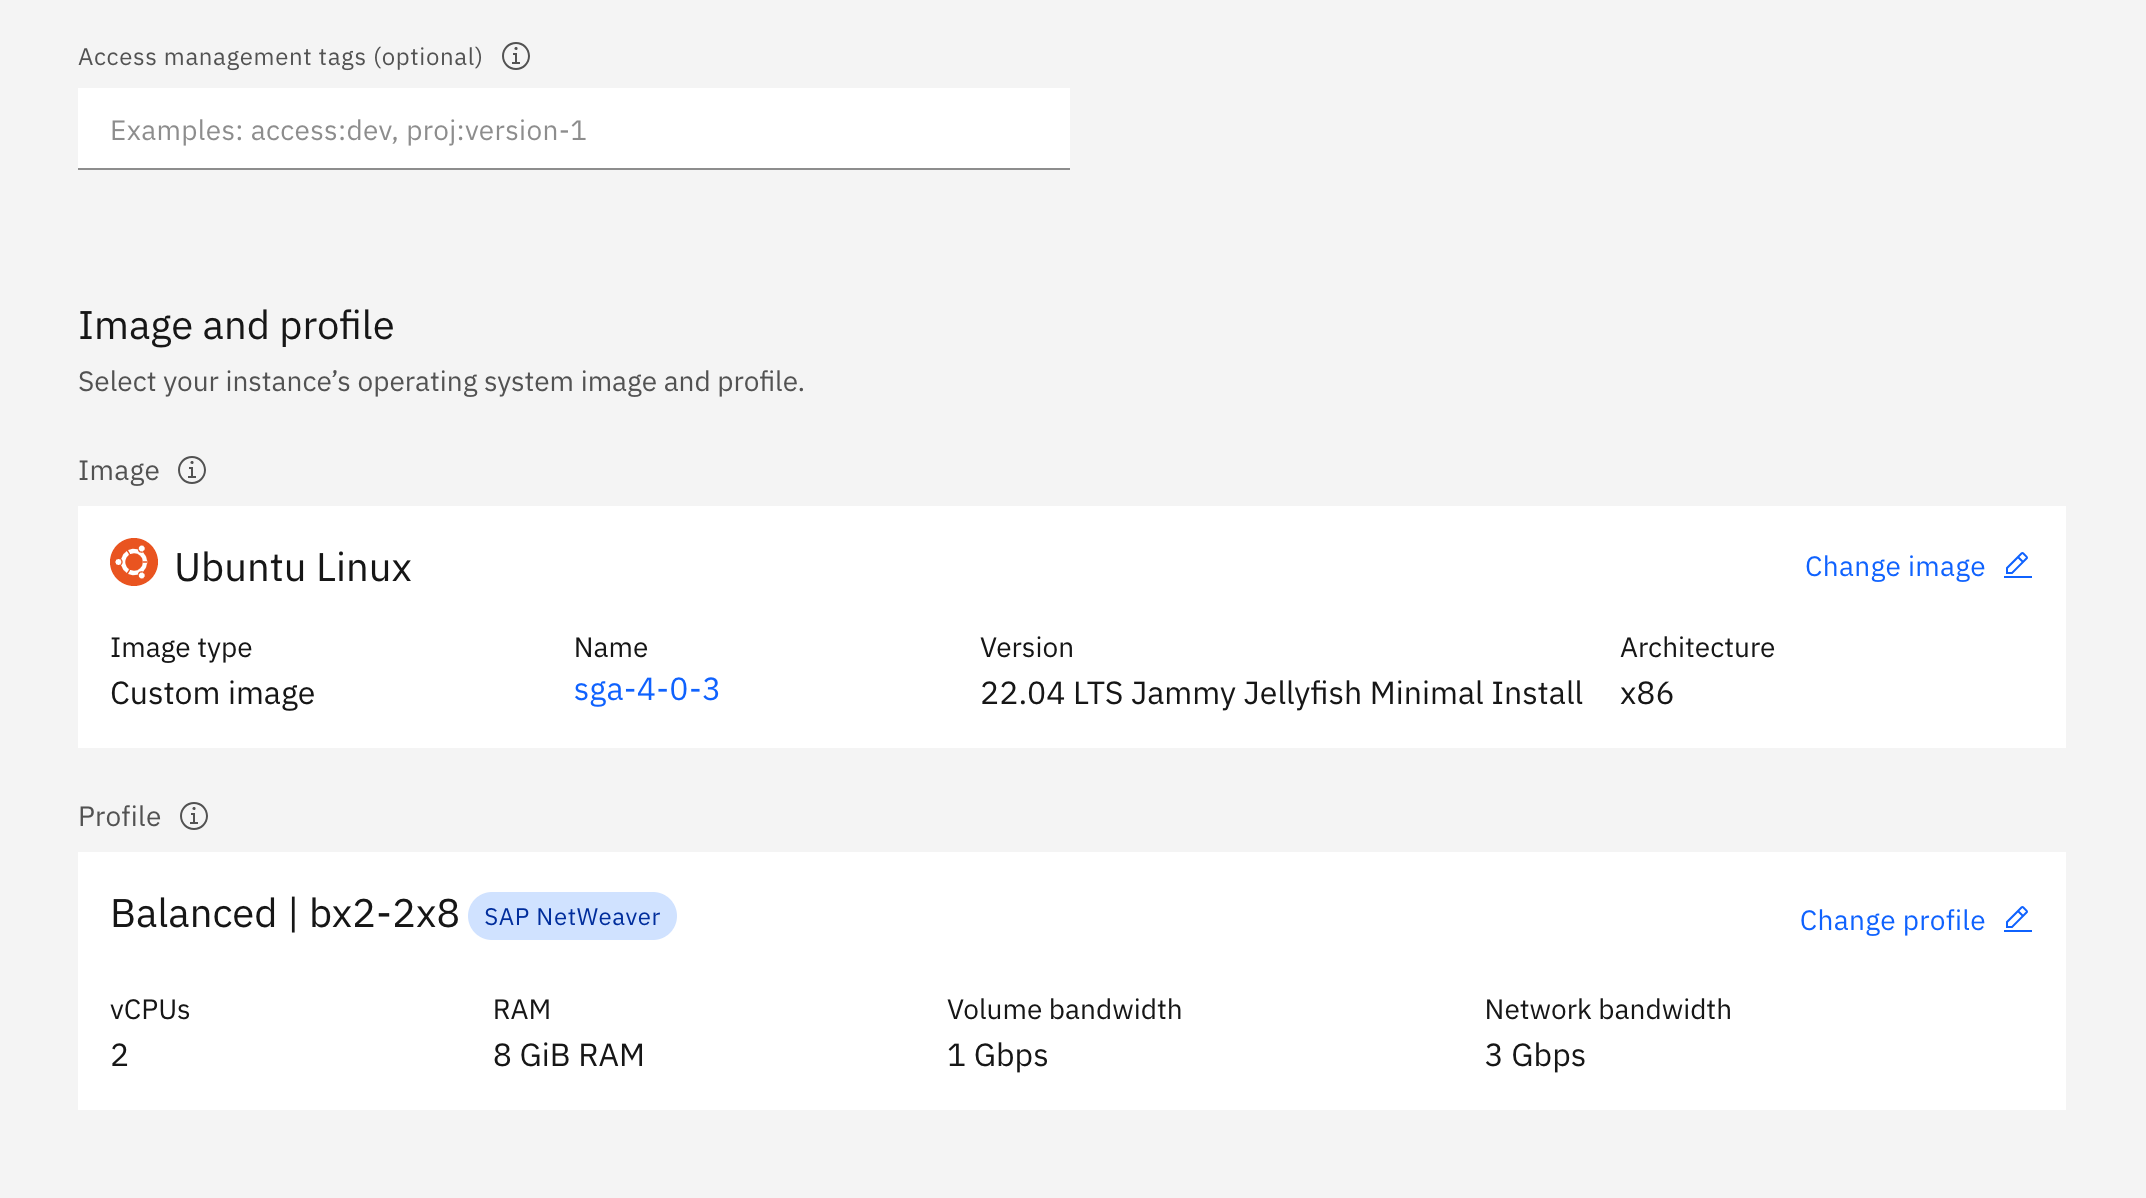
IBM Cloud - Create SGA VM - Region, Zone, and Virtual Server Name b. Specify the SGA 4 custom image and profile.
IBM Cloud - Create SGA VM - Custom Image and Profile c. Specify the VPC and subnet that will contain the SGA VM.
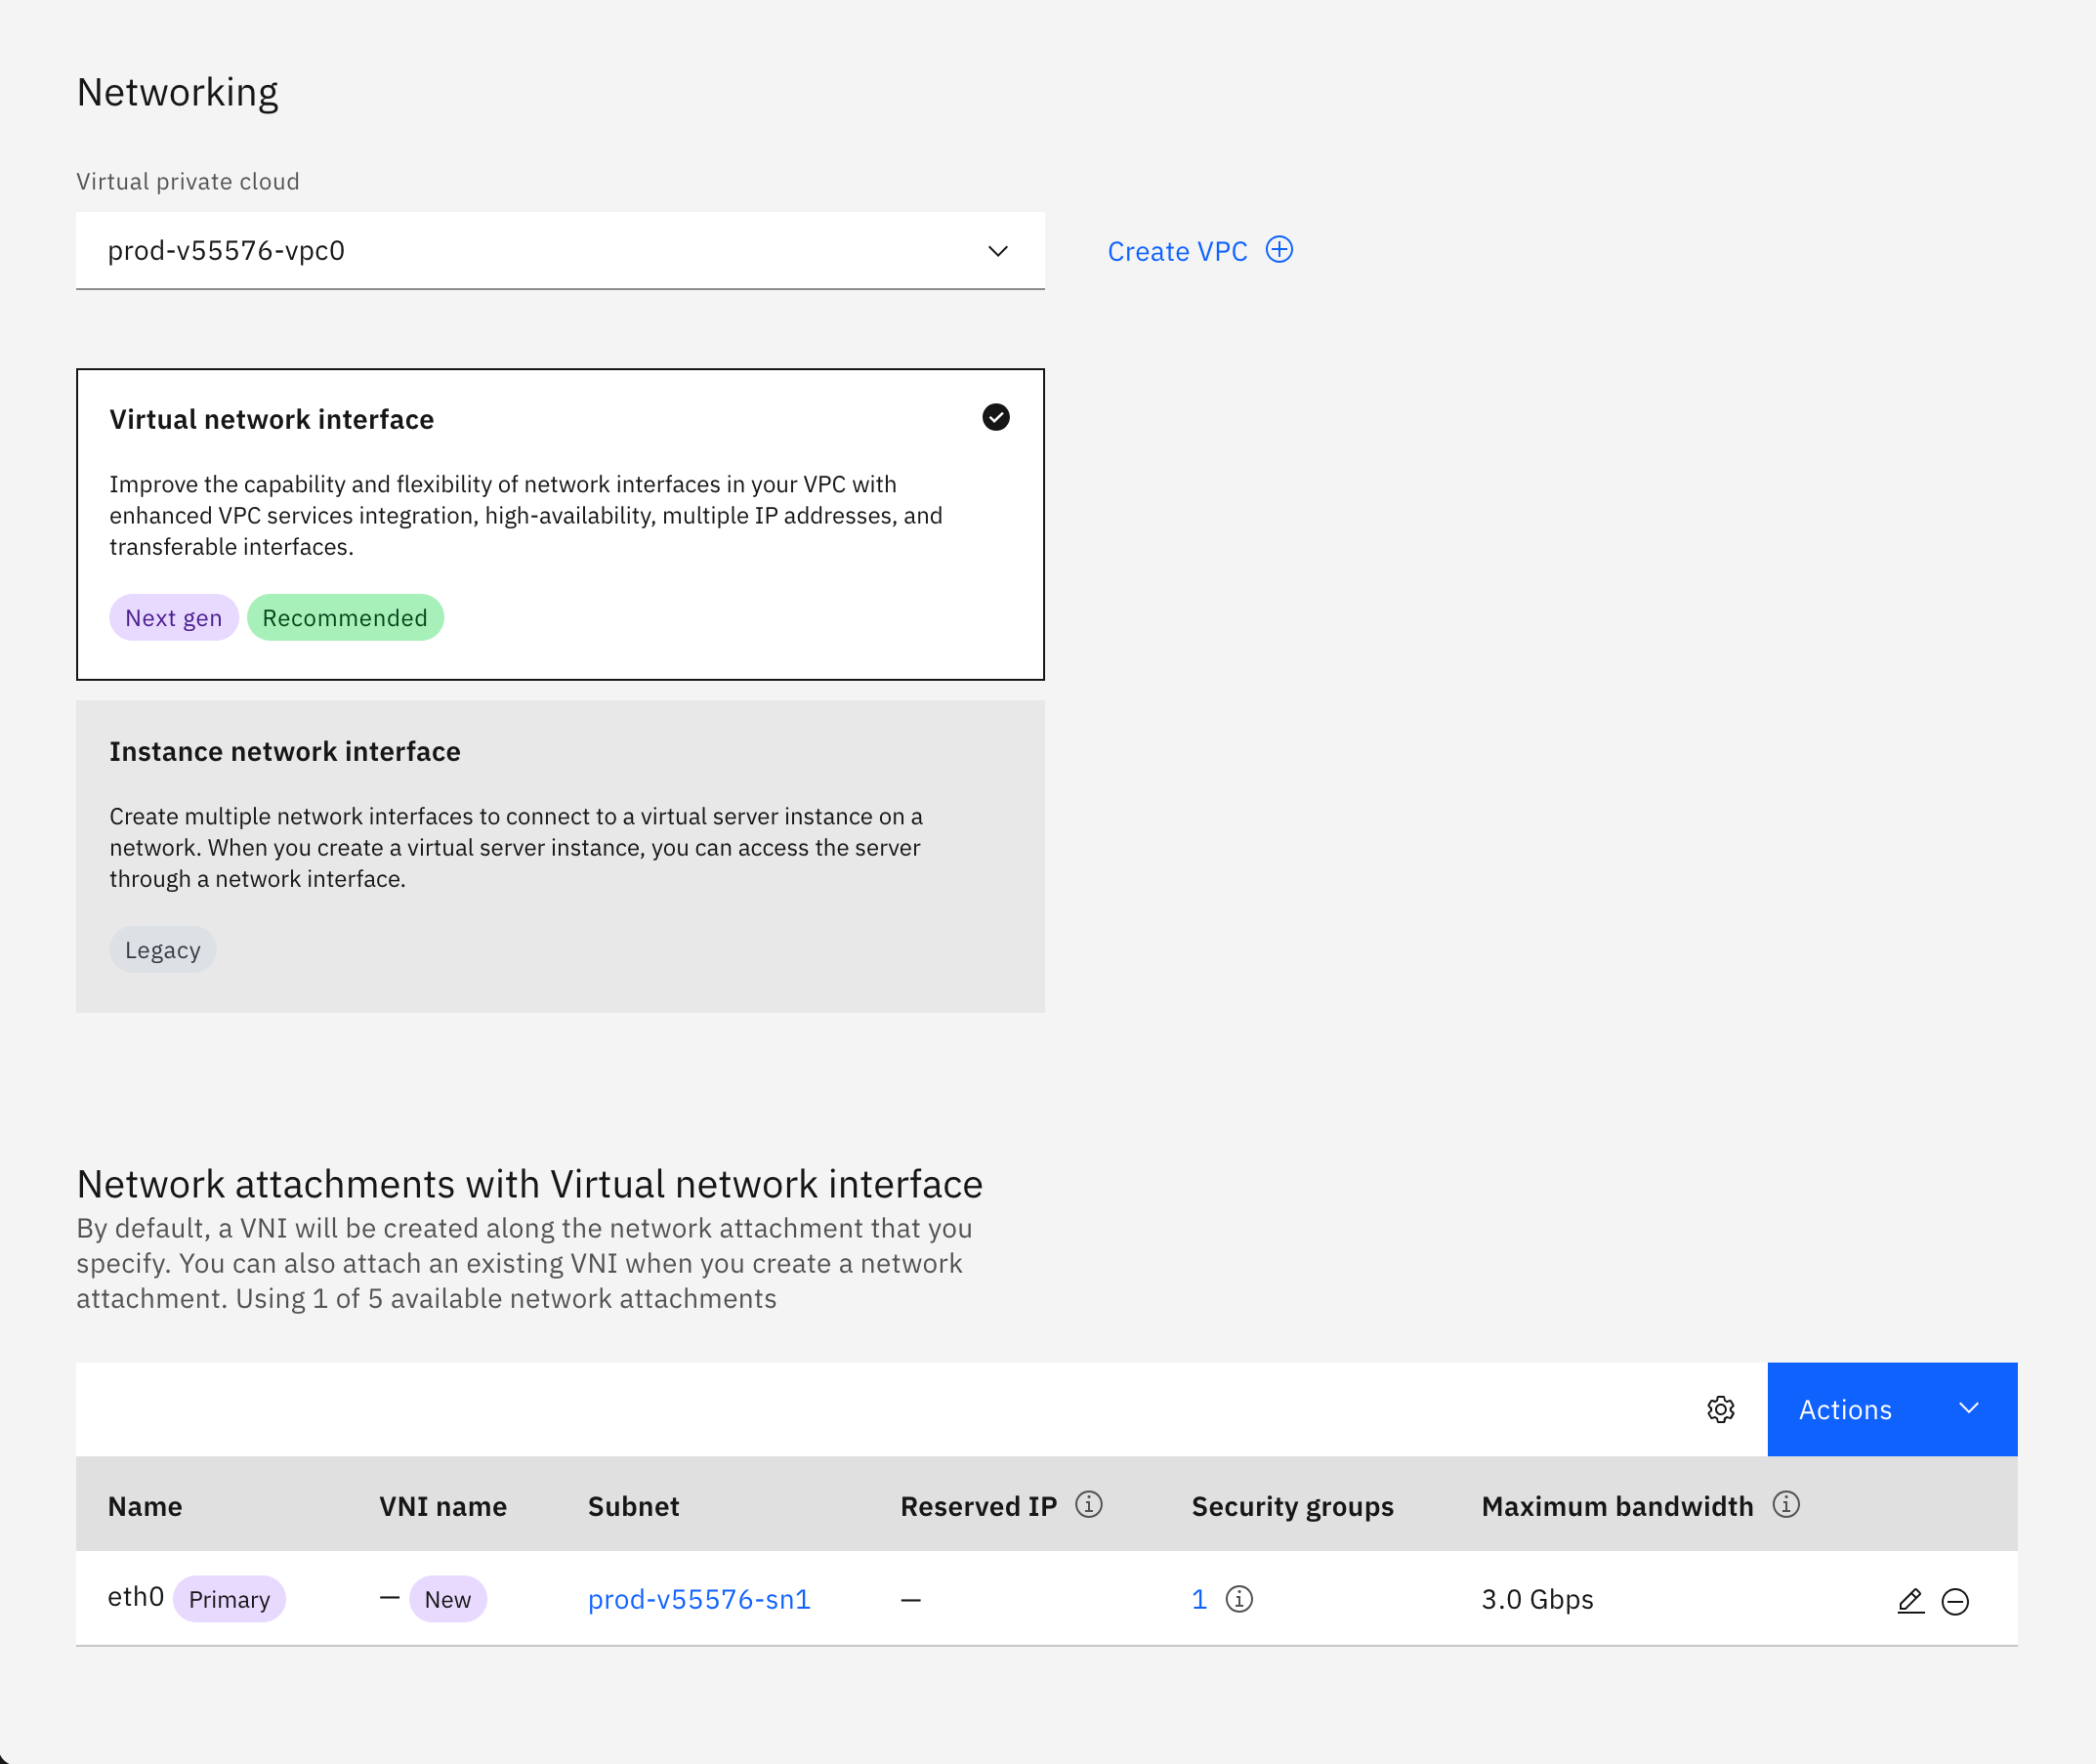
IBM Cloud - Create SGA VM - Network
- Under Advanced options, enable the Metadata service.
- Click on the Create virtual server button to create the SGA VM.
- Reserve a floating IP address and bind it to the SGA VM. Record the floating IP address as you will use it when registering the SGA VM.
Step 2: SGA Configuration
This step is needed for any one or more of the following configuration requirements:
- Specify the SGA Activation Code if it was not specified during the creation of the SGA VM.
- Configure the public IP address of the SGA VM that users will use to reach this SGA Node if the SGA VM does not have the public IP address attached to the network interface of the SGA VM.
- Configure the private IP address of the network interface (relay IP address) that is used for traffic to the workloads (if there is more than one network interface attached to the SGA VM).
- Configure the SGA VM's static private IP address used to accept inbound traffic from the Internet and the DNS server(s) to resolve Frame control plane FQDN.
The public IP address configured in the SGA VM will be provided to the Frame control plane during SGA registration. Frame control plane provide this public IP address to users when users request access to their Frame desktops in Frame Accounts attached to the SGA Cluster.
-
Once the SGA VM is powered up, connect to the serial console of the SGA VM through your infrastructure portal.
-
Log in to the SGA VM using the default credentials (username:
sga, password:difr).
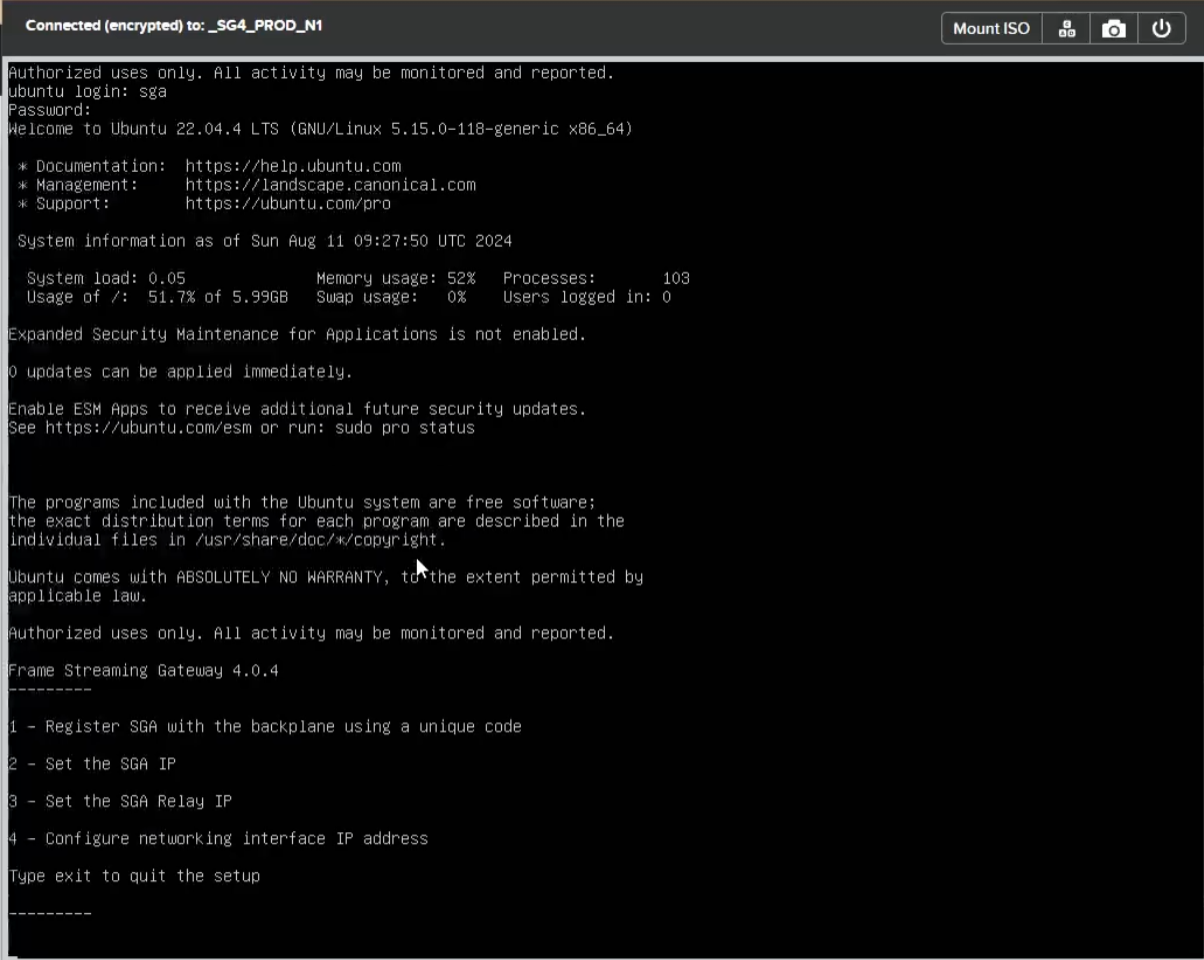
- When you log in to the SGA VM, you'll see the following setup menu:
1 - Register SGA with the backplane using a unique code
2 - Set the SGA IP
3 - Set the SGA Relay IP
4 - Configure networking interface IP address
Type exit to quit the setup
Although the menu lists these options in numerical order, you must complete them in the following sequence below to avoid activation errors. Specifically, complete Steps 1 and 2 before entering the Activation Code in Step 3 to avoid errors.
| Step | Wizard Option | Action | Details / Notes |
|---|---|---|---|
| 1 | Option 4 | Configure private IP, subnet, gateway, and DNS | Must be completed first. If skipped or done out of order, activation code validation will fail. |
| 2 | Option 2 | Set the public IP address for the SGA VM | This is the IP that users will connect to. Can be updated later, but only affects future sessions. |
| 3 | Option 1 | Enter the Activation Code (register with the backplane) | Only works if private and public IPs are configured. Activation code errors occur if done prematurely. |
| 4 (if needed) | Option 3 | Set relay IP for multi-NIC configurations | Use when multiple NICs are present to forward traffic from the user to workload VMs. |
- When you have completed configuring the SGA and verified the SGA VM is available in Step 3: SGA Verification, be sure to log out. It may take a few minutes for the SGA VM to appear as available in the Admin Console.
Step 3: SGA Verification
- Return to your Streaming Gateways page within the Frame Console. It may take a few minutes for the SGA Node to contact the Frame control plane and complete the registration process. Verify that the SGA Node is now available and has the expected public IP address.

- Repeat the Add Node process to create additional SGA Nodes for a highly available SGA Cluster.
Delete Node
Customer administrators can delete an existing SGA 4 Node from their SGA Cluster at any time, except when:
- The SGA 4 node is powered on.
- There is only one SGA 4 node left and there are one or more Frame accounts attached to the SGA Cluster.
Follow the procedure as described for Automatic Deployment, Delete Node. Once the SGA Node is deleted from the Frame control plane, go to your cloud provider infrastructure console and terminate the VM (and any related network resources).
Attach Frame Account
Prerequisites
Before attaching a Frame account to an SGA cluster, there are several prerequisites:
- Confirm there is no private IP address overlap between the network containing the SGA VMs and the network containing the workload VMs.
- For manually deployed SGA 4 clusters, confirm that the SGA 4 nodes have a network route to the network containing the workload VMs, as specified in the Network Requirements for Private Networking with SGA (Public Cloud) or Private Networking with SGA (AHV).
- Frame account must be configured for private networking or private networking with SGA 3.5. Attaching an SGA 4 Cluster to a Frame account that is already using SGA 3.5 will configure the Frame account to use the SGA 4 Cluster. The SGA 3.5 VMs are not impacted.
If the Frame account was created using a Frame-managed network and the SGA 4 Cluster was automatically deployed, then Frame control plane will automatically peer the SGA 4 network and Frame account network together. If the Frame account was created using customer-managed networking and the SGA 4 Cluster was manually deployed, the customer must configure all networking elements to allow bidirectional traffic between the SGA 4 nodes and the Frame account workload VMs.
Procedure
- Navigate to the Settings page of the Frame Account Dashboard.
- Click on the Networking tab and then Attach SGA 4.0.
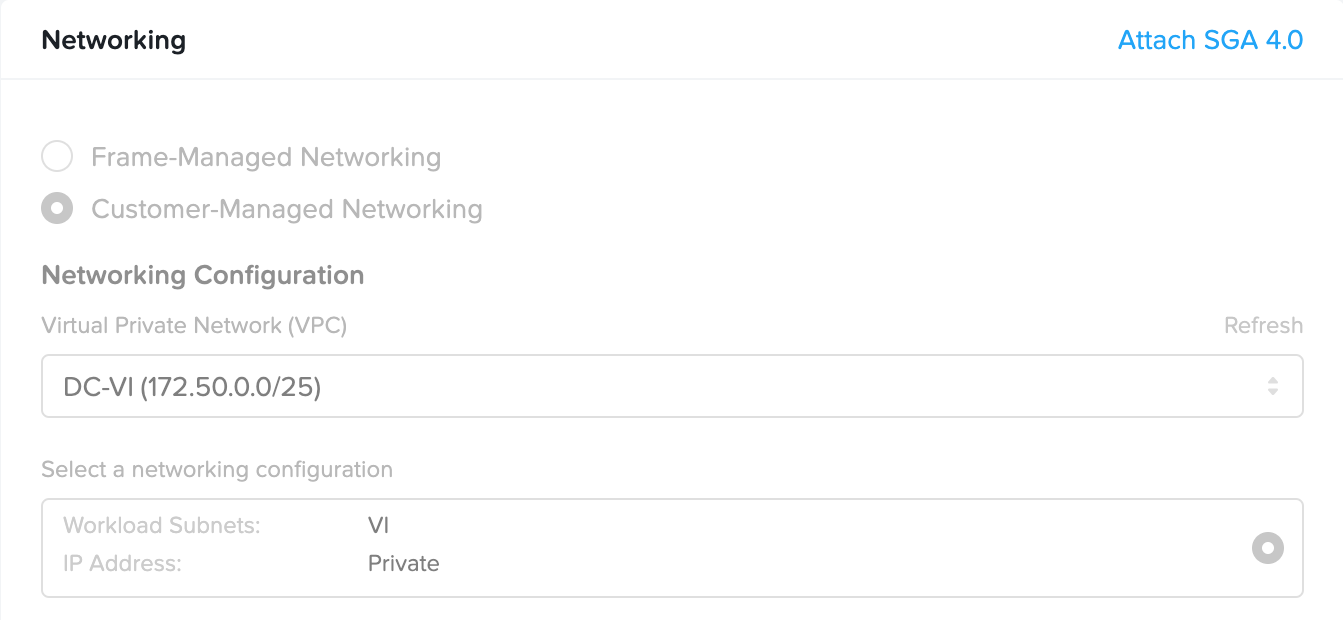
- Specify the SGA cluster you wish to attach this Frame Account to from the list of SGA 4 clusters that have at least one available SGA 4 node will available.
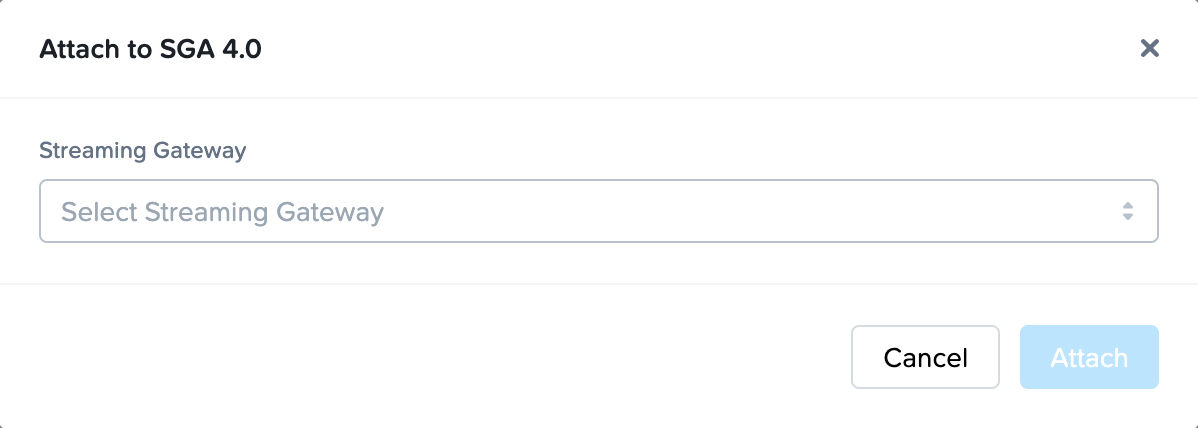
- Click Attach to attach Frame account to the SGA 4 Cluster.
Maintenance Mode
Manually-deployed SGA 4 clusters provide the option to place one or multiple nodes into Maintenance Mode. When this mode is activated, the selected SGA node enters Maintenance status, meaning it will no longer receive new session requests. Instead, incoming sessions will be forwarded to the remaining active nodes in the cluster.
Existing sessions currently hosted on nodes in Maintenance Mode will continue to run without interruption.
To enable Maintenance Mode for your manually-deployed SGA 4 cluster, simply click the kebab menu to the right of the node name and select Start Maintenance.

The status of the node will be reflected under the Status column in the Nodes list.
Lastly, Maintenance Mode can be stopped by again clicking on the kebab menu to the right of the desired node and selecting End Maintenance.

Detach Frame Account
- Navigate to the Settings page of the Frame Account Dashboard.
- Click on the Networking tab and then Detach SGA 4.0.
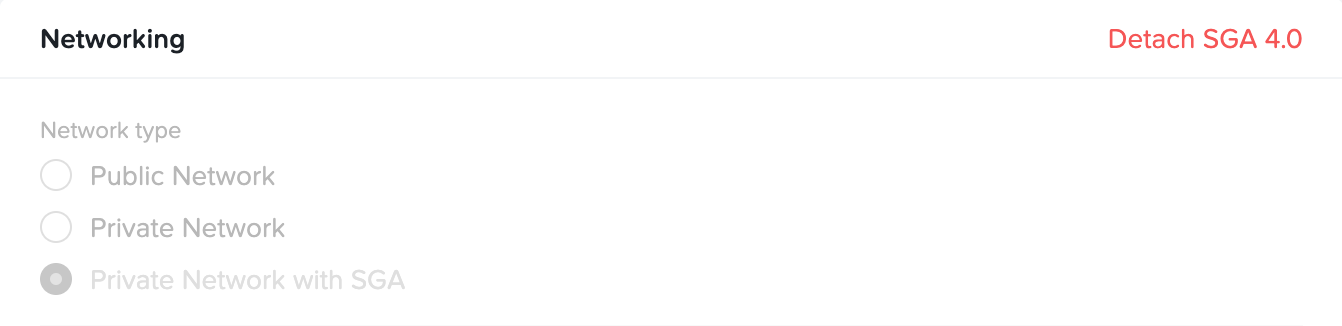
- Click Detach to detach the Frame account from the SGA 4 Cluster.
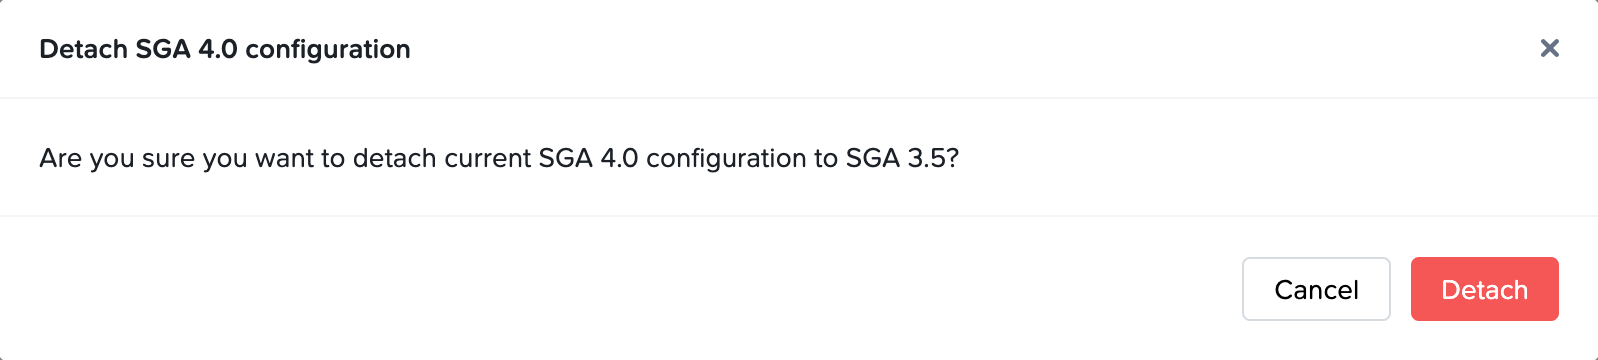
If your Frame account was attached to SGA 3.X before the Frame account was attached to SGA 4, the SGA 4 detach operation will revert the Frame account to use SGA 3.X, as the above figure illustrates. This can be used to rollback to SGA 3.X if necessary (until SGA 3.X is end of life).
Automating Deployment of SGA Nodes
If you plan to automate SGA 4 VM deployment, prepare an SGA VM cloud configuration file (YAML file) that will be used when you provision your SGA VM by replacing <paste_activation_code_here> with the actual Activation Code value in the following template.
#cloud-config

runcmd:
  - set_sga_env SGA_ACTIVATION_CODE <paste_activation_code_here>
Verify that you have #cloud-config as the first line in your SGA VM cloud configuration file.
If you choose to specify the Activation Code in your SGA VM cloud configuration file for AHV, then make sure both SGA_CLOUD_PROVIDER and SGA_ACTIVATION_CODE environment variables are set in the configuration file. For example, in a manually deployed SGA 4 on AHV where the activation code is provided in the SGA VM Cloud Configuration file:
#cloud-config

runcmd:
  - set_sga_env SGA_CLOUD_PROVIDER nutanix
  - set_sga_env SGA_ACTIVATION_CODE <paste_activation_code_here>
The YAML file contents will need to be added as a Cloud-init Custom Script (AHV), to User data (AWS, IBM), to Custom data (Azure), or as the value for the user-data metadata key (GCP) as part of the SGA VM provisioning workflow.
Manual Assignment of Static IP Address
For customers who require their SGA VM to have a static private IP address (versus a DHCP-provided private IP address), administrators can login to the SGA VM via their cloud provider's serial console and run the SGA configuration utility. Alternatively, while inside the SGA VM, they can use the following procedure to configure the static IP address of the Ubuntu VM’s network interface and the DNS servers needed to resolve Frame control plane endpoints.
After connecting into the SGA 4 VM, execute the following steps at the Ubuntu command line:
-
Create a
netplanconfiguration file at/etc/netplan/99_config.yamlby executing:sudo vi /etc/netplan/00-installer-config.yamlwith the following YAML file template, modifying the template for the static private IP address of the SGA VM and the gateway private IP address:
network:
  version: 2
  renderer: networkd
  ethernets:
    eth0:
      addresses:
        - 10.10.10.2/24 # Static private IP address of the SGA VM.
      routes:
        - to: default
          via: 10.10.10.1 # Private IP address of the gateway
      nameservers: # set DNS servers and search domains
          search: [mydomain, otherdomain]
addresses: [10.10.10.1, 1.1.1.1] -
Execute
sudo netplan applyto set the static private IP address. -
Execute
sudo resolvectl dns ens3 8.8.8.8 8.8.4.4 1.1.1.1to configure the DNS servers that will resolve domain names. -
Verify that your DNS configuration is configured as your network requires by running
sudo resolvectl
Monitoring
You can monitor the availability of the SGA Nodes and Clusters in the Streaming Gateways page at the Customer or Organization entity levels. To monitor the CPU, memory, and bandwidth utilization of your SGA VMs, use the monitoring functionality provided by your infrastructure provider.
Adjust Your SGA VM Size
After you have created your SGA VM, you can adjust the size of the VM through the console of your infrastructure hosting your SGA VM. We do recommend the following procedure in your infrastructure console:
- Power off your SGA VM.
- Change the instance type to a smaller (or larger) instance type.
- Power on your SGA VM.
Since users will not be able to reach the workload VMs behind your SGA VM during the time that your SGA VM is unavailable, you will need to schedule a maintenance window to perform this operation if you only have one SGA VM or have more than one SGA VM in a high-availablity configuration.
Troubleshooting
Networking
You can verify that the SGA VM can reach the Frame control plane by using the following command within the SGA VM OS:
curl -v 'https://cch.console.nutanix.com/sga/verify' -H "Content-Type: application/json" -X POST -d '{"code":"dummy_code"}'
This is useful if you encounter issues registering the SGA VM or if the SGA VM status is Unavailable in the Frame Console.
Services
If the SGA VM is not available in Frame Console, check the status of the SGA service.
sudo systemctl status sga.service - sga elixir app status
If the SGA node is not accepting FRP8 sessions, check the status of the coturn service.
sudo systemctl status coturn.service - coturn status
The logs for these two services can be viewed by executing one of the following commands:
sudo journalctl -fu coturn.service - follow the logs of coturn
sudo journalctl -fu sga.service - follow the logs of sga elixir app