Amazon Web Services
Overview
The Bring Your Own AWS (BYO AWS) feature allows customers to seamlessly connect their AWS account with the Frame Platform, enabling full control over infrastructure while leveraging Frame’s virtual desktop and application delivery capabilities. With BYO AWS, customers can deploy Windows and Linux workloads directly into their own cloud environment, customize virtual machines to meet specific needs, and manage resource consumption according to their business goals. This flexibility provides the benefits of cloud infrastructure alongside the simplicity of Frame's remote desktop solution.
Setup
Requirements
In order to register your AWS or AWS GovCloud account with Frame, you need to ensure that you have addressed the following before proceeding:
-
IAM user who can create the CloudFormation stack with the Frame-provided CloudFormation script. The IAM user must have, at a minimum, the following permissions:
- AWS Console login
- AmazonEC2FullAccess
- IAMFullAccess
- AWS_ConfigRole
- AWSCloudFormationFullAccess
Due to the way that AWS CloudFormation Stacks operate, the orchestration of Frame resources in your AWS subscription is not tied to a particular IAM user account. Frame Platform does not rely on the IAM user that was used to associate your AWS subscription to the Frame Platform. The IAM user can be deleted or disabled at any time without disabling your integration with Frame. If you do wish to disable your integration with Frame manually, please delete the Nutanix-Frame-High-Cloud-Stack-Prod CloudFormation stack, as well as the FrameGatewayRole, FrameLambdaRole, and FrameWorkloadRole IAM roles.
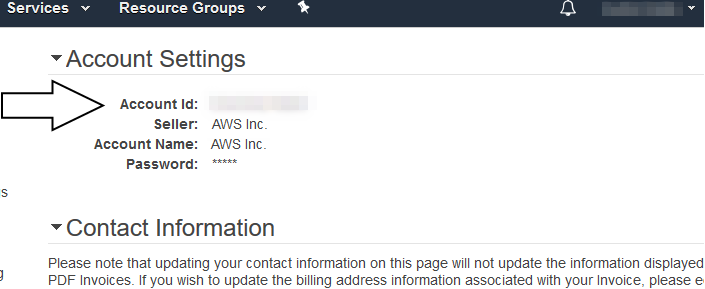
- You know your AWS Account ID that will be registered with Frame. The AWS Account ID can be found by going to your “My Account” page in your AWS Console. Click on the drop down menu next to your account name in the upper right corner of your AWS Console to access this page.
-
Determine whether you are registering your cloud subscription on your Frame Customer Entity or an Organization entity.
-
Streaming Gateway Appliance: If you plan to deploy Streaming Gateway Appliances in AWS (either during the Frame account creation process or manually after the Frame account is created), you will need to accept the CentOS 7 license terms in the AWS Marketplace first. Visit https://aws.amazon.com/marketplace/pp/B00O7WM7QW/ and subscribe to CentOS 7 (x86_64).
Costs may begin to accrue immediately after completing the CloudFormation Stack creation.
You will need to be logged in to the AWS console with your IAM user in a separate tab or window in order to complete the CloudFormation Stack creation. Frame Platform will not have access to your AWS user credentials.
AWS Dedicated Instances
When deploying Windows 10 or 11 VMs using your BYO AWS account, Frame now leverages AWS Dedicated Instances by default. Dedicated Instances provide isolated hardware environments to ensure compliance with Microsoft’s EULA for virtualized desktops. This feature helps maintain licensing integrity for both Frame-provided and customer-provided Windows images. More details around licensing with AWS Dedicated Instances can be found in our Microsoft Licensing Guide
AWS Dedicated Instances follow a pay-as-you-go model, with an additional regional fee (per hour, per region) applied whenever a dedicated instance is active. You can find more information about regional fees in the AWS Dedicated Instance Pricing Guide.
Adding your Cloud Account
Procedure
- Go to your Frame Admin Console.
- Navigate to the Customer or the Organization Dashboard (depending on where you wish to add the cloud account).
- Click on Cloud Accounts in the left-hand menu.
- Click the Add Cloud Account button on the top-right corner of the page.
- A new window will appear prompting you for the following information:
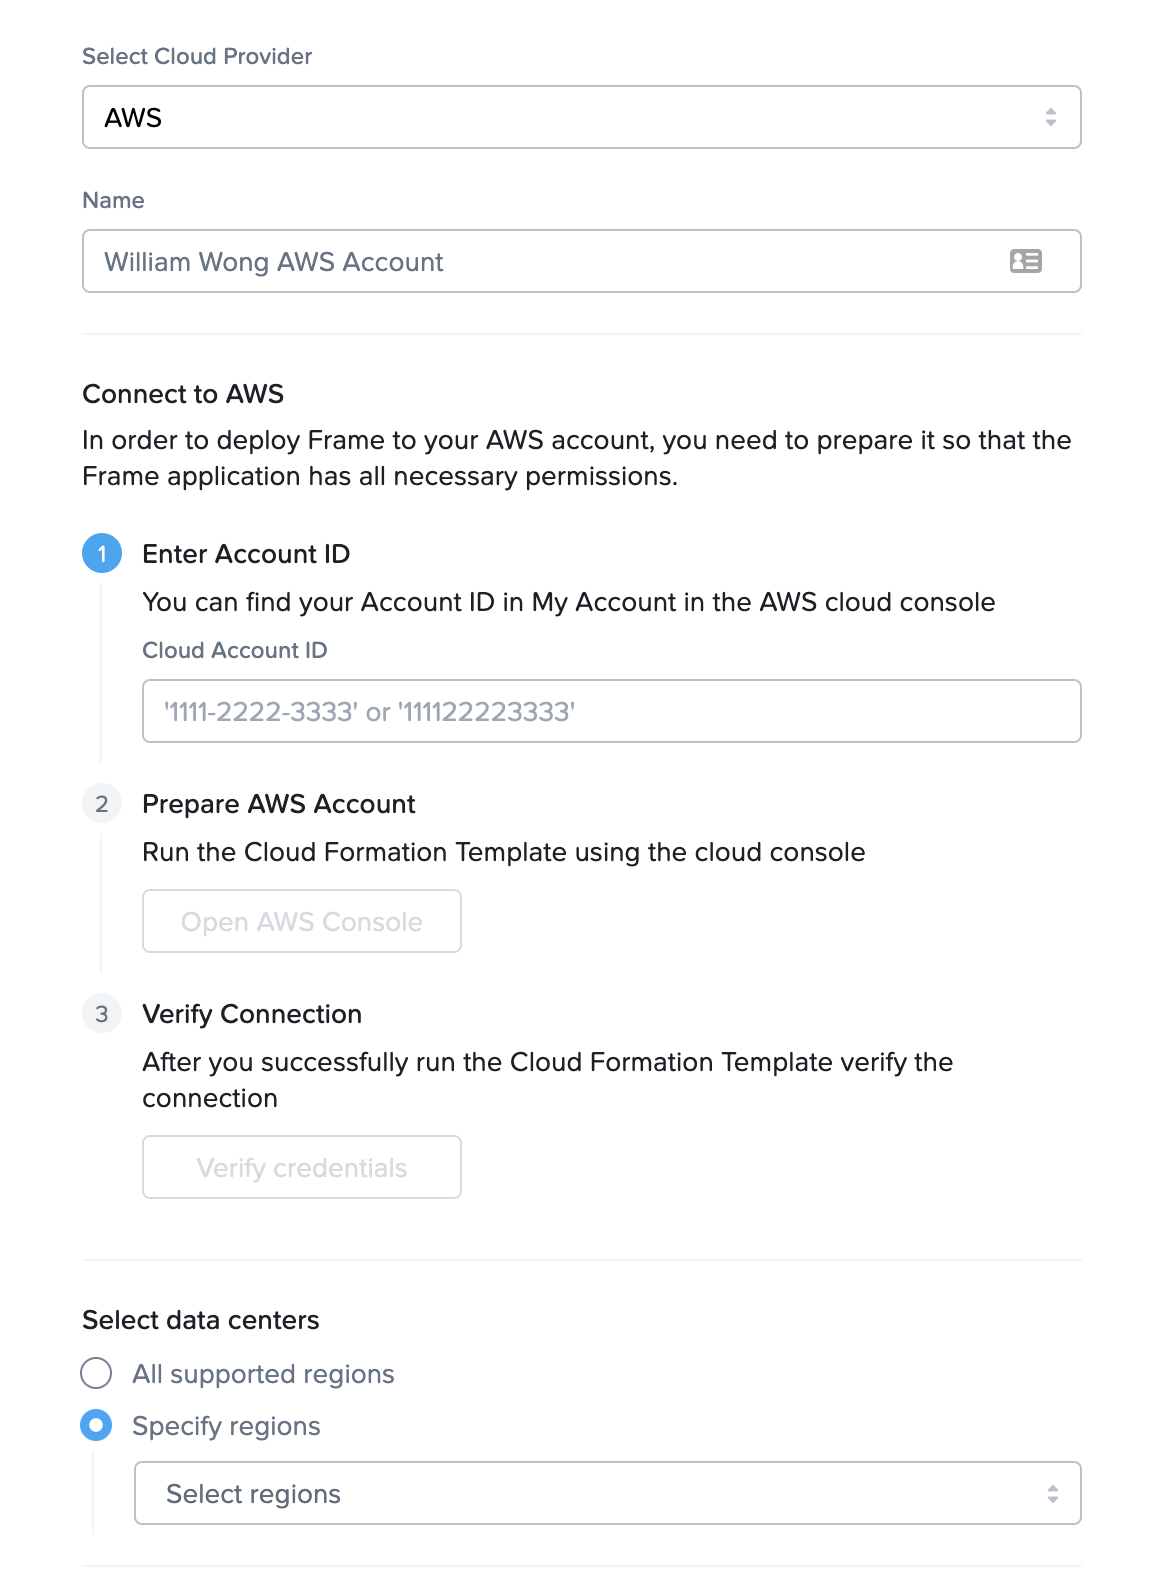
- Cloud Provider: Select AWS.
- Name: Enter the desired name of your cloud service. This will be the name of the Cloud Account in Frame Console.
- Cloud Account ID: Enter your AWS Account ID (without dashes) in this field.
-
Once you have entered the information, click the “Open AWS Console” button.
- At this point, your browser will be redirected to the AWS console in a new tab. If you are not logged in to AWS with the desired BYO AWS account, you will be prompted for credentials.
- Make sure you are logged in with the correct AWS account you wish to use (if you have multiple AWS accounts).
-
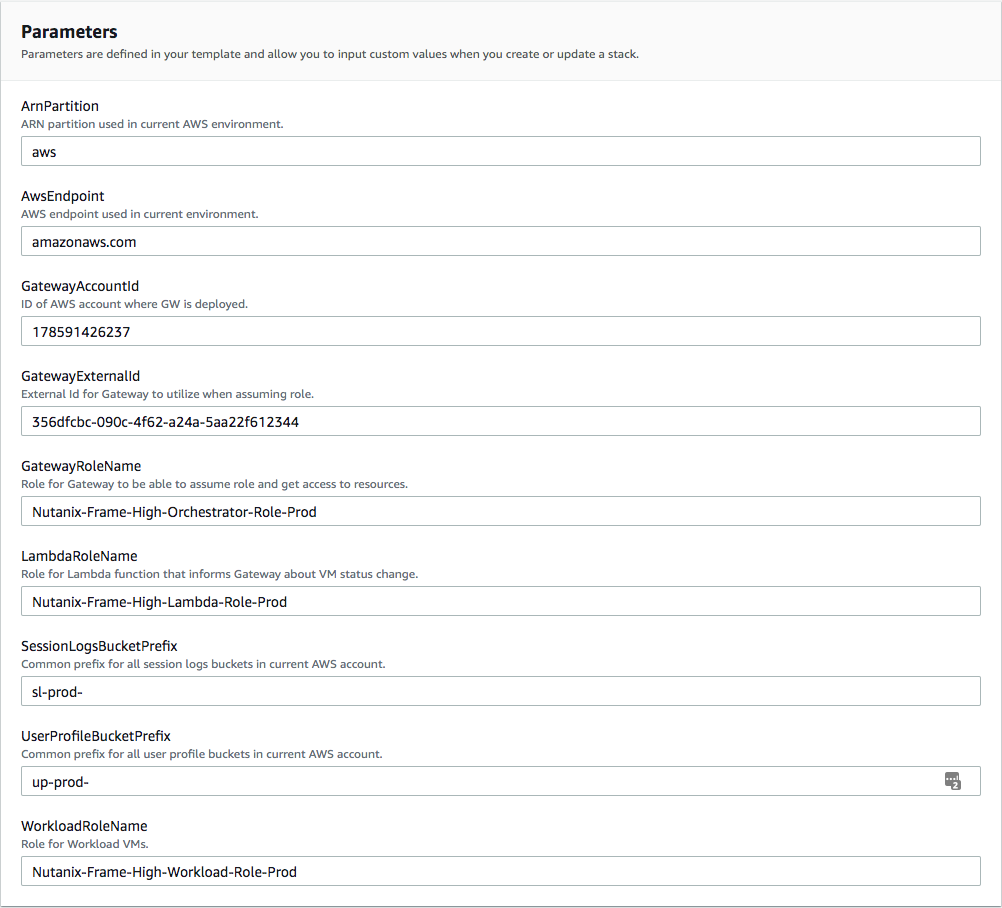
The first page you will be taken to is the CloudFormation Stack Quick Stack Creation page. All information should be automatically filled out for you.
When deploying Windows 10 or 11 VMs using your BYO AWS account, Frame now leverages AWS Dedicated Instances by default. Dedicated Instances provide isolated hardware environments to ensure compliance with Microsoft’s EULA for virtualized desktops. This feature helps maintain licensing integrity for both Frame-provided and customer-provided Windows images. More details around licensing with AWS Dedicated Instances can be found in our Microsoft Licensing Guide
- Simply scroll to the bottom and check the box to allow CloudFormation to create IAM resources for you, then click “Create stack”

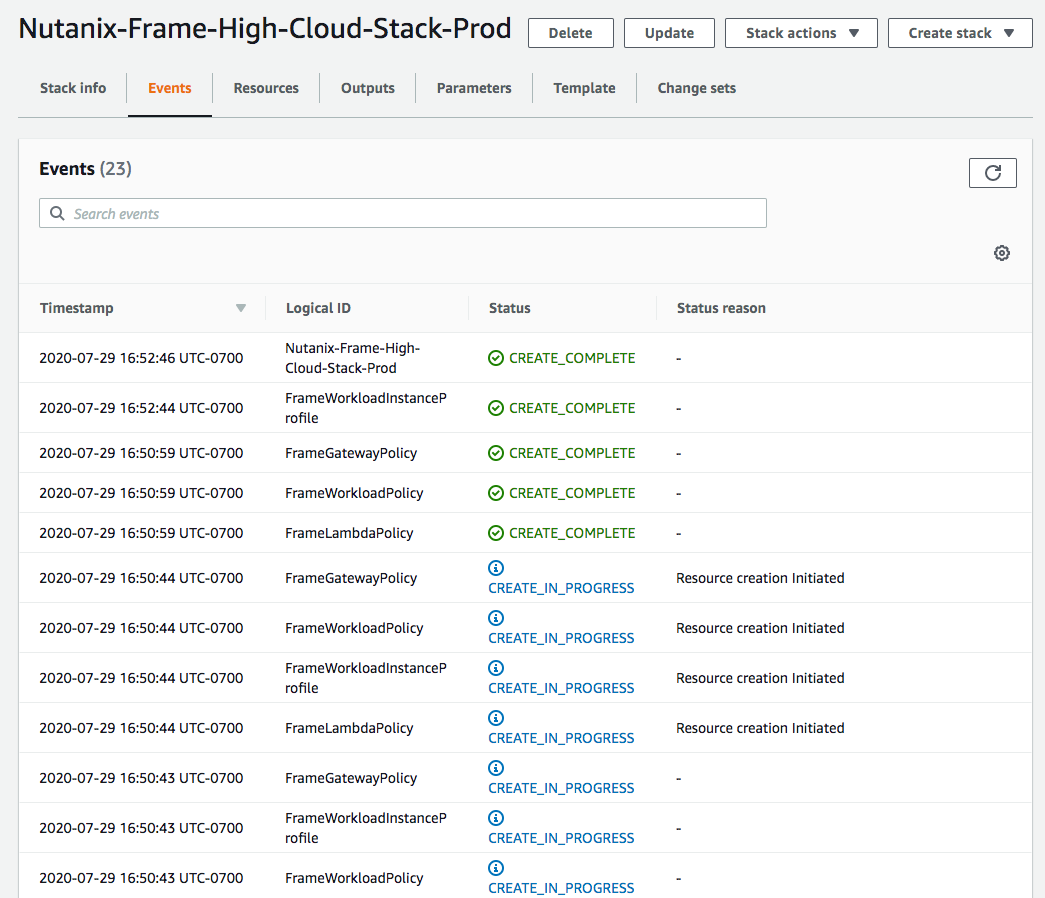
- Once the above process is complete, you will be directed to a page which lists the events for this CloudFormation Stack. The creation process will proceed automatically. You may need to refresh the page to see new events. Once events appear named
Nutanix-Frame-High-Orchestrator-Role-Prod,Nutanix-Frame-High-Lambda-Role-Prod, andNutanix-Frame-High-Workload-Role-Prodand are marked as status “CREATE_COMPLETE”, the stack creation has completed. This typically takes less than two minutes.
-
Once the stack has been created, navigate back to your Frame tab and select “Verify Credentials”.
-
Once your credentials are verified, you can select the data centers (AWS regions) for your Frame accounts. You may add additional data centers in the future.
-
Check the box at the bottom informing you of possible resource usage on your AWS cloud infrastructure and then click "Add Account". After a few minutes, you will see your AWS Cloud Account listed as "Ready".

Now that your AWS Cloud Account is created and accessible within Frame, you will be able to create Frame accounts using this BYO cloud account.
Resources Created During BYO AWS Cloud Account Creation
During the creation of a BYO AWS or BYO AWS GovCloud Cloud Account, the Cloud Formation template creates three IAM Roles.
- FrameGatewayRole allows Frame Platform to provision and deprovision AWS resources for Frame-managed workloads.
- FrameLambdaRole allows log entries to be captured by Frame Platform.
- FrameWorkloadRole enables Frame Platform to store and retrieve Dizzion-provided OS images in an S3 bucket in each of the AWS regions where you create Frame accounts.
Service Limits
By default, a newly created AWS account will impose certain service limits on available resources. Depending on the number of the Frame workload VMs required of a given machine type (e.g., number of concurrent users on g4dn.2xlarge), how the Frame account is created (e.g., Frame networking with or without an SGA), and whether you use Publish or Quick Publish, you will likely need to adjust the default limits imposed on the AWS account. If these limits are set to values that are lower than what is required by the Frame platform, you can expect certain functions to either fail, or be substantially delayed. The requirements by Frame for these service limits depends on the desired workload and required resources. The recommended service limit increases include the following:
| AWS Resource | Recommendation |
|---|---|
| EC2 (CPU-only and GPU instance types) | AWS has service quotas on the total number of vCPUs for any given instance family, on a per-region basis. We recommend you first determine the expected max number of instances by instance type (per Frame account) for your needs. Next, calculate the required number of instance family-specific vCPUs based on the expected max number of instances and the required number of vCPUs per instance type (for that family). If you use Publish, set your vCPU quota to 2.2 times the number of instance family-specific vCPUs. The additional 20% will accommodate any additional resources such as Sandboxes, Utility servers, etc. If you use Quick Publish, you can use a minimum factor of 1.X times to calculate the required number of instance family-specific vCPUs. X is computed as the “Number of production instances created on publish” divided by expected max instances. By default, the “Number of production instances created on publish” value is configured to be 10 VMs. A factor of 1.3-1.5 should be sufficient to account for typical Quick Publishes and overhead. |
| EBS | Typically, this resource does not need to be modified. To estimate total disk storage consumption, multiply the total number of VMs you expect to provision by the size of the Sandbox VM (e.g., 80 GiB) across all Frame accounts you plan to provision. Number and size of any utility servers, number of Sandbox image backups, number and size of personal drives, and number and size of enterprise profile disks would be additional storage to consider. |
| IP Addresses | AWS does not have any service quotas on public or private IP addresses that are assigned when an EC2 instance is powered on and removed when an EC2 instance is powered off. If a Frame account is created with Frame public networking, each workload VM will have both a public and private IP address. If the Frame account is created using Frame private networking, all workload VMs will only have private IP addresses. If the Frame account is created using Frame private networking with Streaming Gateway Appliance (SGA), then Frame will provision 1 public IP address for each SGA VM and 1 public IP address for the load balancer in front of the SGA VMs. All of the workload VMs will only have private IP addresses. You will also need to account for the temporary increase of in-use IP addresses during a Publish or Quick Publish when the new production VMs are created and before the old production VMs are terminated. |
| Elastic IP Addresses | Elastic IP addresses are static, public IPv4 addresses. Frame does not provision Elastic IP addresses. However, if you plan to use VPN endpoints, you will need to factor into your service quota calculations the 1 or 2 Elastic IP Addresses needed for configuring the VPN gateway. |
| Network interfaces | By default, you should have 5,000 network interfaces per region. If a Frame account is created with Frame public networking, you will have need 2 network interfaces (private IP address and public IP address) per workload VM. If a Frame account is created with Frame private networking with SGA, you will have need 1 network interfaces (private IP address) per workload VM. |
| VPCs | If Frame public networking or Frame private networking is used to create Frame accounts, the number of VPCs equals the number of Frame accounts. If Frame private networking with SGA is used to create Frame accounts, the required number of VPCs is two times the number of Frame accounts. For BYO networking, no new networks are created. |
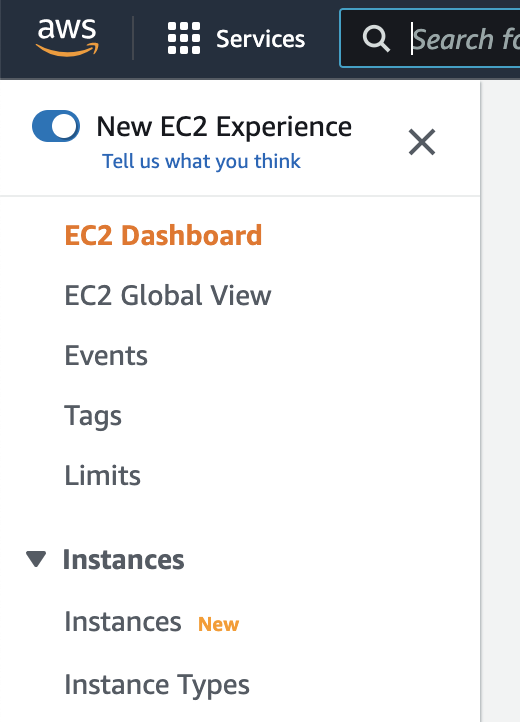
To modify service limits on your AWS account, you will need to click on the “Limits” link in the navigation panel on the left of the AWS console (pictured below):
Service limit increases may not be necessary for smaller production environments or trial accounts.
Tips
- If possible, group your service limit increases by geographic region. Each geographic region has its own approval team. A limit increase across multiple regions can take multiple weeks.
- Approval time can vary by the size of the request. For instance, two or three small service limit increase requests are generally approved more quickly than one large request.
- Since capacity is limited, increasing service limits on GPU-backed instances generally takes longer than general purpose limit increases.
- T3 instance limit increase requests are usually approved and implemented within 24 hours of the request. G4/G5 instance limit increases take longer (especially for larger quantities).
Instance Types
Each IaaS provider has a unique naming scheme for their instance types. AWS categorizes their “Elastic Cloud Compute instances” (a.k.a. “EC2 instances”) based on compute, memory, and GPU configuration. More information about Amazon EC2 instances can be found in their official AWS documentation.
For the latest AWS instances supported by Frame, refer to our Supported Instance Types table.
Resource Naming
Frame provisions the resources below based on a specific naming convention. The resource name value is also saved as value for the tag Name.
| Resource | Resource Name | Example |
|---|---|---|
| Workload VM | prod:v{vendor_id}:s{server.id} | prod:v53209:s8059811 |
| Workload VM root volume | prod:v{vendor_id}:s{server.id}:root | prod:v53209:s8059811:root |
| User Volume | prod:v{vendor_id}:{random 8 character}:{type} | prod:v48287:8206856b:profile |
| User Volume backup (Snapshot) | prod:v{vendor_id}:d{user_volume_id} | prod:v48287:d169928 |
| Image | prod-v{vendor_id}-s{server_id}-{image_type}-{random 5 characters} OR prod-v{vendor_id}-{image_type}-{random 5 characters} | prod-v53209-s8059811-publish-64d3d or prod-v48287-manual-8e750 |
| Master Image | prod-master_image-src-{source_image_id}-{random 5 characters} | prod-master_image-src-239323-d06e8 |
| VPC | prod:v{vendor.id}:vpc{vendor.vpc_set.count()} | prod:v7538:vpc0 |
| Subnet | prod:v{vendor.id}:sn{idx} | prod:v53209:sn3 |
| Security group | prod:v{vendor.id}:sg-default | prod:v53209:sg-default |
| Static Public IP | prod:v{vendor.id}:sg-default | prod:v53242:sg-default |
| NAT Gateway | prod:v{vendor.id}:sg-default | prod:v53242:sg-default |
| Routing table | prod:v{vendor.id}:sg-default | prod:v53242:sg-default |
| SGA VPC | prod:sga:{streaming_configuration_id}:vpc | prod:sga:2425:vpc |
| SGA subnet | prod:sga:{streaming_configuration_id}:vpc{vpc.id}:sn{str(i)} | prod:sga:2425:vpc69807:sn1 |
| SGA security group | prod:sga:{streaming_configuration_id}:vpc:{vpc.id}:sg-default | prod:sga:2420:vpc:69784:sg-default |
| SGA VM | prod:sga:{streaming_configuration_id}:s{server.id} | prod:sga:2420:s1f175e3d |
| SGA VM root disk | prod:sga:{streaming_configuration_id}:s{server.id} | prod:sga:2425:sc95b63e7 |
| SGA load balancer | prod:sga:{streaming_configuration_id}:nlb | prod:sga:2425:nlb |
{image_type} can be one of the following values:
manual- for manual backupspublish- for backups created for publishing purposetest_publish- for backups created for test publishauto- for scheduled backupssystem- for backups created internally in various processes (e.g. cloning, generalization)master- from a master image
{disk_type} can be one of the following values:
profile- Enterprise profile diskpersonal- Personal drive
The Streaming Gateway Appliance (SGA) resource naming applies only to Frame-provisioned and managed SGAs.