Account Creation
Frame Customer and Organization Administrators can create and manage multiple accounts from their Admin console. Each account is created:
- With an AHV, AWS, Azure, GCP or IBM (Infrastructure as a Service, IaaS) cloud account,
- In an on-premises datacenter (if created with an AHV Cloud Account) or a public cloud region (if created with an IaaS Cloud Account),
- In a virtual network (VLAN, VPC, or VNET),
- Non-persistent or persistent, and
- Having its own base image, unique set of applications, URLs, application and/or desktop Launchpads, and properties.
Before creating a Frame account, be sure to review and understand the network configuration requirements discussed in further detail in Network Configuration Requirements.
Infrastructure
Public Cloud
When creating a Frame account in public cloud (AWS, Azure, GCP, or IBM), the Customer or Organization Administrator may choose from one of four different network deployments. Account creation instructions for each network deployment model are provided in the next section.
- Frame-Managed Networking (Public network): all workload VMs have public IP addresses. Frame Platform creates the VNET or VPC.
- Frame-Managed Networking (Private network): all workload VMs have private IP addresses. Frame Platform creates the VNET or VPC.
- Frame-Managed Networking (Private network with Streaming Gateway Appliance (SGA)): all workload VMs have private IP addresses with one public IP address. Frame Platform creates the two VNETs or VPCs (one for the workload VMs and the second for up to 4 SGA VMs).
- Customer-Managed Networking: all workload VMs have private IP addresses. The customer is solely responsible for configuring and managing the network containing the Frame account workload VMs, routing between end users and the workload VMs, and creation of the SGA (if required).
Administrators creating new accounts with Frame base images may find that account creation takes longer when a new base image is available since the updated image needs to be applied.
AHV Infrastructure
When creating a Frame account on AHV infrastructure, the Customer or Organization Administrator creates the Frame account in an existing VLAN in the registered AHV Cloud Account. If the customer requires the SGA to support users accessing the workload VMs from the Internet without a VPN, they will deploy the SGA VM(s) independently in a DMZ LAN.
- Customer-Managed Networking (Private network): all workload VMs have private IP addresses. The customer is solely responsible for configuring and managing the network containing the Frame account workload VMs and routing between end users and the workload VMs.
- Customer-Managed Networking (Private network with Streaming Gateway Appliance (SGA): all workload VMs have private IP addresses. The customer is solely responsible for configuring and managing the networks containing the Frame account workload VMs and SGA VM(s) and routing between end users and the SGA VM(s) and between the SGA VM(s) and the workload VMs.
Create a New Frame Account Entity
-
Administrators with the appropriate role can create new accounts by selecting Accounts in the left-hand menu from the Customer or Organization Dashboard in their Admin Console.
-
Click the Create Account link located on the upper right portion of the screen. The first set of parameters to specify will determine the infrastructure, location, and networking option for the Frame account.
Use the tabs below to find instructions for each network deployment configuration:
- Public Network
- Private Network
- Private Network with SGA
- Customer-managed Networking
- AHV
Customers who wish to rapidly create a Frame account on the public cloud infrastructure for users accessing the virtualized applications/desktops from the Internet can choose this option. This procedure will provision a Frame account with the network requirements and architecture as defined in Public Cloud (Default) Network Requirements. All workload VMs will have public IP addresses.
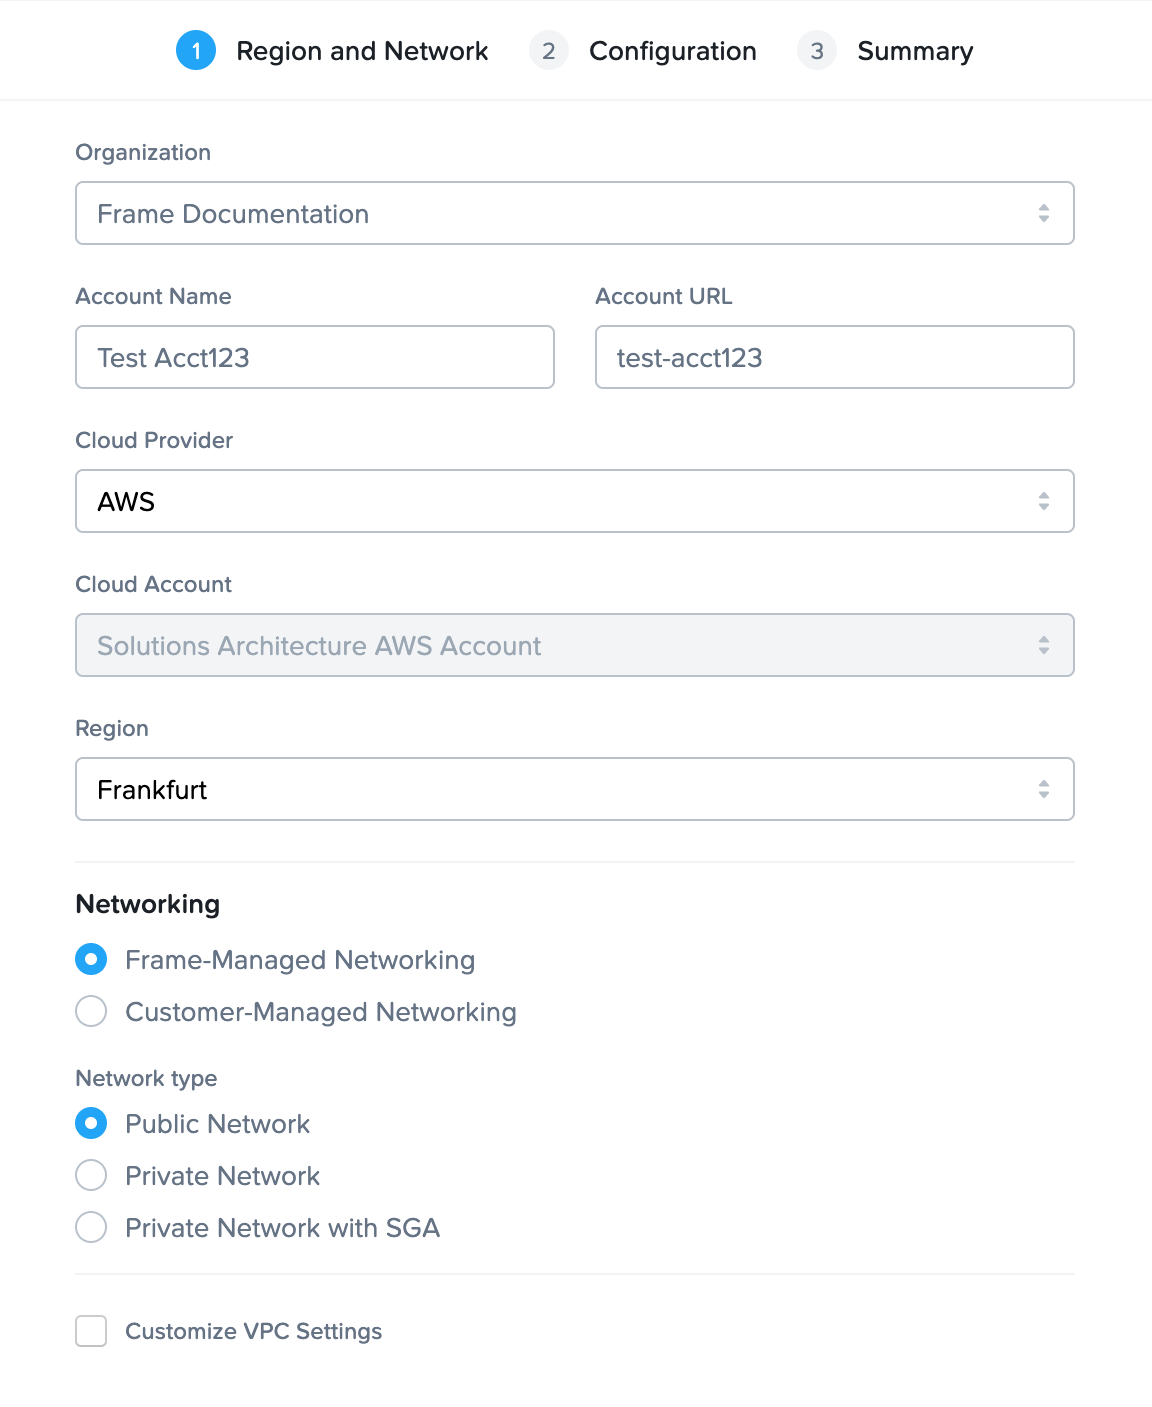
| Field/Button | |
|---|---|
| Organization | If account created at the customer level, this field is visible. Select or search for the top-level organization the account will reside under. |
| Account Name | Frame automatically generates an account name for you, but you can edit this field if desired. The account name will be displayed in the account Dashboard and Launchpad. |
| Account URL | This editable field designates the unique identifier for the account, when referencing the account in a URL. The format for the string referenced above would appear as: https://console.nutanix.com/frame/customer/org/test-acct-123 |
| Cloud Provider | Select the desired cloud or IaaS (Infrastructure-as-a-Service) provider for your account. |
| Cloud Account | Select the desired cloud account to use, if there is more than one cloud account for that cloud provider. |
| Region | Specify the desired datacenter you would like the account to be created in. |
| Networking | Select Frame-Managed Networking |
| Network Type | Select Public Network. |
| Customize VPC Settings | Select to specify a VPC/VNET CIDR. If left unchecked, a randomized CIDR (e.g., 10.-255.0.0/18) will be used. To connect this VPC/VNET to another network (peer, VPN, etc.), use a non-overlapping CIDR (e.g., 10.0.0.0/20, 192.168.0.0/24). You can change the CIDR later in Dashboard > Settings > Networking, provided no network resources are attached.  |
Customers who wish to create a Frame account on the public cloud infrastructure for users accessing the virtualized applications/desktops through a private network can choose this option. This procedure will provision a Frame account with the network requirements and architecture as defined in Public Cloud with Private Networking. All workload VMs will only have private IP addresses.
Networking and routing must be configured to reach the workload VMs, otherwise the customer will not be able to access the Sandbox, Utility Servers, or production VMs.
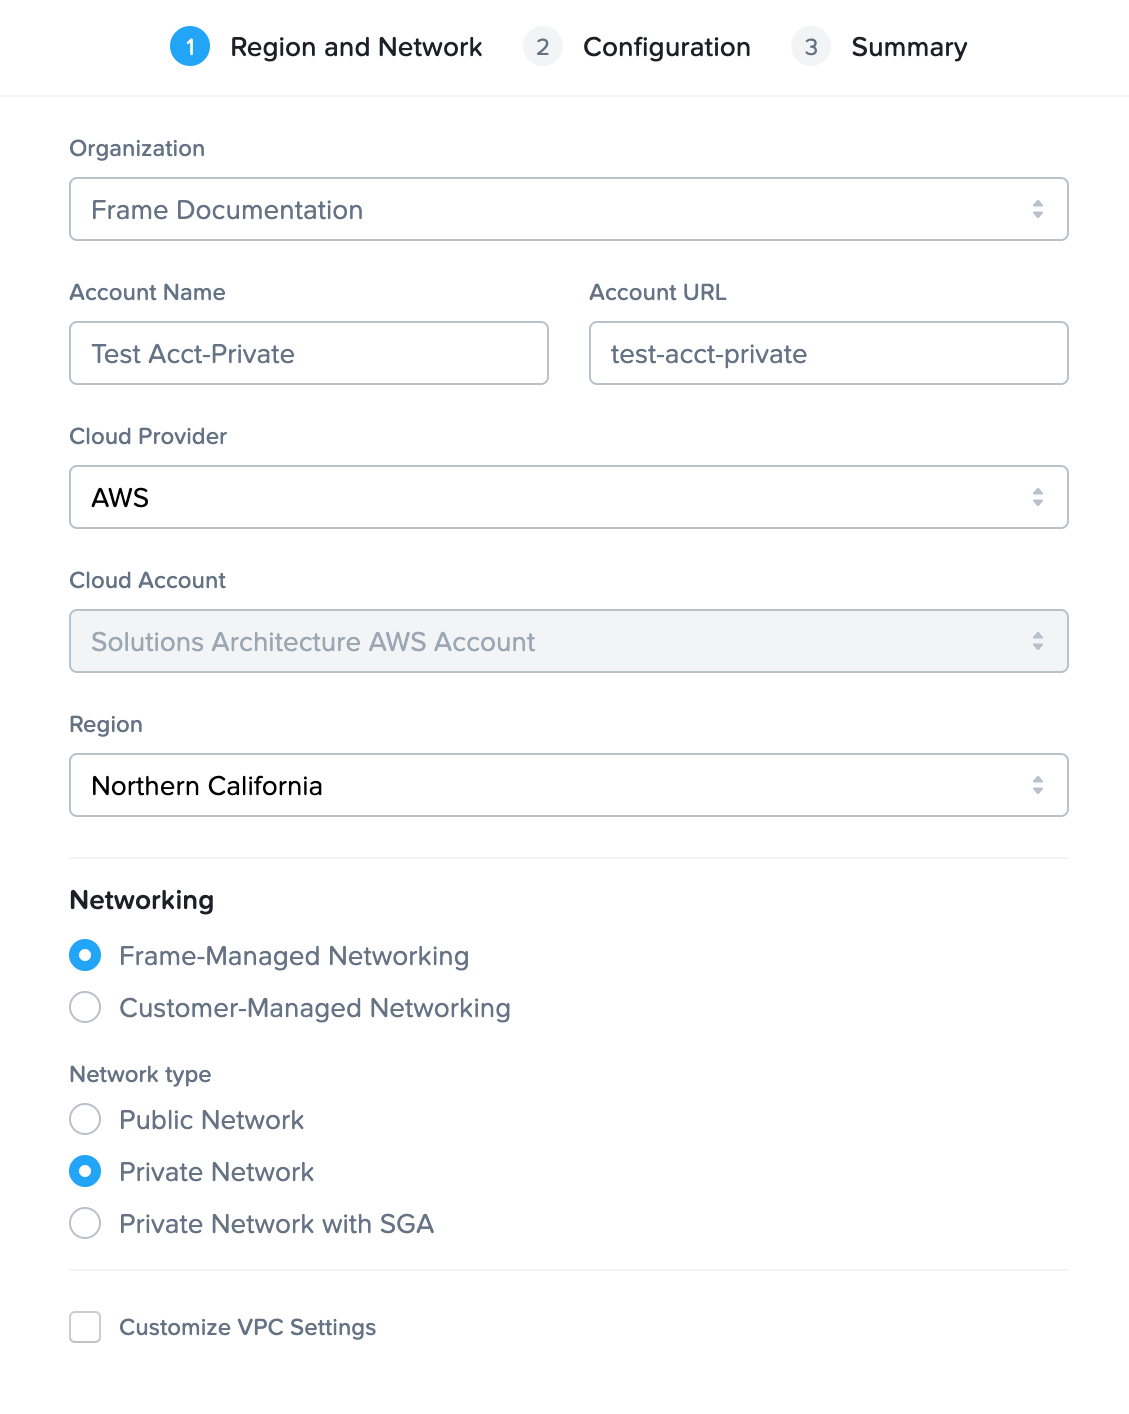
| Field/Button | Description |
|---|---|
| Organization | If account created at the customer level, this field is visible. Select or search for the top-level organization the account will reside under. |
| Account Name | Frame automatically generates an account name for you, but you can edit this field if desired. The account name will be displayed in the account Dashboard and Launchpad. |
| Account URL | This editable field designates the unique identifier for the account, when referencing the account in a URL. The format for the string referenced above would appear as: |
| Cloud Provider | Select the desired cloud or IaaS (Infrastructure-as-a-Service) provider for your account. |
| Cloud Account | Select the desired cloud account to use, if there is more than one cloud account for that cloud provider. |
| Region | Specify the desired datacenter you would like the account to be created in. |
| Networking | Select Frame-Managed Networking |
| Network Type | Select Private Network. |
| Customize VPC Settings | Select this checkbox to specify a specific VPC/VNET CIDR. If you plan to connect this VPC/VNET to another network through a peer, VPN, or other private connection, you need to specify a non-overlapping CIDR (e.g.,  |
Customers who wish to create a Frame account on the public cloud infrastructure for users accessing the virtualized applications/desktops through a single public IP address can choose this option. This procedure will provision a Frame account with the network requirements and architecture as defined in Public Cloud with Private Networking and SGA. All workload VMs will only have private IP addresses.
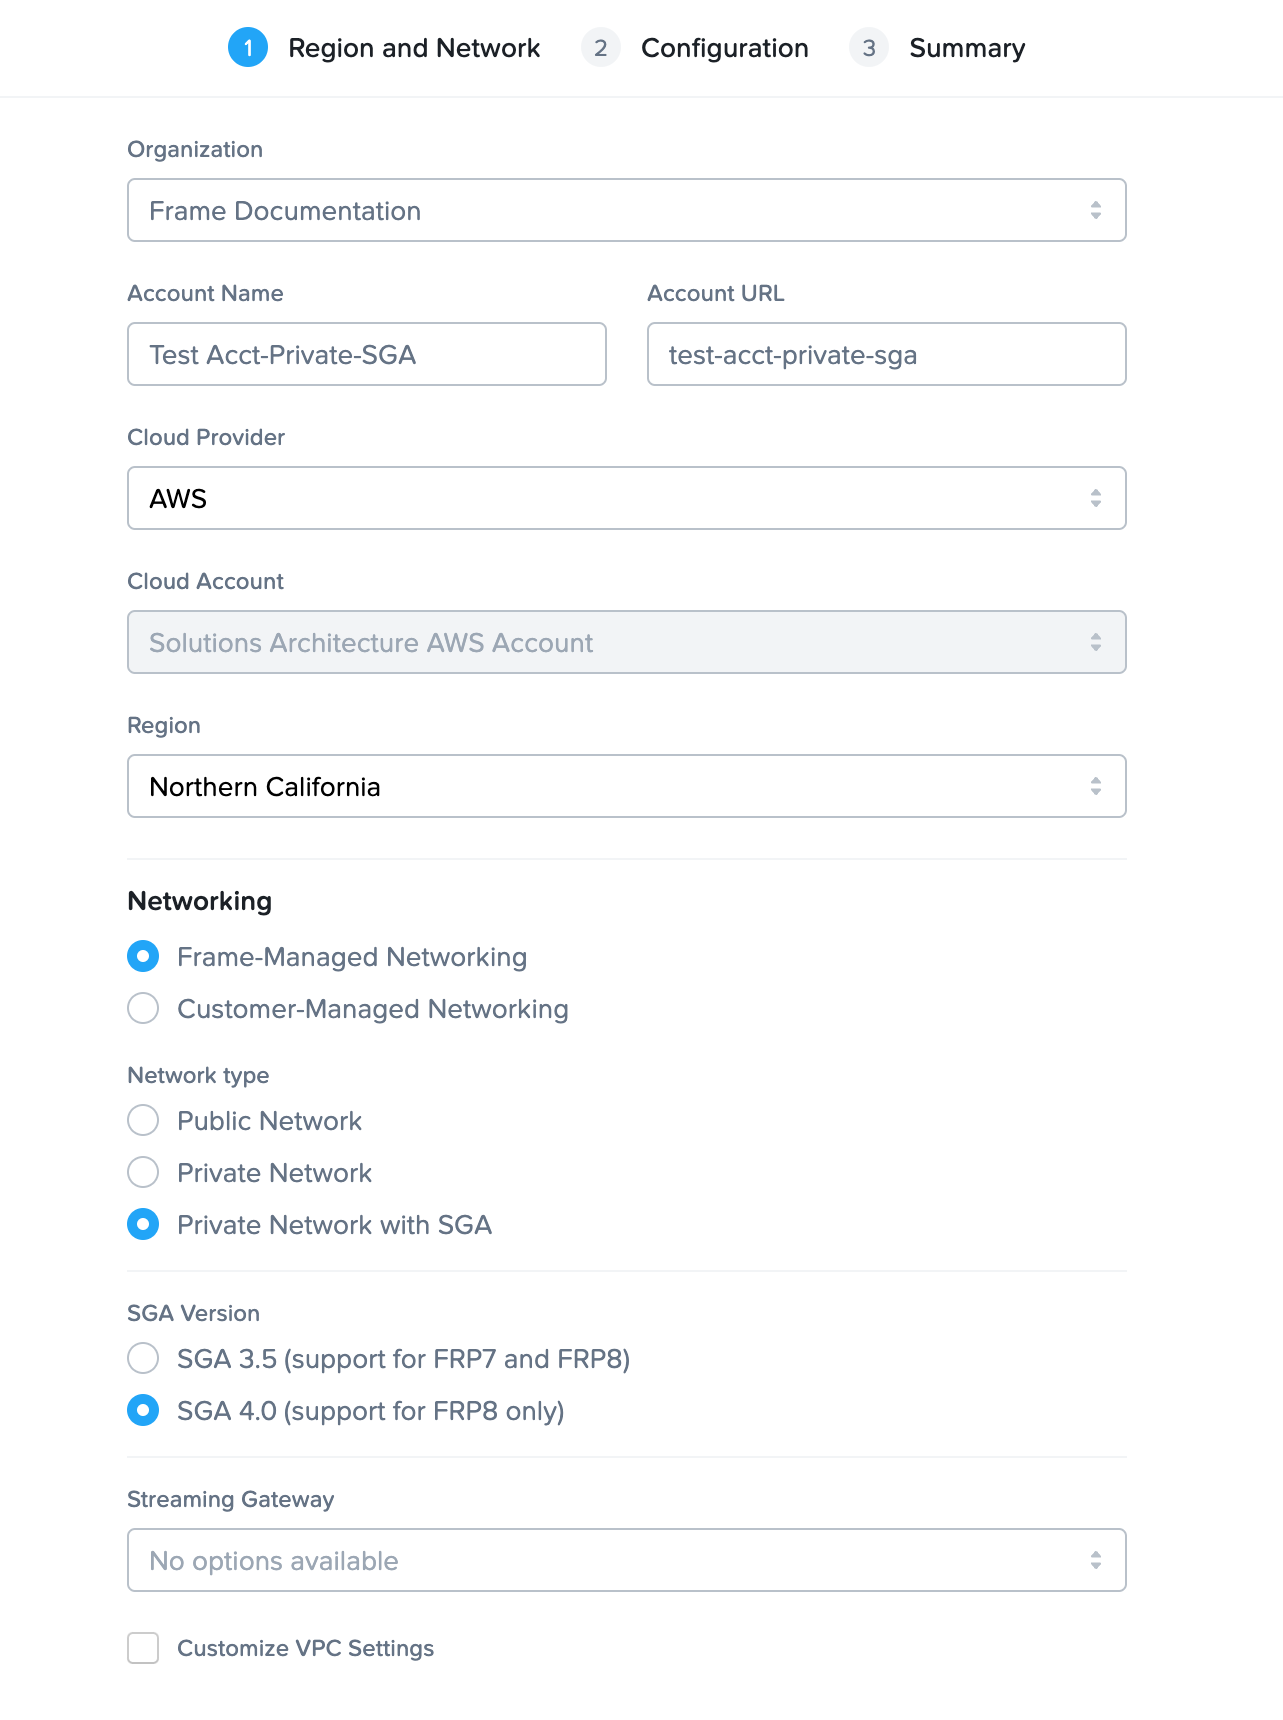
| Field/Button | Description |
|---|---|
| Organization | If account created at the customer level, this field is visible. Select or search for the the top-level organization the account will reside under. |
| Account Name | Frame automatically generates an account name for you, but you can edit this field if desired. The account name will be displayed in the account Dashboard and Launchpad. |
| Account URL | This editable field designates the unique identifier for the account, when referencing the account in a URL. The format for the string referenced above would appear as: |
| Cloud Provider | Select the desired cloud or IaaS (Infrastructure-as-a-Service) provider for your account. |
| Cloud Account | Select the desired cloud account to use, if there is more than one cloud account for that cloud provider. |
| Region | Specify the desired datacenter you would like the account to be created in. |
| Networking | Select Frame-Managed Networking |
| Network type | Select Private Network with SGA |
| SGA Version | Select SGA 3.5 to automatically deploy one or more SGA 3.5 VMs or SGA 4 to attach this Frame account to an existing SGA 4 cluster. |
| Number of SGA instances | If SGA 3.5 is selected and 2 or more SGA instances are requested, Frame will automatically provision a load balancer in front of the SGA VMs. These SGA VMs will run 24x7x365. |
| Customize VPC Settings | Select this checkbox to specify specific CIDRs for the workload VPC and the SGA VPC (SGA 3.5 only). If you do not enable this feature and specify a CIDR, Frame will set the workload CIDR to a randomized IP address range of 10.-255.0.0/18 and the SGA CIDR is |
| VPC CIDR | Specify the workload VPC/VNET CIDR in CIDR notation. CIDR must be a minimum of |
| SGA CIDR | If SGA 3.5 is selected, specify the SGA VPC/VNET CIDR in CIDR notation. CIDR must be a minimum of |
Frame Platform will provision SGA VM(s) on the following instance/machine types. These VMs will run 24x7 since users need to be able to access the workload VMs at any time.
- AWS: c5.xlarge
- Azure: D4 v3
- GCP: e2-standard-2 (SGA 3), e2-standard-4 (SGA 4)
- IBM: cx3d-4x10 (SGA 4 only)
Customers who wish to create a Frame account on the public cloud infrastructure in an existing network (VPC or VNET) can choose this option. The existing VPC or VNET must comply with the network requirements and architecture as defined in Public Cloud with Private Networking. By default, all workload VMs will only have private IP addresses.
Until the customer configures networking, security groups, and routing to reach these workload VMs, the customer will not be able to access the Sandbox, Utility Servers, or production VMs.
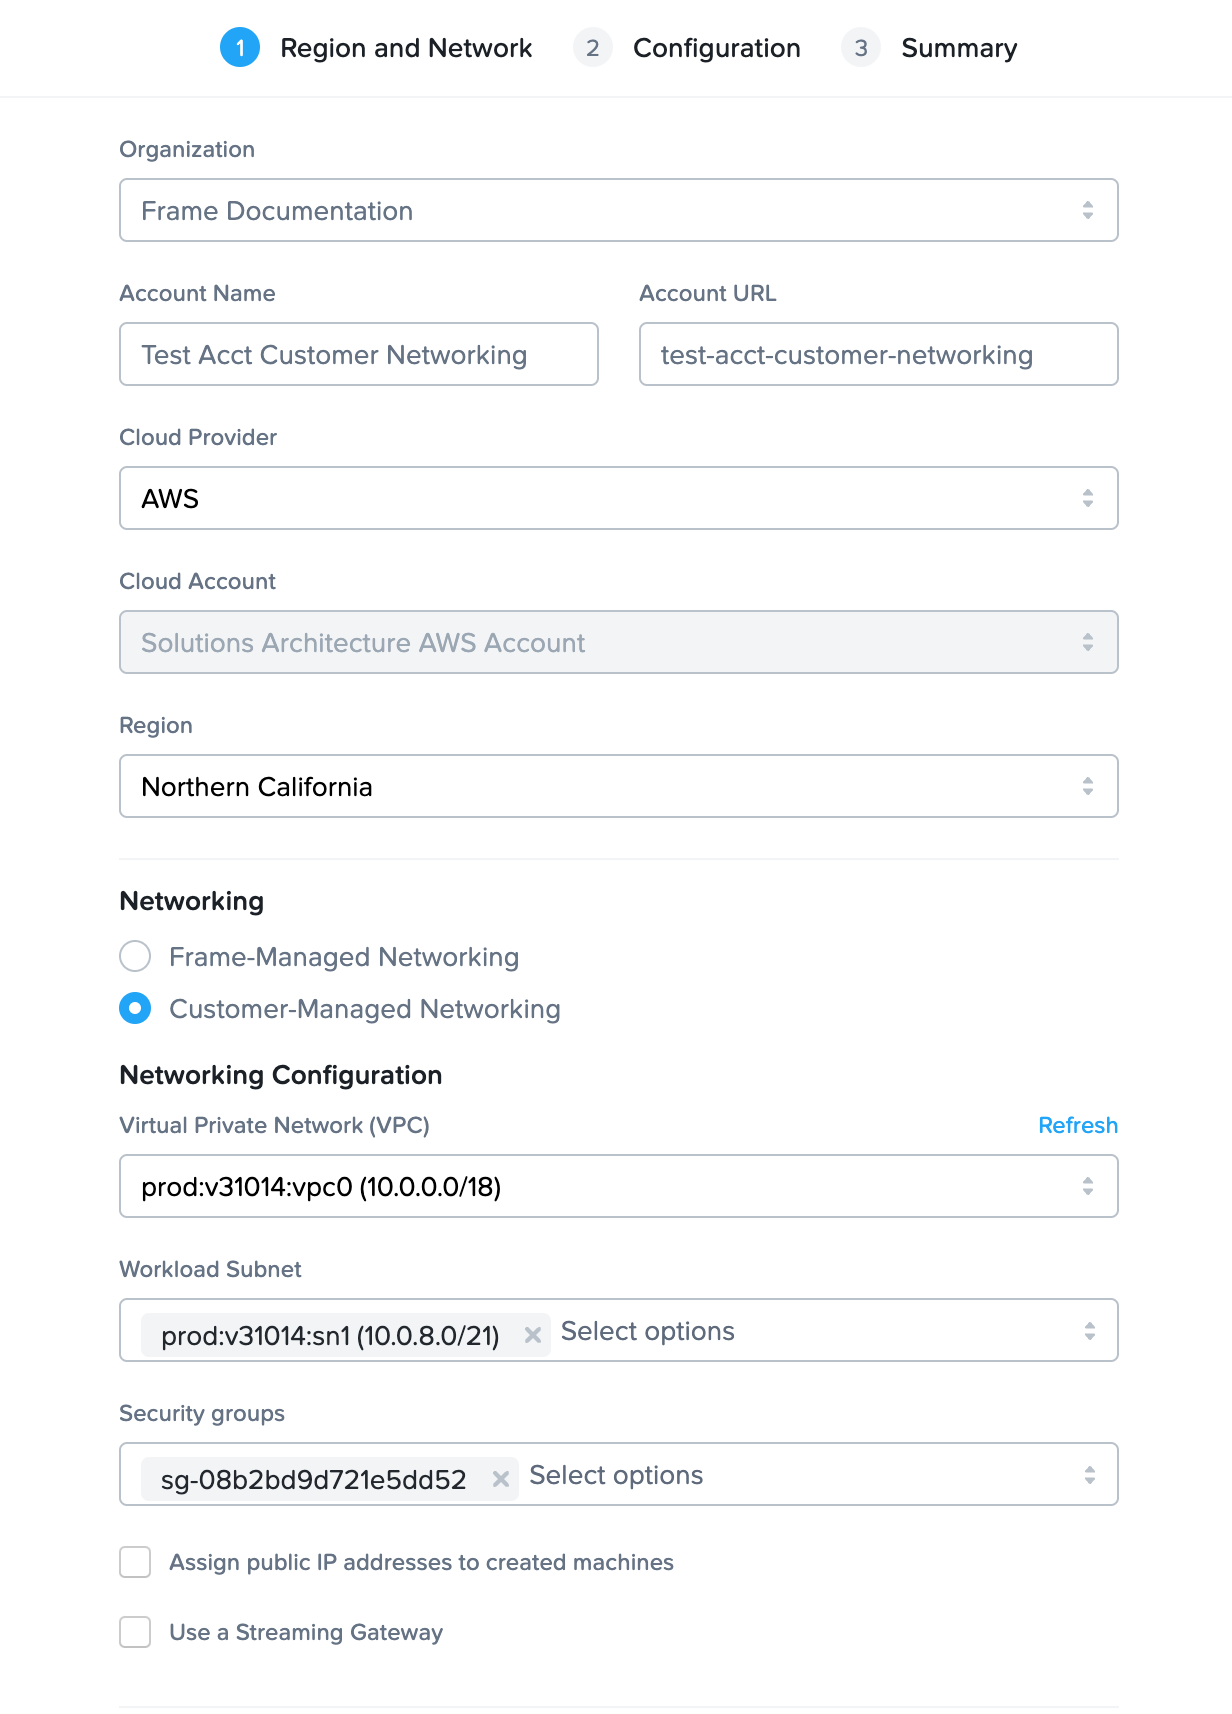
| Field/Button | Description |
|---|---|
| Organization | If account created at the customer level, this field is visible. Select or search for the top-level organization the account will reside under. |
| Account Name | Frame automatically generates an account name for you, but you can edit this field if desired. The account name will be displayed in the account Dashboard and Launchpad. |
| Account URL | This editable field designates the unique identifier for the account, when referencing the account in a URL. The format for the string referenced above would appear as: |
| Cloud Provider | Select the desired cloud or IaaS (Infrastructure-as-a-Service) provider for your account. |
| Cloud Account | Select the desired cloud account to use, if there is more than one cloud account for that cloud provider. |
| Region | Specify the desired datacenter you would like the account to be created in. |
| Networking | Select Customer-Managed Networking. |
| Virtual Private Network (VPC) | Specify the desired VPC/VNET from the list of the existing VPCs/VNETs in the specified region for the registered public cloud account. |
| Workload Subnet | Pick the subnet(s) from the list of subnets in the specified VPC or VNET. |
| Security groups (AWS only) | Pick the security group(s) from the list of security groups for the specified AWS VPC. |
| Assign public IP addresses to created machines | If you select this option, all newly-provisioned machines in the VNET/VPC will have public IP addresses, in addition to private IP addresses. |
| Use Streaming Gateway | Select this option and specify the existing SGA 4 cluster that will be attached to this Frame account. |
While an Azure security group is not required in the above Frame account creation workflow, an Azure security group must be provisioned on the VNET/subnet before Frame account creation. Specific inbound/outbound rules will be dependent on how the Frame traffic is routed, as defined in Public Cloud with Private Networking.
Customers who wish to create a Frame account on the AHV infrastructure must choose this option. The AHV cluster and VLAN configuration comply with the network requirements and architecture as defined in Frame on AHV. All workload VMs will only have private IP addresses.
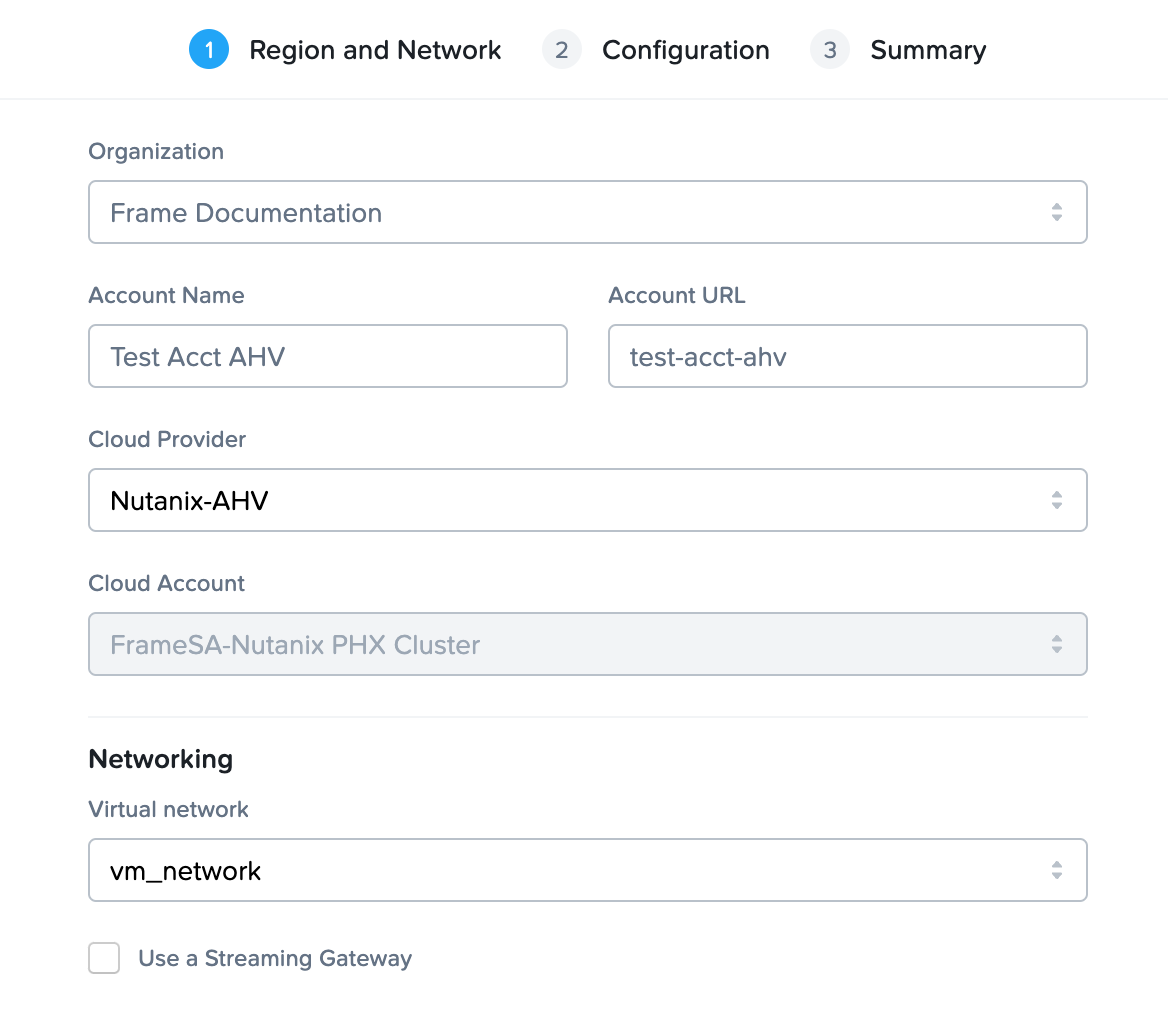
| Field/Button | Description |
|---|---|
| Organization | If account created at the customer level, this field is visible. Select or search for the top-level organization the account will reside under. |
| Account Name | Frame automatically generates an account name for you, but you can edit this field if desired. The account name will be displayed in the account Dashboard and Launchpad. |
| Account URL | This editable field designates the unique identifier for the account, when referencing the account in a URL. The format for the string referenced above would appear as: |
| Cloud Provider | Select the desired AHV-based Nutanix Cloud Provider for your account. |
| Cloud Account | Select the desired cloud account to use, if there is more than one cloud account for that cloud provider. |
| Region | Specify the desired datacenter or cluster you would like the account to be created in. |
| Virtual Network | Specify the desired VLAN from the list of the existing VLANs in the registered AHV Cloud Account. With Frame accounts on AHV, the CIDR block is defined in Prism Central/Prism Element and not within Frame. |
- After selecting the Next button, you will be asked to specify the Frame account configuration.
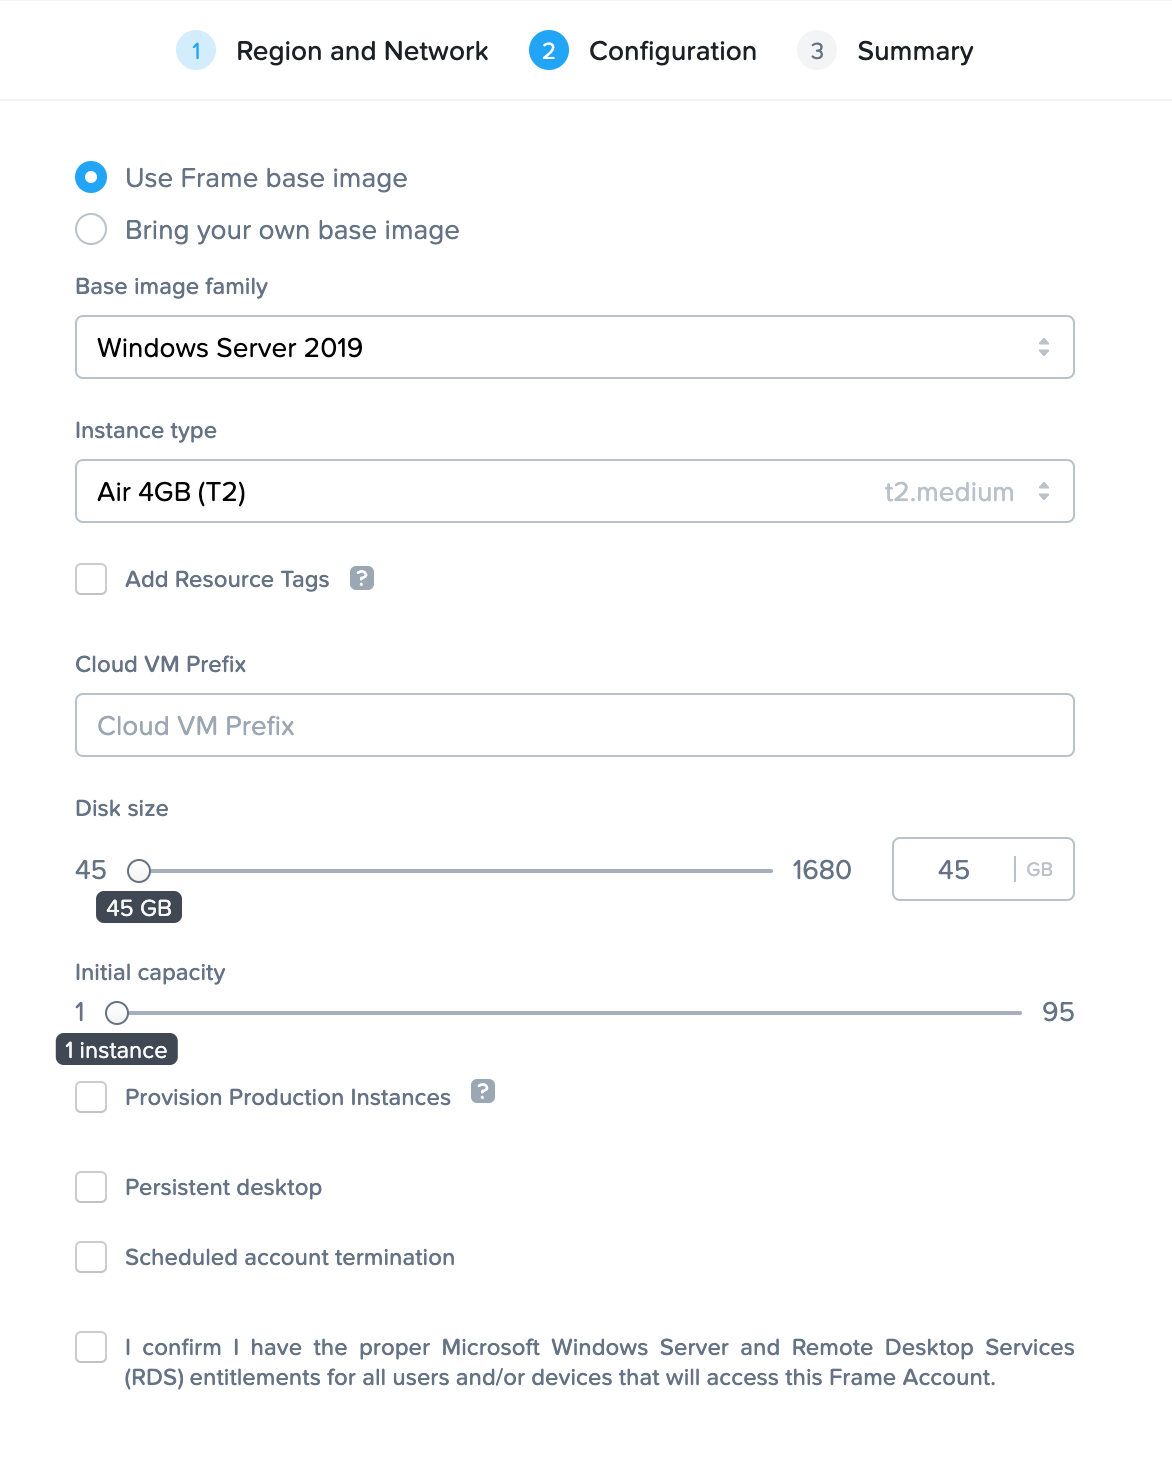
| Field/Button | Description |
|---|---|
| Frame/BYO base image | If you have already configured your organization or customer entity with a BYO base image, you can select the “Bring your own base image” radio button and use your custom base image here. Otherwise, select Use Frame base image (public cloud only). |
| Base image family | Select the base server type/version for the account. The options for image family vary depending on the cloud provider. If Windows 10 or Windows 11 is selected on AWS infrastructure, Frame will create AWS Dedicated Instances. * |
| Instance type | Select the system type of the Sandbox upon account creation. The system type can be modified at a later time from the Dashboard of the account. |
| Add Resource Tags | This toggle will enable you to specify one or more resource tags that will be added to cloud provider resources provisioned by Frame (public cloud only). |
| Cloud VM Prefix | If desired, specify the prefix that will be prepended to the name of each virtual machine provisioned by Frame. |
| Disk size | Use the slider or the editable field next to it to specify the initial Sandbox disk capacity upon account creation. We recommend you start with the smallest disk size since you can always increase the Sandbox disk size in the Dashboard. |
| Initial capacity | Use the slider to specify the number of workload VMs you would like provisioned upon account creation. You can adjust capacity settings any time after account creation. |
| Provision Production Instances | Enable this toggle if you wish to provision production instances using the base image immediately at Frame Account creation. |
| Persistent Desktop | This toggle will enable “Persistent Desktops” for your account. If you wish to deliver non-persistent desktops or individual applications to your users, do not select the Persistent Desktop option. |
| Scheduled Account Termination | Select this option if you wish to have Frame terminate the Frame account on a specific date and time. |
* The AWS infrastructure must either be customer-managed (BYO) or Dizzion-provided (Complete customers only). Legacy Frame customers using Frame IaaS are not eligible.
- Review the configuration you have specified in the first two steps of the account creation wizard and click Create in the bottom right corner of the window. Once the operation is complete, the new account will populate in the accounts list.
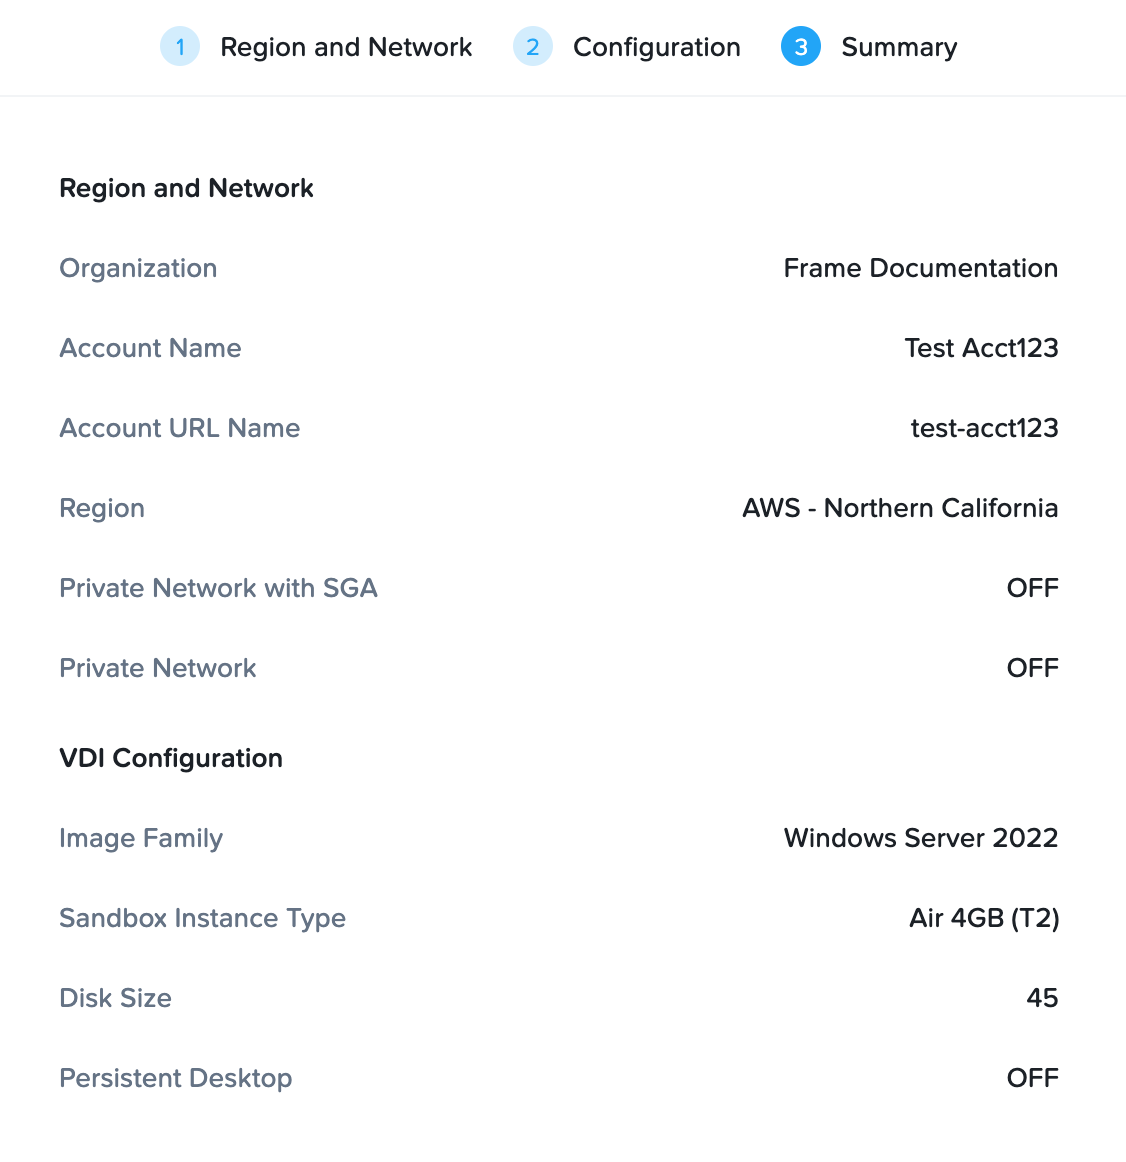
Troubleshooting
"My Sandbox is taking a long time to provision on my new account..."
-
The typical time required to create a new instance (for the Sandbox on a new account) is 10-15 minutes for public cloud. This time is necessary as the Sandbox image is being created from the Frame-provided base image. After creation, updates are applied incrementally and there may be a reboot required for an update – this can extend the provisioning time for the Sandbox to over 15 minutes.
-
In some cases, if there is a problem with provisioning the first Sandbox, the system may go into a recovery process that will terminate the original instance and start over with a new Sandbox which could result in a provisioning time closer to 30 minutes.
-
If the above process takes between 30 minutes to an hour, there could be a problem with a lack of capacity in your AHV cluster or service limits with your IaaS cloud subscription. For example, provisioning can't proceed when a virtual machine limit is reached with the request by Frame Platform for a new instance. In this case, you should check your IaaS service/quota limits.
"My Sandbox failed to provision during account creation..."
-
When publishing to provision instances with storage volumes (especially GPU-backed instances), there is a possibility that the instance and/or storage limit can be reached in the given region (e.g. the default limits for GPU instances on new IaaS accounts are typically very low per region).
-
If instance storage limits in a given region are hit, provisioning of the Sandbox for the new account will fail.
-
If the Sandbox VM cannot be provisioned during the Account creation process due to lack of availability of that instance type, the administrator will be prompted to retry creating the Sandbox or change the instance type.
"My account creation failed..."
-
For each account, a new VPC/VNET is required when creating an account using Frame networking. IaaS providers limit the number of VPCs or VNETs that can be created.
-
If an issue is encountered when creating VPCs or VNETs due to the limit being hit, the account creation will fail.
"I can't access my Sandbox after account creation..."
If a Frame account using Frame Networking (Private Networking) or Customer-Managed Networking is created, the Sandbox may not be created successfully or accessible from the Internet. The Administrator must verify that the network configuration requirements are satisfied.
"How do I request a capacity limit increase from my IaaS provider?"
In general, when provisioning accounts, the IaaS cloud account must have sufficient capacity/limits to support the instance, storage, VPC/VNET and networking demands. If limits are reached, the owner of the IaaS account must request limit increases by submitting a support ticket with their IaaS provider.
"I need help, how do I contact support?"
If you need additional help, contact our Frame support team using the guide on our support page.